
DIY Painted Flower Pots: Transform Your Outdoor Space on a Budget
Hello, garden enthusiasts and DIY lovers! Spring is in the air, and for many of us, February marks the perfect time to begin sprucing up our outdoor living areas. The promise of warmer days inspires us to refresh our yards, and one of the most satisfying ways to do this is by adding a splash of color and style to your garden with beautifully arranged flowers. This past weekend, we embarked on a simple yet highly impactful project that breathed new life into our garden: giving our plain planters a much-needed makeover with a little spray paint.
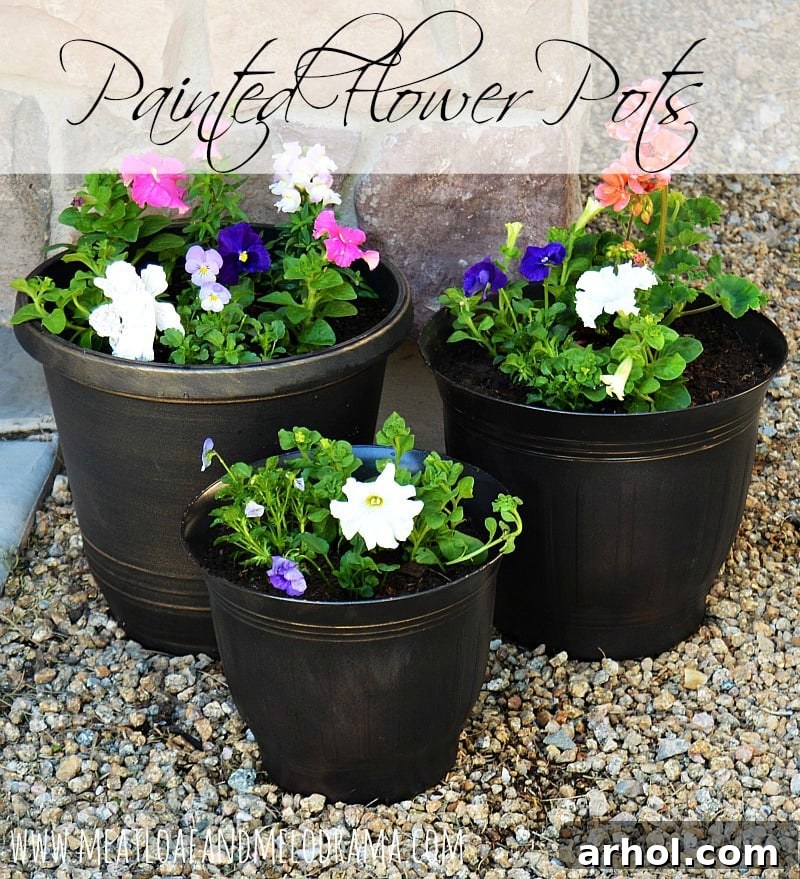
The result? Our painted flower pots now look incredibly stylish and perfectly coordinated, creating a cohesive and inviting display that truly elevates our outdoor aesthetic. It’s amazing what a difference a can of paint can make!
The Inspiration: A Quest for Cohesion in Outdoor Decor
Our journey to these beautifully refreshed planters began with a simple purchase. Last week, we picked up a lovely, dark oil rubbed bronze flower pot. It was elegant and exactly what I envisioned for a sophisticated touch in our yard. However, when my husband placed it amongst our existing collection, it immediately stood out – not in a good way. It didn’t quite match the older planter already occupying the space. While he, being the pragmatic type, didn’t see an issue, I confess to having a strong desire for things to be harmonious and aesthetically pleasing. The mismatched look just wasn’t sitting right with me; I simply wasn’t “feeling the love” for the arrangement.
The obvious solution, one might think, would be to simply buy another matching high-end planter. But herein lies the challenge: stylish, high-quality planters aren’t exactly budget-friendly. They can be quite an investment, especially when you need more than one. I knew there had to be a more economical yet equally beautiful solution. That’s when inspiration struck: why not buy some inexpensive, plain planters and spray paint them to perfectly match our new, fancier one?
My husband’s initial reaction was a classic “you’ve grown two heads” look. He’s seen me work wonders with spray paint on indoor items countless times, transforming old furniture and decor into chic pieces. Yet, the idea of painting outdoor items, exposed to the elements, seemed to surprise him. After a bit of convincing, and perhaps a nod to my persistent vision, he finally agreed. Sometimes, you just have to trust the creative process!
So, with a plan in mind, we made another trip to the store. Our mission was clear: find plain, affordable planters that could serve as a blank canvas for our DIY project. We returned home with two simple, terra cotta-colored plastic planters, ready for their transformation.
Gathering Your Materials: What You’ll Need for This DIY
Before diving into any painting project, especially one that aims to replicate a specific finish, preparation is key. Here’s a quick list of what we used to achieve our desired look:
- Plain Planters: Terra cotta, plastic, or ceramic pots work well. Choose ones that are clean and structurally sound.
- Rust-Oleum Oil Rubbed Bronze Spray Paint: This particular shade perfectly mimicked the finish of our existing planter. When choosing your paint, ensure it’s suitable for outdoor use and adheres well to your chosen planter material.
- Gold Paint Pen: For adding delicate, metallic details that truly elevate the finished look.
- Protective Drop Cloth or Newspaper: Essential for protecting your work surface from overspray.
- Gloves and Mask: To protect your hands and ensure proper ventilation while painting.
- Cleaner and Cloth: For thoroughly cleaning the planters before painting.
- Optional: Primer: If your planters are particularly slick or you want to ensure maximum paint adhesion, a universal primer can be beneficial.
Step-by-Step Guide: How to Spray Paint Your Flower Pots
1. Preparation is Key
The first step in any successful painting project is proper preparation. We began by thoroughly cleaning our terra cotta-colored planters. This involved wiping them down to remove any dust, dirt, or debris. If your pots have been used before, a good scrub with soap and water, followed by complete drying, is crucial to ensure the paint adheres smoothly and evenly. We then moved our workspace to a well-ventilated outdoor area, laying down a protective drop cloth to prevent overspray from reaching unintended surfaces.
2. Applying the Base Coat
With our planters clean and our workspace ready, it was time for the main event: applying the Rust-Oleum oil rubbed bronze spray paint. My husband, ever the helpful partner, assisted with this step, as applying multiple coats of metallic spray paint can be tiring for one hand! We followed the instructions on the can, ensuring we held the nozzle at the recommended distance and applied the paint in light, even coats. This particular metallic paint is quite thick, which can sometimes lead to the nozzle getting clogged. We kept an old cloth handy to quickly wipe off any buildup, ensuring a consistent spray pattern.
Patience is a virtue here. Rather than trying to achieve full coverage in one thick coat, which can lead to drips and an uneven finish, we applied several thin layers, allowing each coat to dry to the touch before applying the next. This layering technique is critical for a smooth, professional-looking finish and ensures the paint bonds properly to the planter surface. The transformation was already becoming evident, with the plain terra cotta disappearing under the rich, metallic sheen.
3. Adding Elegant Details with Gold
Once the base coat of oil rubbed bronze was completely dry, it was time to add the finishing touch that would truly make these painted flower pots mimic our original, expensive planter. The store-bought pot had subtle gold detailing around its edges, and I wanted to replicate that elegant touch. Using a fine-tipped gold paint pen, I carefully outlined some of the raised lines and decorative elements on the newly painted planters. This step required a steady hand and a keen eye, but the effort was well worth it. The gold accents caught the light beautifully, adding a layer of sophistication and depth to the dark bronze finish.
The Big Reveal: A Cohesive Outdoor Oasis
Seeing all three planters together after the paint had fully cured was incredibly satisfying. I honestly couldn’t believe how seamlessly the newly painted pots blended with the original one. They truly looked as if they were all purchased as a matching set, straight from a high-end garden store! The once-mismatched arrangement was transformed into a cohesive, elegant display, making the entire garden area look significantly more polished and inviting. This budget-friendly makeover proved to be far more cost-effective than buying three expensive matching pots, delivering maximum impact for minimal expense.
A small thought did cross my mind later: perhaps I should have added some gold detailing to the very bottoms of the pots as well. But sometimes, it’s best to know when to stop and simply appreciate the work done. For now, I’m perfectly happy with the outcome and will let that minor thought go. The overall effect is stunning, and that’s what truly matters.
Bringing Life to Your New Planters: Planting Your Favorites
With our beautifully painted flower pots ready, it was time for the most enjoyable part: filling them with vibrant spring blooms! We carefully selected a variety of flowers that would complement the dark bronze and gold hues and add a burst of color to our yard. Our choices included delicate petunias, cheerful violas, classic pansies, fragrant stock, and my personal favorite, geraniums. The geraniums, with their stunning coral color, truly pop against the dark backdrop, adding a touch of warmth and vibrancy.
Beyond their beauty, these flowers brought some fun into our home too! The kids absolutely love the stock flowers, primarily because my husband taught them a playful trick: how to gently squeeze the blooms to make them “open and talk.” Yes, we’re a bit quirky like that, but these small moments of joy and interaction with nature are what make gardening truly special for our family.
In addition to our outdoor display, we also brought some greenery indoors. We purchased cilantro and some lovely succulents, hoping to cultivate a small indoor herb and plant collection. Confession time: I find it much easier to manage lively children than quiet plants! They don’t demand my attention in the same way, which sometimes makes keeping them thriving a unique challenge. But I’m determined to keep these green companions alive and well!
Why DIY Planter Painting is a Game-Changer for Your Garden
This simple project highlights several compelling reasons why you should consider DIY painted flower pots for your own outdoor space:
Cost-Effectiveness
As demonstrated, painting plain or existing planters is significantly cheaper than purchasing new, high-end designer pots. You can achieve a luxurious look without the hefty price tag, freeing up your budget for more plants or other garden essentials.
Customization and Style
DIY allows you to perfectly match your planters to existing outdoor furniture, specific color schemes, or unique design aesthetics. The possibilities are endless, from elegant metallic finishes like our oil rubbed bronze to vibrant solid colors or even intricate stenciled patterns. You become the designer of your outdoor sanctuary.
Sustainability and Repurposing
Instead of discarding old, faded, or mismatched planters, spray painting gives them a second life. This approach reduces waste and promotes a more sustainable way of decorating your home and garden.
Personal Satisfaction
There’s immense joy and pride that comes from a successful DIY project. Seeing your vision come to life through your own effort is incredibly rewarding, and it adds a personal touch to your home that store-bought items simply cannot replicate.
Tips for Success and Troubleshooting Your Spray Paint Project
To ensure your painted flower pot project goes smoothly and yields beautiful results, keep these tips in mind:
- Choose the Right Paint: Always opt for spray paints specifically designed for outdoor use and suitable for the material of your planter (plastic, terra cotta, ceramic, metal). These paints often contain UV inhibitors and are more durable against weather.
- Work in a Well-Ventilated Area: Spray paint fumes can be strong. Always work outdoors or in a very well-ventilated garage, and consider wearing a mask for protection.
- Patience with Drying Times: Rushing the drying process can lead to tacky finishes or smudges. Allow ample time between coats and before handling or planting. Humidity can affect drying times, so check the weather.
- Protect Your Surroundings: Use a large drop cloth or old newspapers to protect any surfaces from overspray. Even a slight breeze can carry paint particles surprisingly far.
- Dealing with Clogged Nozzles: If your nozzle clogs, try wiping it with a cloth soaked in mineral spirits or nail polish remover (check compatibility with paint type). You can also try carefully removing the nozzle and soaking it in the same solution, replacing it with a new one if available.
- Even Application: Maintain a consistent distance from the planter and use sweeping motions to apply paint. Avoid holding the can in one spot for too long, as this can cause drips.
Beyond Flower Pots: Other Outdoor DIY Projects
Once you discover the magic of spray paint, you’ll start seeing potential transformations everywhere! This technique isn’t limited to just flower pots. Consider refreshing old metal garden furniture, faded decorative birdbaths, or even outdated garden statues to create a truly harmonious and personalized outdoor retreat. The same principles of cleaning, prepping, and applying thin, even coats apply, opening up a world of budget-friendly outdoor decorating possibilities.
We hope our little planter makeover inspires you to pick up a can of spray paint and transform your own garden space. It’s a simple project with incredibly rewarding results, perfect for welcoming the spring season. Thanks for stopping by to see our transformation! Have a wonderful and creative day! 🙂
You May Also Like