
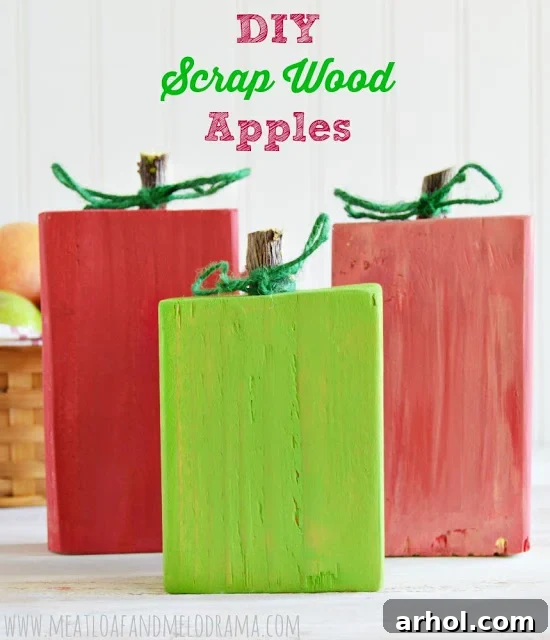
Welcome the crisp air and cozy vibes of autumn with a charming craft that’s both simple to make and wonderfully rustic: DIY Scrap Wood Apples. These delightful little decorations are perfect for ushering in the early fall season, adding a touch of handmade warmth to any corner of your home. Forget complicated techniques or expensive supplies; all you need are a few basic items – scrap wood blocks, natural twigs, a splash of paint, and a bit of yarn or twine – and you’re well on your way to creating a beautiful, personalized harvest display.
As the days grow shorter and the leaves begin their magnificent transformation, there’s a natural inclination to refresh our living spaces with seasonal touches. While the hustle and bustle of daily life can sometimes leave little time for creative pursuits, the arrival of fall always sparks a renewed desire for home decor projects. It’s truly my favorite season, inspiring me to infuse our home with that distinct autumn charm. Last year, I thoroughly enjoyed crafting some rustic wood pumpkins and even whimsical Jack o’ lanterns. However, with autumn just beginning, pumpkins feel a touch premature. That’s why I decided to pivot to an equally iconic symbol of the season: apples.
Working with wood brings a unique satisfaction, especially when transforming discarded pieces into something beautiful and functional. Scrap wood projects are not only eco-friendly, giving new life to forgotten materials, but they also result in decor with an authentic, handcrafted feel. These DIY wood apples perfectly capture that rustic farmhouse aesthetic, making them an ideal addition to your fall decorating repertoire. They offer a versatile way to celebrate the harvest season, looking equally stunning on a mantelpiece, as a centerpiece, or nestled in a decorative basket.
How to Make Charming DIY Scrap Wood Apples
Embarking on a new craft project is always exciting, and these scrap wood apples are incredibly forgiving and fun for all skill levels. The beauty of this project lies in its simplicity and the ability to customize each apple to your unique style. Follow these detailed steps to create your own adorable collection of lasting fall decor.
Supplies Needed
Gathering your materials is the first step towards bringing these rustic apples to life. Most of these items can be found around your home, in nature, or at your local craft and hardware stores. Opting for scrap materials not only saves money but also contributes to a more sustainable crafting practice.
- Wood blocks: Cut from a 2×4 or any suitable scrap lumber. The beauty of scrap wood is its imperfection, so varying sizes and shapes add character. Look for pieces about 3-5 inches tall and 3.5 inches wide (standard 2×4 width).
- Acrylic paint: A range of colors to mimic real apples. Think classic reds, vibrant greens, sunny yellows, and even deeper maroon shades. Matte or chalk paint can also give a beautiful, soft finish.
- Strong adhesive glue: Tacky Glue, wood glue, or super glue will work well to secure the stems. Ensure it dries clear and holds firmly to wood.
- Twigs: Small branches or twigs from your yard, pruned bushes, or even craft store floral sections. Choose pieces that resemble natural apple stems, roughly 2-3 inches long and about 1/4 inch thick.
- Colored twine or yarn: Green, brown, or natural jute twine works best to create leaf-like accents. You could also use thin ribbon or raffia for a different look.
- Sandpaper: Medium-grit (around 100-150) for shaping and smoothing, and fine-grit (200-220) for a smoother finish if desired.
- Optional: Paintbrushes (various sizes for detail work), a drop cloth or newspaper to protect your work surface, a saw (if you’re cutting your own wood), and a clear sealer or varnish for added durability.
Directions
Now that you have all your supplies ready, let’s dive into the fun part: crafting your scrap wood apples. Remember, this project is about embracing the rustic aesthetic, so don’t worry about achieving perfect symmetry or flawless finishes. The handmade touch is what gives these apples their charm!
Step 1: Preparing Your Wood Blocks and Stems
The foundation of your wood apples begins with well-prepared wood blocks. If you’re sourcing scrap wood, you might find pieces already close to the size you need. For this project, I initially had my husband trim a 2×4 piece into various lengths, ensuring a delightful assortment of apple sizes for our display. Two pieces were cut to a standard height, and one was deliberately made a little shorter to add visual interest and mimic the natural variety of apples. If you’re cutting your own wood, always prioritize safety: use appropriate protective gear and ensure your cutting tools are sharp and stable. A miter saw makes quick, clean cuts, but a hand saw will also do the trick. Don’t worry if the cuts aren’t perfectly straight; a slight imperfection adds to the rustic appeal.
While he was conveniently trimming some bushes, I also enlisted his help to cut the branches into small, manageable apple stems. Look for twigs that are sturdy but not too thick, with a natural character. Aim for pieces approximately 2 to 3 inches long. This step is a great way to utilize natural materials from your garden, further enhancing the organic feel of your decor. Sometimes, I’m truly amazed that he doesn’t run in the other direction when he sees me approaching with another creative request!
Once your wood blocks are cut, it’s time for sanding. Even if you want a rustic look, sanding off the rough edges is crucial for a smooth crafting experience and to prevent splinters. Use medium-grit sandpaper (around 100-150) to smooth any sharp edges or splinters. If you prefer a slightly smoother finish, follow up with a finer grit (200-220). This step prepares the wood surface for better paint adhesion and a more pleasant tactile experience.
Step 2: Attaching the Stems
With your wood blocks smoothed and your twigs ready, it’s time to secure the stems. Apply a small amount of strong adhesive glue – such as Tacky Glue, wood glue, or even hot glue for a quicker set – to one end of each twig. Press the glued end firmly into the top center of each wood block. Hold it in place for a few seconds to ensure good contact. If using wood glue or Tacky Glue, allow sufficient drying time, usually an hour or two, before proceeding to the next step. Hot glue offers instant adhesion, which can be convenient for impatient crafters.
Step 3: Painting Your Rustic Apples
Now for my absolute favorite part – bringing color to these bare wood blocks! This is where your apples truly come to life and where you can express your creativity. I chose a vibrant apple green for one of the blocks and a classic bright red for the other two. To add a touch of realism and dimension, I then layered some soft yellow highlights onto one of the red blocks, mimicking the subtle blush and varied tones often seen on real apples. My inspiration literally came from a basket full of fresh apples sitting on our kitchen counter, providing a perfect palette guide.
When painting, consider applying multiple thin coats rather than one thick coat. This prevents streaks and allows for better coverage and a smoother finish. For a truly authentic look, observe actual apples – notice the gradients of color, the small imperfections, and the way light reflects off their skin. You can use a dry brush technique to lightly add contrasting colors or blend shades seamlessly. For instance, after applying a base red, you could dry brush a darker red or even a hint of brown in certain areas for depth, or a lighter red/pink for a sun-kissed effect.
While distressing is a popular technique for rustic decor, I decided against it this time. The natural texture and slightly rough surface of the scrap wood already provided enough character and a wonderfully rustic appeal for my taste. However, if you prefer a more weathered or vintage look, you can gently sand the edges and raised surfaces of your painted apples once the paint is completely dry. This exposes bits of the raw wood underneath, creating a beautifully aged effect. Alternatively, you could apply a dark wax or a watered-down brown paint wash to enhance the aged appearance.
Step 4: Adding the “Leaves” with Twine
To complete the apple illusion and add a touch of charming detail, I tied some green twine around the base of each wood stem. This simple step instantly transforms the twig into a recognizable apple stem complete with a little “leaf” accent. You can experiment with different ways to wrap the twine. A simple wrap and knot create a minimalist leaf, or you can loop and tie it to resemble a small bow or a more defined leaf shape. Consider using natural jute twine for a very rustic feel, or a slightly brighter green yarn for a more whimsical touch. This small detail truly brings the whole project together, adding that final, delightful touch of nature.
Step 5: Finishing Touches and Display
And voilà! Your colorful, rustic wood apples are now complete. Take a step back and admire your handiwork. Each apple, with its unique character, contributes to a charming autumnal display. If you wish to protect your painted apples and ensure their longevity, you can apply a clear matte or satin sealer once all paint and glue are completely dry. This will safeguard them from dust and minor scuffs, making them even more durable.
One of the greatest advantages of these DIY scrap wood apples is their incredible durability. Unlike real apples, these charming wooden counterparts won’t rot or attract pests, meaning you can proudly display them throughout the entire autumn season – from early September right through Thanksgiving, without any worries! They are a fantastic, long-lasting investment in your fall decor.
If you don’t happen to have a stash of scrap wood in your garage, don’t fret! You can easily purchase a 2×4 at any hardware store and have it cut down to your desired sizes right there, often for free. Alternatively, check local construction sites (with permission, of course) or repurpose old furniture pieces for unique wood scraps. We are fortunate to have an abundance of wood from various home projects, making our garage the first stop for any new wood-crafting adventure.
These rustic wood apples are incredibly versatile in their display. Arrange them in a vintage wooden bowl or a woven basket for a classic farmhouse centerpiece. Line them up along a mantelpiece with some fall foliage and candles for a cozy vignette. They also look wonderful nestled on a tiered tray alongside mini pumpkins, gourds, and other seasonal accents. Their simple, wholesome appeal makes them perfect for any autumn-themed decor, from traditional to modern farmhouse.
Creating these DIY Scrap Wood Apples is more than just a craft; it’s an opportunity to infuse your home with personal touches and celebrate the beauty of the fall season in a sustainable and creative way. Have you started any fall decorating projects yet? I’d love to hear about your ideas and creations!
Thanks for stopping by and sharing in the joy of crafting!
You Might Also Like These Fall Wood Craft Ideas:
Sharing At These Wonderful Link Parties:
- Share your Style
- I Heart Naptime
- The Party Bunch
- Inspiration Monday
- Monday Funday
- Met Monday
- The Scoop
- Tip Me Tuesday
- Wow Us Wednesdays