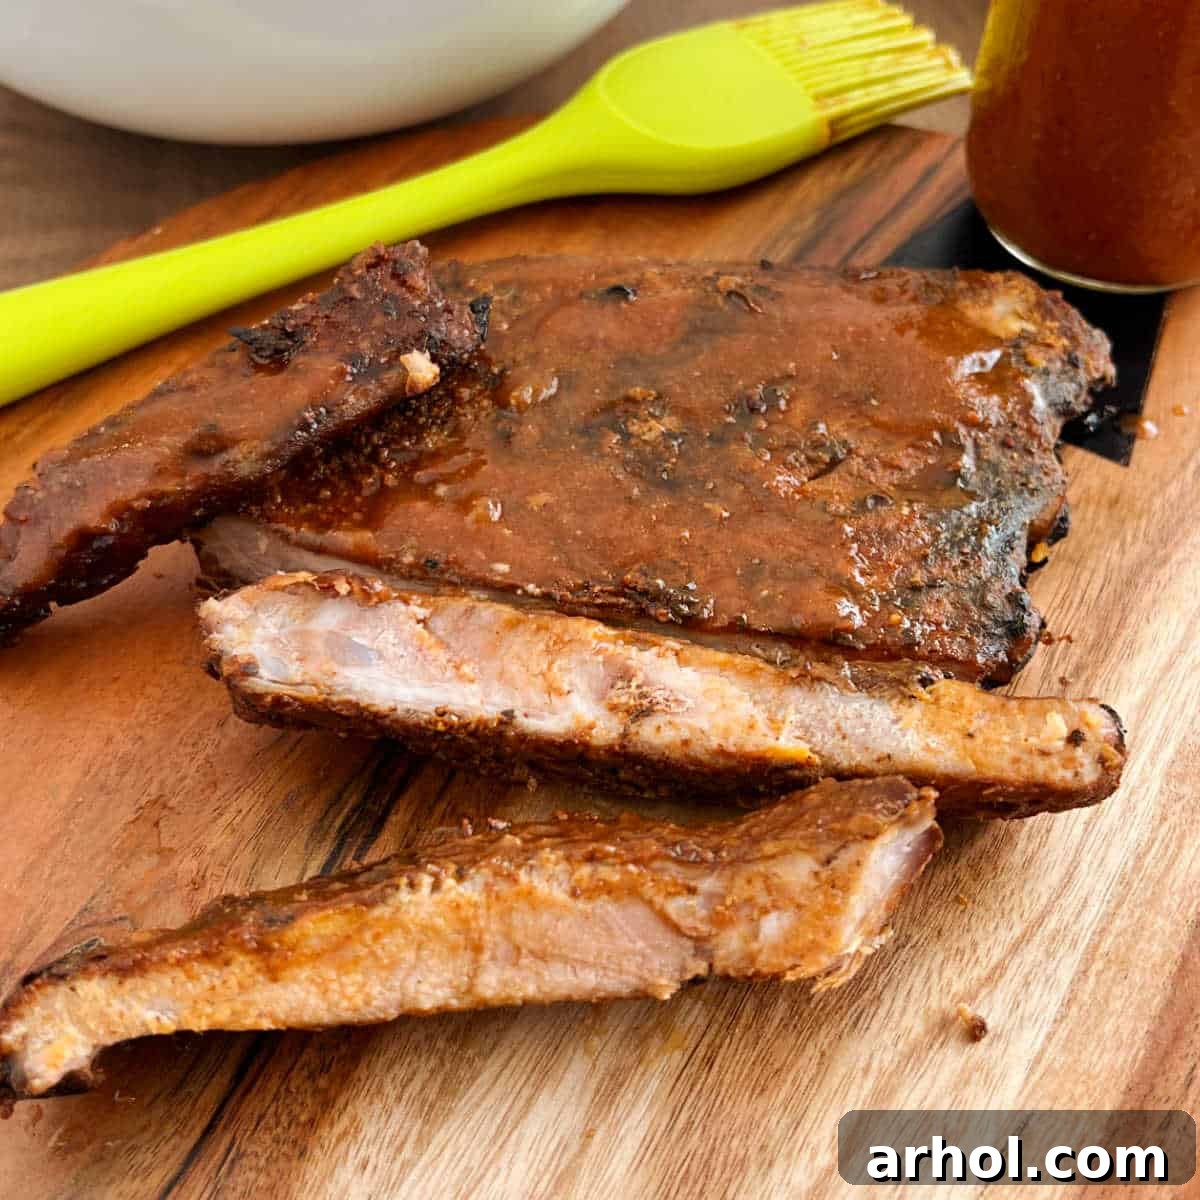
Unlock the secrets to perfectly smoked ribs with your electric smoker. This comprehensive guide will walk you through the renowned 3-2-1 method, ensuring you achieve incredibly tender, fall-off-the-bone ribs bursting with smoky flavor. Prepare to impress your family and friends with this foolproof recipe!

Table of Contents
- Mastering Electric Smoker Ribs
- The 3-2-1 Smoking Method Explained
- Essential Ingredients for Perfect Smoked Ribs
- Preparing Your Ribs for the Smoker
- Step-by-Step Smoking Process in an Electric Smoker
- Knowing When Your Smoked Ribs Are Done
- Delicious Side Dishes to Pair with Ribs
- Pro Tips for Smoking Ribs
- Storage and Reheating Leftover Ribs
- Electric Smoker Ribs Recipe
Mastering Electric Smoker Ribs: Effortless Flavor
There’s nothing quite like the irresistible aroma and succulent taste of perfectly smoked ribs. While many associate smoking with elaborate, expensive setups, electric smokers have revolutionized home barbecue, making it accessible and incredibly simple for everyone. Cooking ribs in an electric smoker, especially using the proven 3-2-1 method, yields consistently delicious results with minimal effort. It’s a fantastic option, particularly in warmer climates where standing over a hot grill for hours isn’t ideal, or for those who simply prefer a hands-off approach to smoking.
Before discovering the magic of our Masterbuilt electric smoker, our go-to methods for ribs often involved the Instant Pot or slow cooker, usually followed by a quick finish under the broiler or on a conventional grill. While these methods produce tasty ribs, they simply can’t compare to the deep, rich flavor infused by a smoker. An electric smoker, with its precise temperature control and consistent smoke generation, transforms ordinary ribs into extraordinary culinary masterpieces.
Beyond the incredible flavor, the ease of use is a major advantage. Electric smokers typically require less active management than charcoal or pellet smokers. You set the temperature, add your wood chips, and let the smoker do the heavy lifting. This allows you to spend less time tending to the fire and more time enjoying the company of your guests or simply relaxing while your ribs slow-cook to perfection. It’s truly a game-changer for anyone looking to elevate their outdoor cooking.
The 3-2-1 Smoking Method: A Blueprint for Perfection
The 3-2-1 method is a widely celebrated technique for smoking ribs, particularly spare ribs or St. Louis style cuts, designed to achieve that coveted balance of smoky flavor, tender meat, and a beautiful bark. It breaks down the smoking process into three distinct phases:
- 3 Hours of Smoke: Building the Bark and Flavor Base
The initial three hours are crucial for infusing the ribs with rich smoke flavor and developing a delectable crust, often referred to as “bark.” During this period, the ribs are exposed directly to the smoke and heat, allowing the dry rub to meld with the meat and create a flavorful exterior. The low and slow temperature (typically 225°F or 107°C) slowly breaks down connective tissues, beginning the tenderization process without drying out the meat. The steady flow of smoke penetrates deep into the muscle fibers, laying the foundation for an unforgettable taste. - 2 Hours Wrapped: Achieving Unrivaled Tenderness
Following the initial smoke, the ribs are tightly wrapped in aluminum foil. This creates a moist, steamy environment, often referred to as a “Texas Crutch.” The foil traps heat and moisture, allowing the ribs to braise in their own juices (and any added liquids like apple juice or cider, or even a pat of butter). This phase dramatically accelerates the tenderization, breaking down remaining tough connective tissues and rendering fat, leading to incredibly juicy, fall-off-the-bone results. It prevents the ribs from drying out and helps the meat become incredibly supple. - 1 Hour Unwrapped & Sauced: The Perfect Finish
In the final hour, the ribs are unwrapped, brushed generously with your favorite BBQ sauce, and returned to the smoker. This step allows the sauce to caramelize and “set” on the ribs, forming a sticky, flavorful glaze. The direct heat and smoke exposure during this period also re-establish a slight crust on the exterior, adding textural contrast while preventing the ribs from becoming too mushy from the wrapping phase. It’s the perfect grand finale, delivering that classic barbecue appeal.
This systematic approach ensures that each aspect of a great smoked rib — intense flavor, profound tenderness, and a delicious glazed finish — is perfectly addressed. It’s a method that consistently delivers fantastic results, making you feel like a barbecue pitmaster.
Essential Ingredients for Perfect Smoked Ribs
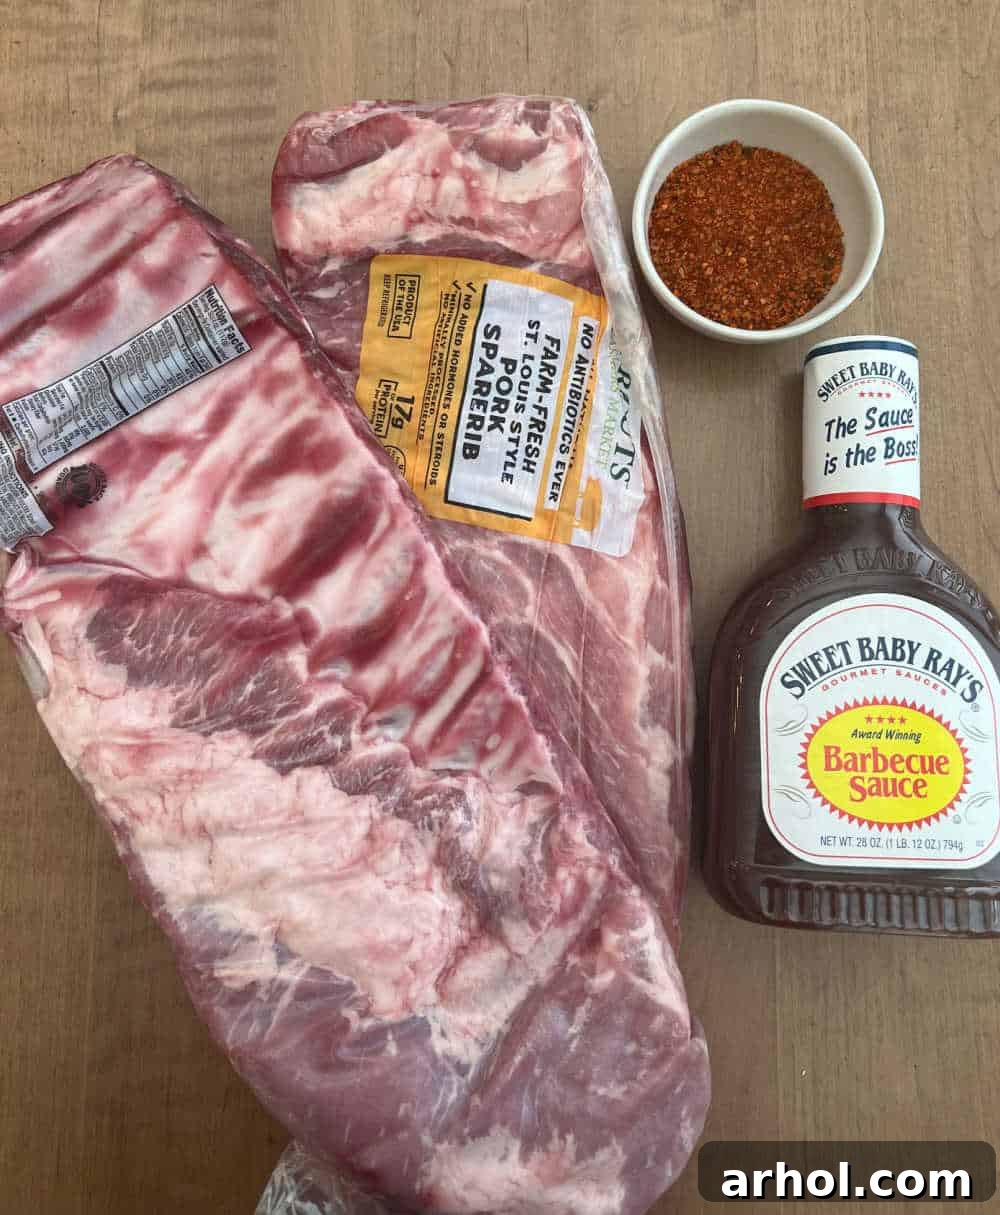
Crafting exceptional smoked ribs requires just a few key ingredients. The quality and choice of each component will significantly impact the final flavor profile. Full, detailed amounts are conveniently listed in the printable recipe card below.
- Ribs: The Foundation of Your Feast
For the 3-2-1 method, St. Louis style ribs or baby back ribs are highly recommended. St. Louis style ribs are spareribs that have been trimmed to a rectangular shape, removing the sternum bone and cartilage. They have a good meat-to-fat ratio, cook evenly, and are wonderfully flavorful. Baby back ribs, while smaller and leaner, are also excellent and tend to cook a bit faster due to their size. We typically prepare two racks, weighing approximately 4 pounds in total, which serves a crowd generously. While you can certainly use full spare ribs, be aware that they are larger and might require additional cooking time to achieve the desired tenderness. - Dry Rub: The Heart of the Flavor
A good dry rub is indispensable for smoked ribs, building a complex layer of flavor that penetrates the meat during the long smoking process. While many fantastic store-bought rubs are available, we often create our own signature blend. Our preferred dry rub incorporates a harmonious mix of sweet, savory, and aromatic elements: rich brown sugar for caramelization, fine sea salt and coarse black pepper for fundamental seasoning, pungent garlic powder and onion powder for depth, and smoky smoked paprika for color and a subtle warmth. Feel free to experiment with your favorite blend or choose a high-quality commercial rub that suits your taste preferences. - BBQ Sauce: The Finishing Glaze
The final hour of smoking is dedicated to basting the ribs with BBQ sauce, which caramelizes into a glossy, sticky glaze. The choice of sauce is entirely up to you. Whether you prefer a tangy, vinegar-based sauce, a sweet and smoky Kansas City style, or a spicy mustard-based one, ensure it’s a flavor you love. You can either whip up a homemade barbecue sauce for a personalized touch or opt for a convenient, high-quality store-bought option when time is short. - Wood Chips: The Essence of Smoke Flavor
Though not an ingredient in the traditional sense, wood chips are vital for imparting that characteristic smoky flavor. The type of wood you choose will significantly influence the final taste. For a bold, robust smoke, hickory or mesquite are classic choices that pair exceptionally well with pork. If you prefer a sweeter, milder smoke profile, consider fruit woods like apple or cherry, which add delicate, subtly sweet notes that complement the ribs beautifully. Other excellent options include pecan, oak, or maple. Always ensure your wood chips are specifically designed for smoking and are of good quality.
Preparing Your Ribs for the Smoker
Proper preparation is key to achieving succulent, tender ribs. These simple steps ensure your ribs are ready to absorb all that delicious smoke flavor and cook evenly.
- Pat Dry: Begin by thoroughly patting down your racks of ribs with clean paper towels. Removing excess moisture from the surface allows the dry rub to adhere better and promotes the formation of a desirable “bark” during smoking.
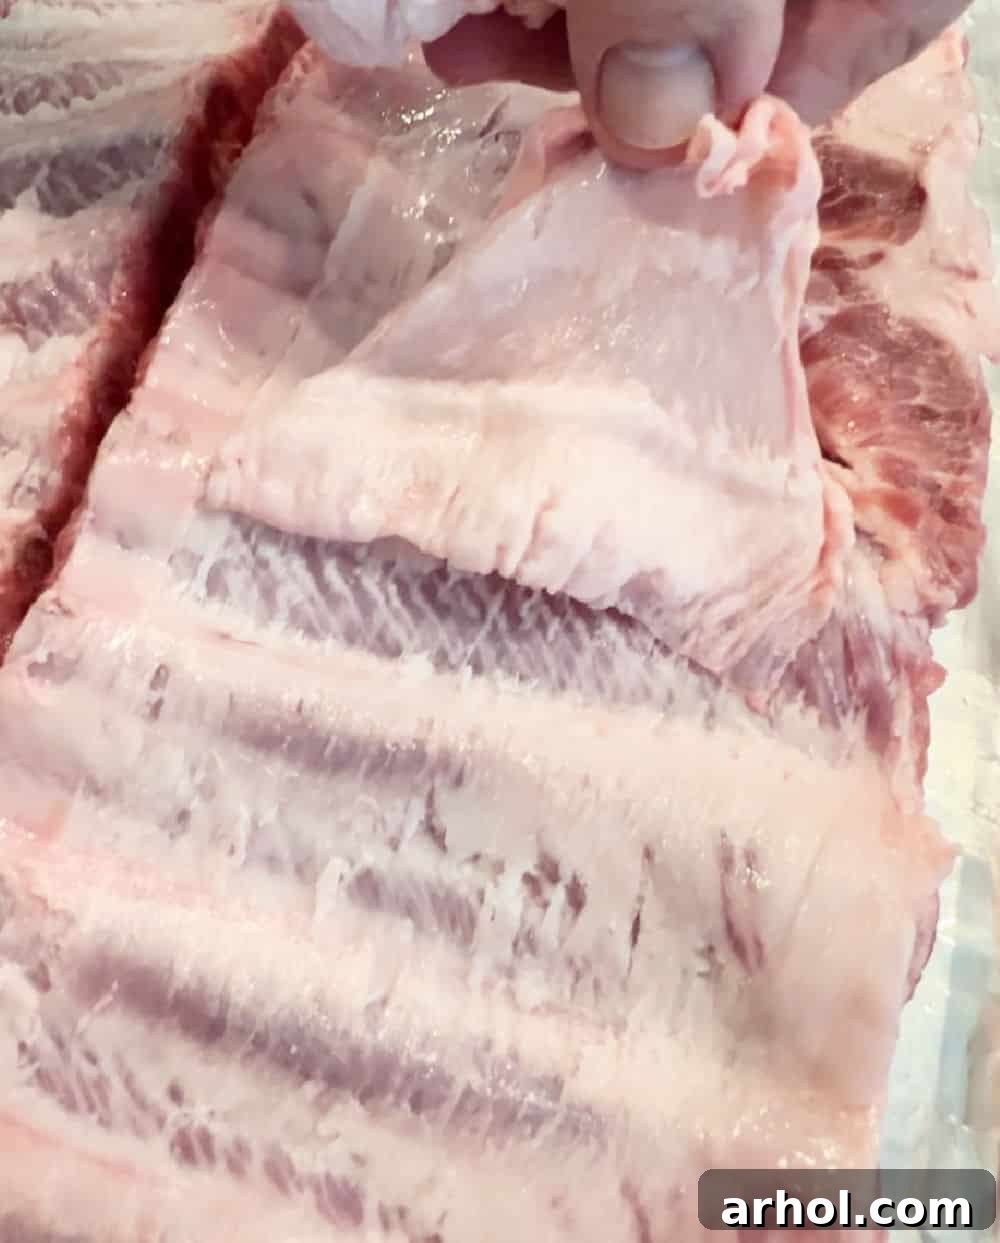
- Remove the Membrane: This is a crucial step for achieving tender ribs. On the bone side of each rib rack, you’ll find a thin, silvery membrane. If left on, this membrane can become tough and chewy, preventing the smoke and rub flavors from fully penetrating the meat, and hindering the ribs from becoming truly fall-off-the-bone tender. To remove it:
- Gently insert a small paring knife or the tip of a spoon underneath the membrane at one end of the rack, usually near the smallest rib.
- Carefully lift and separate a small section of the membrane from the bone.
- Once you have a good grip, use a paper towel or a clean kitchen towel to firmly grasp the membrane. This provides a much better grip, as the membrane can be quite slippery.
- Slowly and steadily pull the membrane away from the bones. It should peel off in one long piece. If it tears, simply repeat the process for any remaining sections.
This step might seem a bit daunting at first, but it gets easier with practice and makes a world of difference in the final texture of your ribs.
- Apply the Dry Rub: Once the membrane is removed and the ribs are dry, it’s time to apply your chosen dry rub. Generously sprinkle the dry rub over all surfaces of the ribs — front, back, and sides. Don’t be shy! Use your hands to gently pat the rub into the meat, ensuring it forms an even coating and sticks well. This creates a flavorful crust as the ribs smoke.
- Prepare Your Smoker: Before placing your ribs in, preheat your electric smoker to the target temperature of 225°F (107°C). While the smoker heats up, add your chosen wood chips to the designated chip tray or box. For sustained smoke, you may need to replenish the wood chips a couple of times during the initial smoking phase.
With these steps complete, your ribs are perfectly prepped and ready for their smoky journey!
Step-by-Step Smoking Process in an Electric Smoker
The 3-2-1 method simplifies the art of smoking ribs, making it achievable for any home cook. Follow these steps for tender, flavorful results every time:
Phase 1: The Initial Smoke (3 Hours)
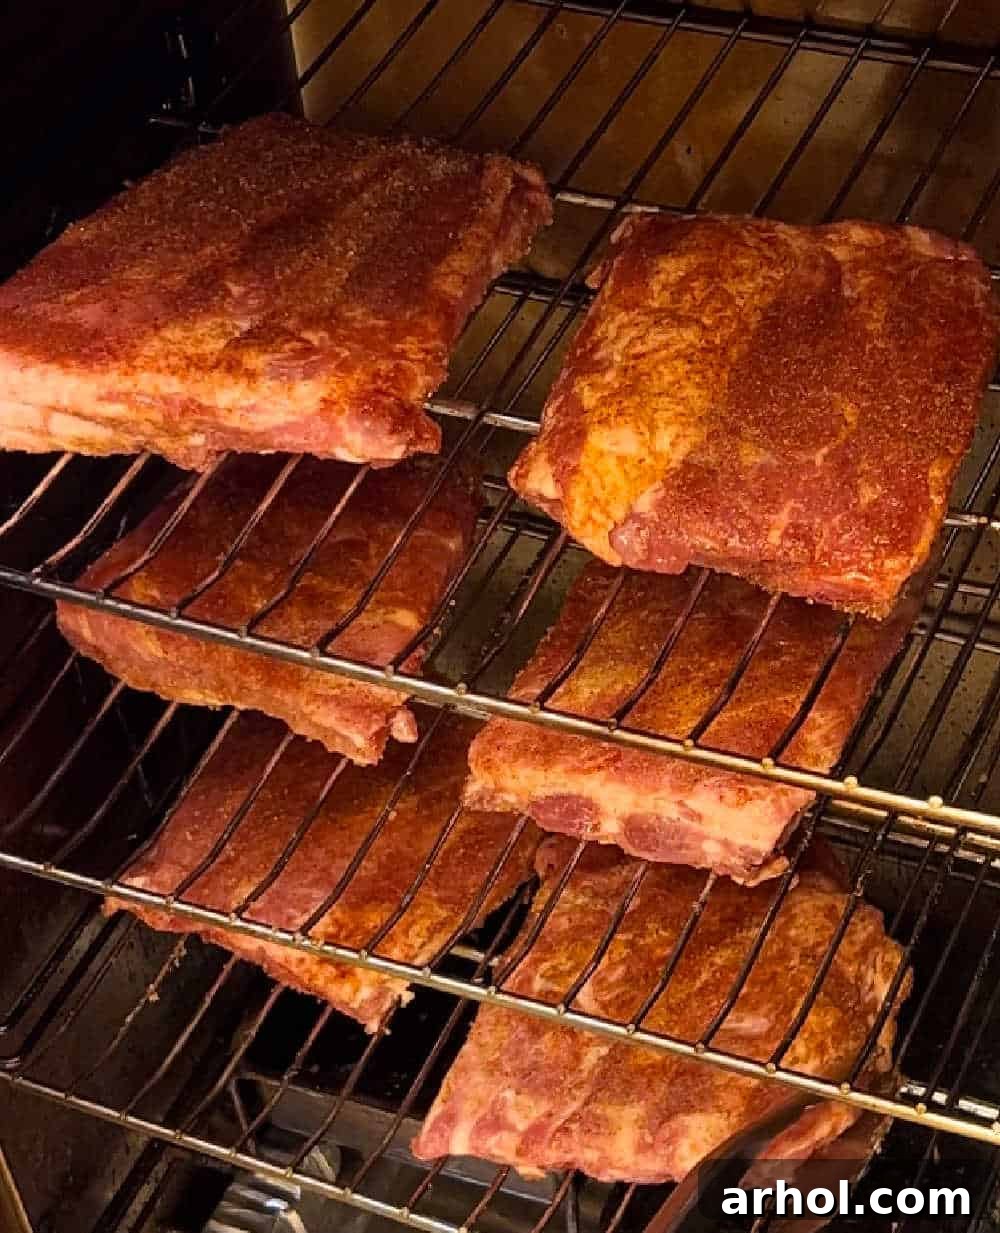
- Load the Smoker: Once your electric smoker has reached a stable temperature of 225°F (107°C) and is producing consistent smoke, carefully place the seasoned ribs directly onto the smoker racks. Position them bone-side down. If you have a meat thermometer with a probe, insert it into the thickest part of the meat, avoiding the bone, to monitor the internal temperature.
- Smoke Unwrapped: Close the smoker door tightly to maintain the temperature and trap the smoke. Let the ribs smoke undisturbed for a full 3 hours. During this period, the low heat and constant smoke will begin to tenderize the meat and create a beautiful, dark “bark” — the flavorful crust on the exterior. Resist the urge to open the smoker door frequently, as this causes temperature fluctuations and allows precious smoke to escape. Replenish wood chips as needed to maintain a steady stream of smoke, typically every 45-60 minutes, depending on your smoker model and wood chip capacity.
Phase 2: The Wrap (2 Hours)
- Remove and Wrap: After 3 hours, the ribs should have developed a nice smoky color and a firm crust. Carefully remove the ribs from the smoker. Place each rack onto a large sheet of heavy-duty aluminum foil. For extra moisture and tenderness, you can add a splash of apple juice, cider vinegar, beer, or a pat of butter to the foil packet before sealing.
- Return to Smoker: Tightly wrap the ribs in the aluminum foil, creating a sealed packet. Ensure there are no gaps for steam to escape. Place the wrapped ribs back into the electric smoker, bone-side down, and continue smoking for an additional 2 hours at 225°F (107°C). This wrapping phase is critical for breaking down any remaining tough connective tissues, making the ribs incredibly tender and juicy.
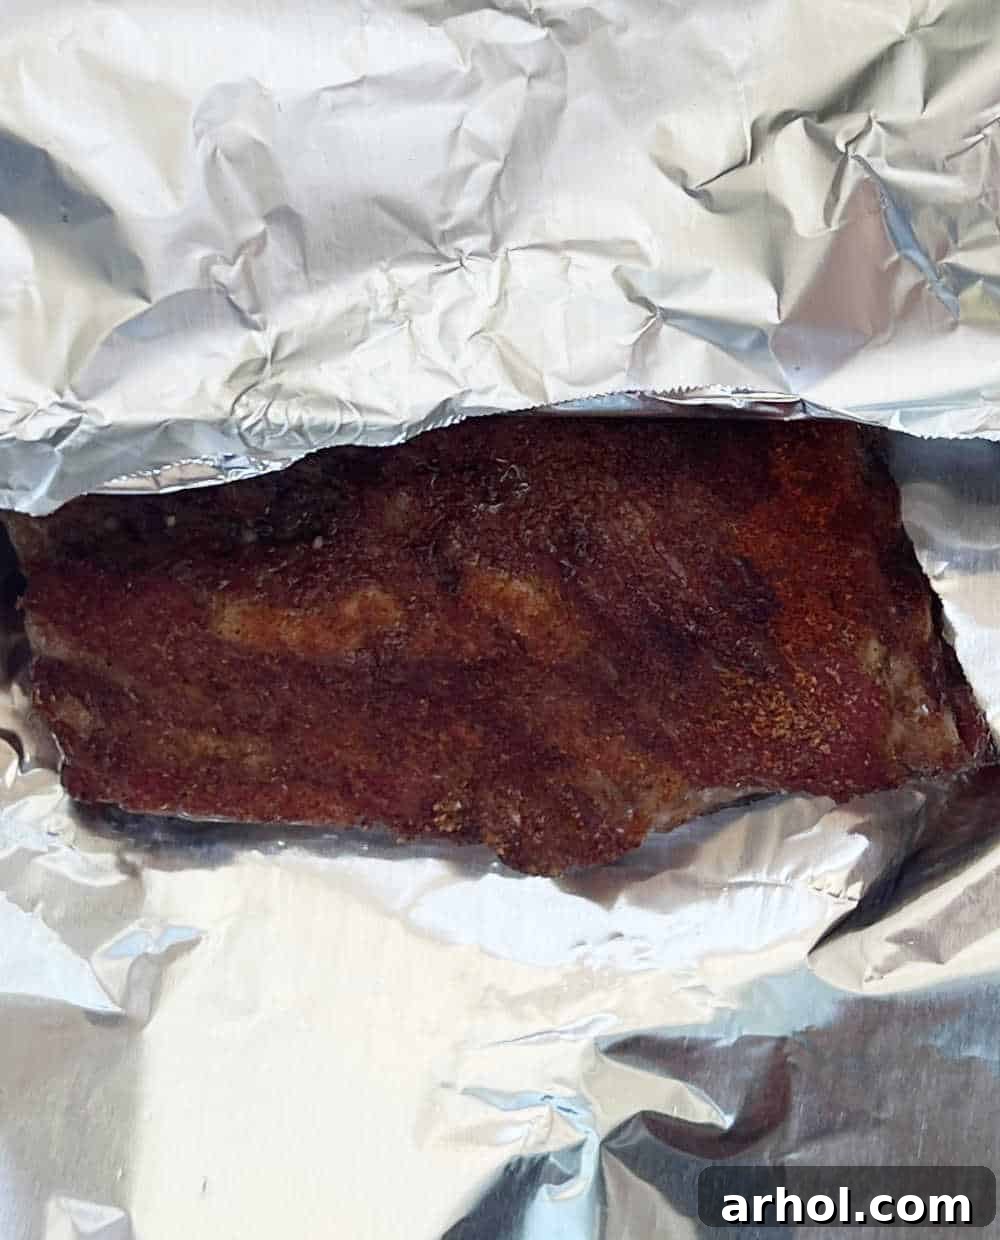
Phase 3: The Glaze (1 Hour)
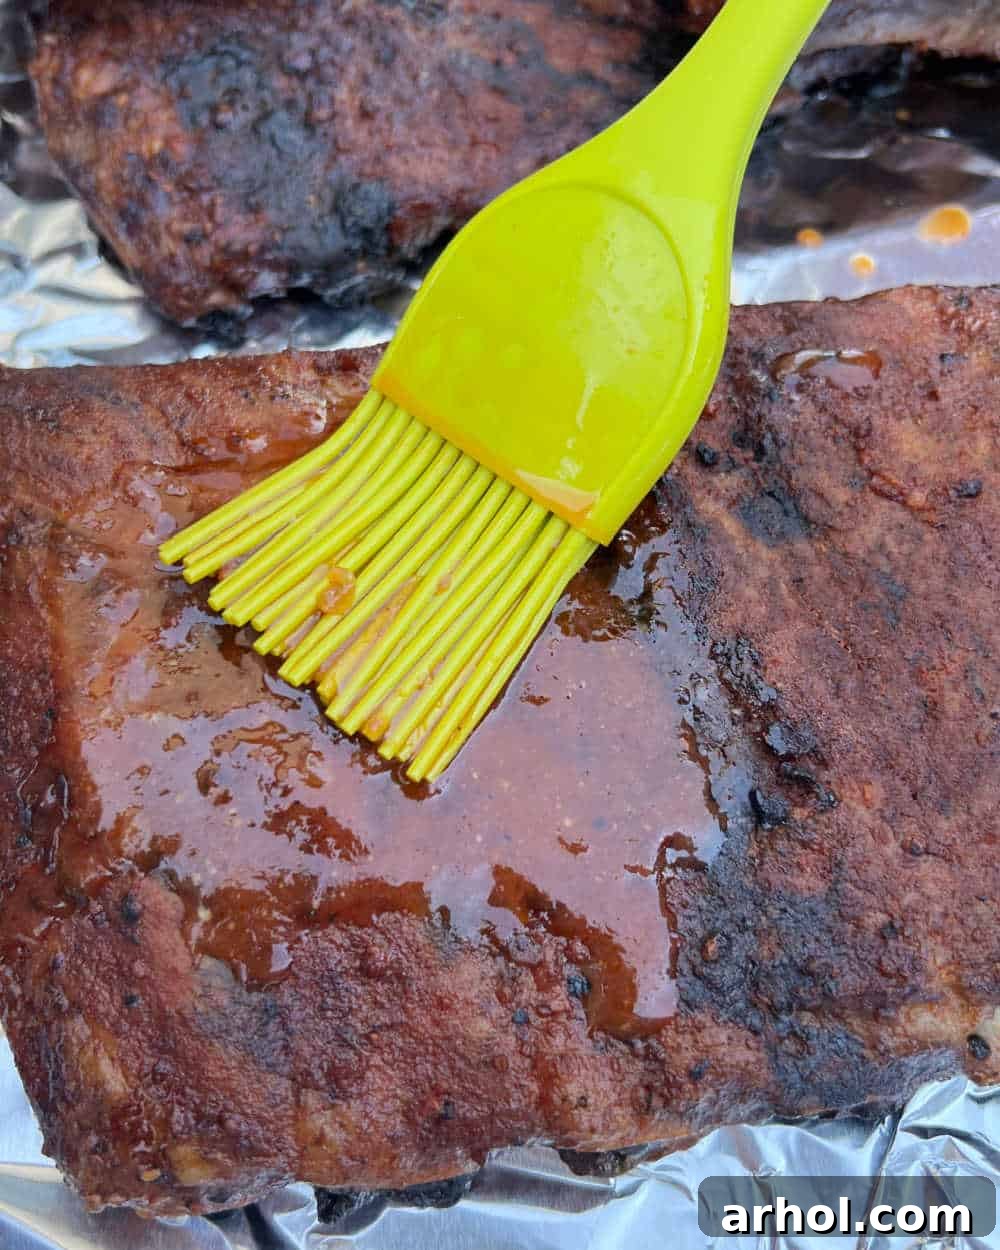
- Unwrap and Sauce: After 2 hours in foil, remove the ribs from the smoker. Carefully unwrap them, being mindful of the hot steam that will be released. Discard the foil. At this point, the ribs should be very tender. Generously brush your favorite barbecue sauce over all surfaces of the ribs.
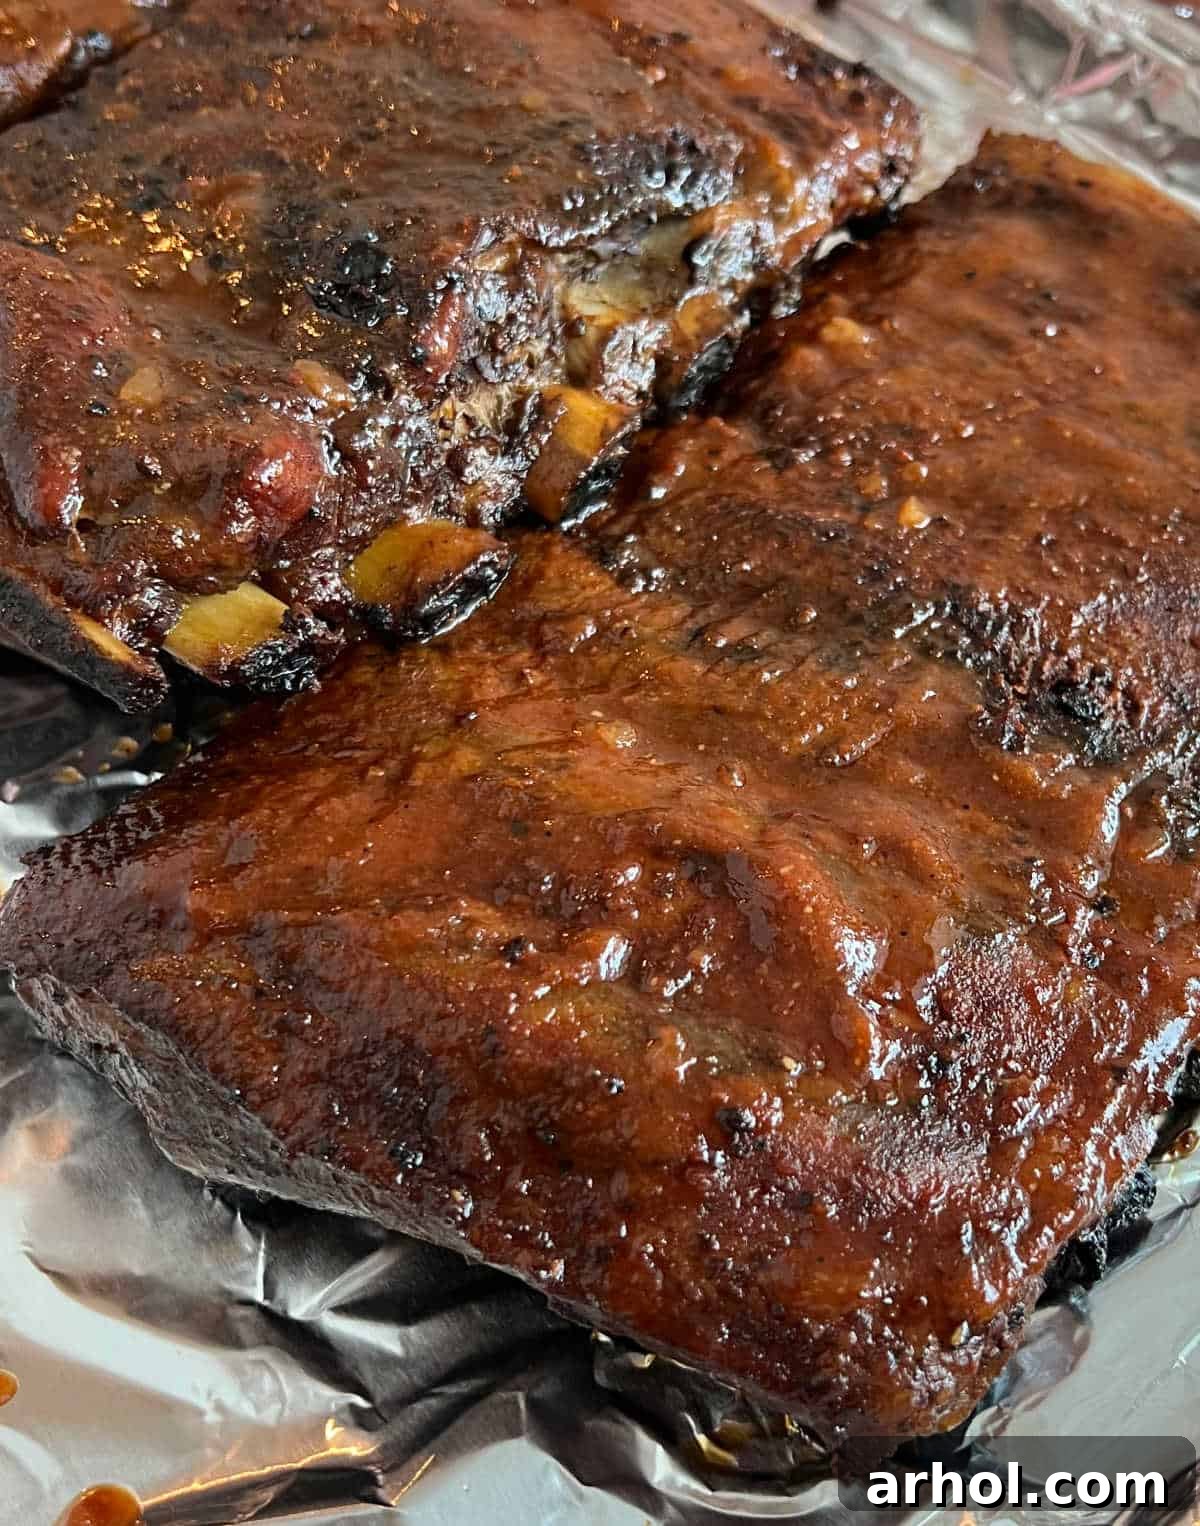
- Final Smoke: Place the sauced ribs back into the smoker, bone-side down, for the final hour at 225°F (107°C). This last hour allows the BBQ sauce to caramelize and set, forming a beautiful, sticky glaze that adds another layer of flavor and appeal. Again, avoid frequently opening the smoker door.
- Rest and Serve: Once the final hour is complete, carefully remove the ribs from the smoker. Allow them to rest for 10-15 minutes on a cutting board, lightly tented with foil. This resting period allows the juices to redistribute throughout the meat, resulting in an even more tender and moist product. Slice between the bones and serve with extra BBQ sauce on the side if desired.
Knowing When Your Smoked Ribs Are Done
Determining when your smoked ribs have reached their peak tenderness is crucial for a perfect outcome. While the 3-2-1 method provides a reliable timeline, factors like rib thickness, smoker consistency, and even outdoor temperature can influence cooking times. Here are a few reliable ways to check for doneness:
- Internal Temperature:
A high-quality meat thermometer is your best friend here. While pork is generally considered safe to eat at 145°F (63°C), ribs need to be cooked to a significantly higher temperature to become truly tender.- For ribs that are tender with a slight chew, aiming for an internal temperature between 180-190°F (82-88°C) is ideal. The meat will be soft and pull easily from the bone but still retain some structure.
- For that coveted “fall-off-the-bone” tenderness, where the meat practically melts in your mouth, aim for an internal temperature around 200-205°F (93-96°C). At this temperature, the collagen and connective tissues have fully broken down.
Always insert the probe into the thickest part of the meat, ensuring it doesn’t touch any bone, as bones heat up faster than meat and can give a false reading.
- The Bend Test:
This is a popular and very effective method for judging tenderness. Using tongs, pick up one end of a rib rack. If the ribs are done, the rack should bend significantly in the middle, and the meat on the surface should show cracks and signs of wanting to separate from the bone. If it feels stiff, it needs more time. If it completely breaks apart, it might be slightly overdone for some preferences, though still delicious. - The Bone Pull Test:
Gently twist one of the bones. If it wiggles freely or you can easily pull it out with minimal resistance, your ribs are likely ready. The meat should have visibly pulled back from the ends of the bones, exposing about a quarter to half-inch of bone. - Visual Cues:
Beyond the bend and bone test, look for general signs of tenderness. The meat should look incredibly moist, and the surface should have a rich, deep color from the smoke and caramelized sauce.
Combine these methods for the most accurate assessment. With practice, you’ll learn to recognize the perfect “feel” of done ribs.
Delicious Side Dishes to Pair with Ribs
No plate of perfectly smoked ribs is complete without an array of complementary side dishes. The rich, savory flavor of barbecue ribs pairs wonderfully with a variety of classic accompaniments. Here are some delectable options to round out your meal:
- Smoked Mac and Cheese: If your smoker has enough capacity, consider making smoked mac and cheese during the last few hours of the rib cooking process. The gentle kiss of smoke adds an incredible depth of flavor to this creamy classic, making it an irresistible pairing.
- Smoked Baked Beans: Similarly, smoked baked beans benefit immensely from time in the smoker. They soak up the smoky essence beautifully, creating a rich, hearty, and flavorful side that complements the ribs perfectly.
- Hawaiian Macaroni Salad: For a refreshing contrast to the rich ribs, a creamy and tangy Hawaiian Mac salad is an excellent choice. Its cool, slightly sweet profile cuts through the richness of the barbecue.
- Potato Salad: A classic potato salad, whether creamy and traditional or a tangy, mustard-based version, is always a crowd-pleaser with ribs. It’s hearty, comforting, and perfectly balances the smoky main course.
- Corn on the Cob: Sweet and tender corn on the cob, especially when grilled or smoked, adds a vibrant touch and natural sweetness that harmonizes with barbecue flavors.
- Coleslaw: A crisp, refreshing coleslaw provides a much-needed crunch and tang, cleansing the palate between bites of rich, tender ribs.
- Cornbread: Fluffy cornbread, perhaps with a hint of jalapeño or cheese, is perfect for soaking up any leftover barbecue sauce and adds a comforting, home-style element to the meal.
Choose one or a combination of these sides to create a truly memorable barbecue experience!
Pro Tips for Smoking Ribs
Achieving barbecue perfection often comes down to a few key insights. Here are some pro tips to ensure your electric smoker ribs are nothing short of spectacular:
- Maintain Consistent Temperature: Electric smokers excel at temperature control, but every time you open the door, the internal temperature drops significantly, extending cooking time and potentially impacting smoke penetration. Resist the urge to peek too often! Only open it to add wood chips or transition between the 3-2-1 phases.
- The Water Pan Advantage: Most electric smokers have a water pan. Keep it filled with warm water (or even apple juice or beer for extra flavor) throughout the smoking process. This creates a moist environment, helping to keep the ribs from drying out and promoting tender meat.
- Experiment with Liquids in the Wrap: For extra juicy and flavorful ribs during the “2” hour wrap phase, don’t just use plain foil. Add a splash of apple juice, cider vinegar, beer, or even a few pats of butter to the foil packet before sealing. This liquid steams the ribs, intensifying their moisture and infusing them with subtle additional flavors.
- Don’t Skimp on the Rest: After the ribs come out of the smoker, let them rest for at least 10-15 minutes, lightly tented with foil, before slicing. This allows the muscle fibers to relax and redistribute the juices throughout the meat, resulting in a more tender and moist final product. Cutting them too soon can cause the juices to run out, leading to drier ribs.
- Wood Chip Strategy: For maximum smoke flavor, especially during the initial 3-hour period, ensure your smoker has a continuous supply of wood chips. Depending on your smoker, you might need to replenish them every 45-60 minutes. Once the ribs are wrapped, they won’t absorb much more smoke, so less emphasis is needed on replenishing chips in the later stages.
Storage and Reheating Leftover Ribs
If you’re lucky enough to have leftover smoked ribs, proper storage and reheating will ensure they remain delicious for future enjoyment.
Storage:
Once the ribs have cooled to room temperature, wrap them tightly in aluminum foil or place them in an airtight container. Store them in the refrigerator for 3-5 days. For longer storage, you can freeze individual portions, wrapped well, for up to 2-3 months. Thaw frozen ribs in the refrigerator overnight before reheating.
Reheating:
Leftover smoked ribs are incredibly versatile and can be enjoyed in various ways. They’re fantastic for sandwiches, tacos, or even cold right out of the fridge!
- Oven Method: This is generally the best method for retaining moisture. Preheat your oven to 250-275°F (120-135°C). Wrap the ribs tightly in aluminum foil (you can add a tablespoon or two of apple juice or broth to the packet for extra moisture) and heat for 20-30 minutes, or until warmed through.
- Grill Method: For a quick reheat with a bit of char, wrap the ribs loosely in foil and place them on a medium-low grill for 10-15 minutes, flipping occasionally. You can finish them unwrapped for a few minutes to crisp up the edges.
- Microwave Method: While convenient, the microwave can sometimes dry out ribs. If using, place ribs on a microwave-safe plate, add a tablespoon of water, and cover loosely with plastic wrap. Heat in short bursts (30-60 seconds) until warmed, checking frequently.
No matter how you enjoy them, leftover smoked ribs are always a treat!
Electric Smoker Ribs Recipe: The 3-2-1 Method
Equipment
- Masterbuilt electric smoker
Ingredients
- 4 pounds pork ribs, membrane removed (2 racks; St. Louis style or baby back recommended)
- 3 tablespoons brown sugar
- 3 teaspoons sea salt
- 2 teaspoons garlic powder
- 2 teaspoons smoked paprika
- 1 teaspoon ground black pepper
- 1 teaspoon onion powder
- 1 cup BBQ sauce (your favorite brand or homemade)
- Wood chips (hickory or mesquite for bold flavor, apple or cherry for milder/sweeter)
Instructions
-
In a small bowl, combine the brown sugar, sea salt, garlic powder, smoked paprika, onion powder, and black pepper. Stir well to create your dry rub.
-
Pat the ribs dry with paper towels. Remove the thin membrane from the bone side of each rib rack (see notes for detailed instructions). Generously rub the seasoning mix over all surfaces of the ribs, patting it gently to ensure it sticks.
-
Preheat your electric smoker to 225℉ (107°C) and add your chosen wood chips to the chip tray. Keep the water pan filled with warm water.
-
Place the seasoned ribs directly onto the smoker racks, bone-side down. If using, insert a temperature probe into the thickest part of the meat (avoiding bone). Close the smoker door and cook for 3 hours, replenishing wood chips as needed to maintain consistent smoke. Avoid opening the door unnecessarily.
-
After 3 hours, carefully remove the ribs from the smoker. Place each rack onto a large sheet of heavy-duty aluminum foil. For extra moisture, you can add a splash of apple juice or a pat of butter before tightly wrapping the ribs in the foil. Place the wrapped ribs back into the smoker and cook for another 2 hours.
-
After 2 hours, remove the ribs from the smoker and carefully unwrap them (watch for hot steam). Generously brush your chosen BBQ sauce over all surfaces of the ribs.
-
Place the sauced ribs back into the smoker (unwrapped) and cook for 1 more hour. This allows the sauce to caramelize and set.
-
Once the ribs are done (internal temperature 190-205°F for desired tenderness), remove them from the smoker. Allow them to rest for 10-15 minutes, lightly tented with foil, before slicing and serving.
Notes
For “fall-off-the-bone” ribs, aim for an internal temperature around 200-205°F. For slightly firmer, tender ribs with a good chew, cook to 180-190°F.
Avoid frequently opening the smoker door, as this causes temperature drops and slows down cooking.
Nutrition
Nutrition information is automatically calculated, so should only be used as an approximation.
Additional Info
For more delicious and easy recipes, be sure to sign up for our newsletter and follow us on social media!