
Sustainable Holiday Decor: Transforming a Toddler Bed into a Rustic DIY Wood Pallet Christmas Tree
The holiday season brings with it a special kind of magic, inspiring us to infuse our homes with warmth, joy, and personal touches. For many, this means diving into the delightful world of crafting and decorating. While store-bought ornaments and traditional trees hold their own charm, there’s an unparalleled satisfaction in creating something truly unique and meaningful for your festive display. This year, I embarked on a particularly creative journey, merging my love for holiday decor with a passion for repurposing. Inspired by the charming, rustic appeal of popular wood pallet Christmas trees, I decided to tackle a similar project – but with an unexpected twist. Instead of finding pallets, I looked to an item ready for the landfill: an old toddler bed. This transformation truly showcases the power of imagination and sustainability in crafting.
An Unexpected Beginning: The Toddler Bed’s Second Act
My journey into unique holiday decor often starts with a desire to repurpose items whenever possible. This particular project, however, stands out as perhaps the most unconventional and rewarding upcycle I’ve ever attempted. The star of this transformation was an unassuming toddler bed, which had served its primary purpose faithfully for years.
After my youngest child outgrew it, the toddler bed found a new home in our bedroom, serving as extra seating. It was a cozy spot where the kids could gather to watch movies, enjoy TV, or simply spend time with us. This arrangement also proved incredibly convenient during those late-night wanderings when little ones couldn’t sleep; they’d simply climb onto the familiar bed for comfort. It was a functional, albeit temporary, solution that extended the life of a beloved piece of furniture.
However, all good things eventually come to an end. One day, a playful ‘plop’ from my teen queen sealed its fate. The bed frame, no longer able to withstand the enthusiastic impact, completely broke. It was irreparable as a bed, a goner in its original form. While my daughter was perfectly fine, the bed definitely wasn’t. Faced with the immediate thought of discarding it, my pragmatic side (and my husband’s foresight!) kicked in. Luckily, my husband knows better than to immediately throw things out, so the remnants were stashed away in the garage, awaiting a potential future purpose.
A Journey of Repurposing: Why Upcycle?
The decision to hold onto the broken toddler bed pieces highlights a core principle of sustainable living: upcycling. Upcycling isn’t just a trend; it’s a mindful approach to consumption that breathes new life into old, discarded items. Instead of contributing to landfills, we transform materials into something of higher value or different utility. This process not only reduces waste but also sparks creativity, saves money, and allows for the creation of truly personalized items that tell a story. For me, the prospect of turning a broken bed into a festive decoration was an exciting challenge, promising a unique piece of holiday decor with a rich history.
Gathering Your Tools and Materials for This Unique Project
The initial idea sparked when I found myself wanting to create a wood pallet-style Christmas tree, a popular rustic decor item. Suddenly, it clicked! The various boards from the broken toddler bed frame, with their varied lengths and sturdy construction, seemed to be the perfect raw material for crafting the ‘branches’ of a Christmas tree. This serendipitous discovery transformed a potential chore of disposal into an exciting DIY opportunity.
What You’ll Need:
- Boards from a broken wooden toddler bed frame (or similar scrap wood)
- A sturdy garden stake or wooden dowel for the tree’s ‘spine’
- Wood saw (hand saw or electric, depending on preference and safety)
- Sander or sandpaper
- Strong wood glue
- Burnt umber acrylic paint
- Green acrylic paint
- Water for diluting paint
- Paint brushes
- Wood slices for ornaments (natural or pre-cut)
- Optional: Protective eyewear and gloves for cutting and sanding
Prepping Your Upcycled Wood
With the concept solidified, it was time to prepare the salvaged wood. My husband, ever the helpful partner in my crafting adventures, took on the task of cutting the boards. To mimic the natural tapering shape of a pine tree, he cut the boards into progressively shorter lengths. This attention to detail from the outset was crucial for achieving the desired aesthetic. After cutting, each piece was meticulously sanded until it was fairly smooth, removing any splinters and preparing the surface for painting. For the central trunk of our unconventional tree, we chose a simple yet effective garden stake, providing a stable backbone for our festive creation.
The Transformation Process: Crafting Your Rustic Tree
With all the pieces cut and smoothed, the real magic began: assembling our DIY wood pallet Christmas tree. This stage is where the vision truly starts to take shape, transforming simple wood scraps into a festive centerpiece.
Assembling the Tree Branches
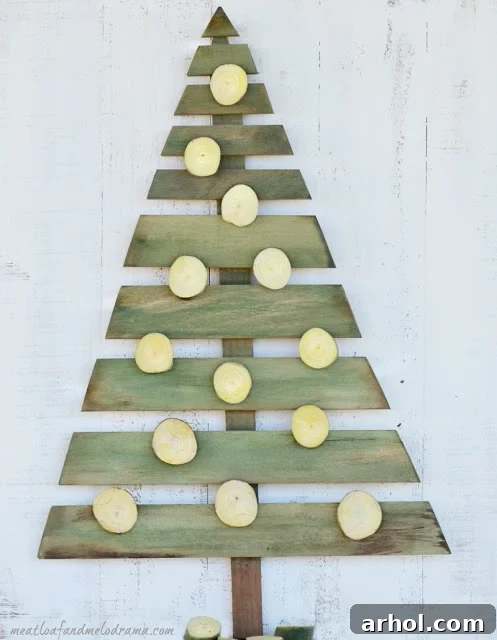
The assembly process was straightforward yet required precision. We began by gluing the smallest wooden pieces to the top of the garden stake, carefully centering each one. Progressing downwards, we attached progressively longer boards, ensuring they were evenly spaced and horizontally aligned. This method effectively created the classic conical silhouette of a pine tree, with the longest ‘branches’ at the bottom providing a stable base. We used a strong wood glue, applying it generously to ensure a secure bond between the recycled boards and the central stake. It’s important to allow adequate drying time after this step to ensure the structure is stable before moving on.
Adding Character with Paint and Finish
Once the structure was solid, I faced a delightful dilemma: should I leave the wood natural or add a finish? While the raw wood had a certain charm, it looked a bit too ‘new’ and unadorned for the rustic, aged look I envisioned. To achieve that coveted weathered aesthetic, I decided on a two-step painting process.
First, I applied a coat of burnt umber paint. This rich, dark brown created an immediate sense of age and depth, darkening the raw wood and providing a foundational, earthy tone. Once this layer was dry, I watered down some green acrylic paint significantly. The diluted green was then lightly brushed over the burnt umber. This technique allowed the underlying brown to show through, creating a beautiful, faded, and slightly mossy appearance, reminiscent of an old, weathered piece of timber that has gracefully aged outdoors. The result was far from brand new; it was a character-filled finish that added significant personality to our DIY Christmas tree.
Embellishing with Natural Ornaments
The final touch for our rustic tree came from a truly natural source. My husband had recently cut a batch of wood slices from our Palo Verde tree. These slices, with their organic shapes and distinct green edges (a natural characteristic of Palo Verde branches), were absolutely perfect. They offered an authentic, earthy charm that perfectly complemented the aged wood of the tree. The beauty was that their sides looked as if they were intentionally painted green, but it was all completely natural – a delightful surprise!
After the paint on the tree had fully dried, these beautiful wood slices were glued strategically onto the ‘branches’ as ornaments. They added another layer of rustic texture and natural beauty, completing the transformation. This little DIY wood pallet Christmas tree, born from a broken toddler bed and adorned with nature’s own embellishments, was finally complete and ready to bring a unique, handmade charm to our holiday decor.
Showcasing Your Masterpiece: Displaying Your Unique Creation
The finished tree is definitely distinctive, standing out from typical holiday decorations. And I’m thrilled with the outcome; it truly bears no resemblance whatsoever to its former life as a toddler bed! The rustic charm and handmade appeal are undeniable, making it a wonderful conversation piece for guests.
I’ve been contemplating using this charming wood pallet Christmas tree as a central part of our Christmas mantel display this year. Its relatively compact size and unique character make it incredibly versatile for various spots around the home – perhaps an entryway, a cozy corner in the living room, or even as a cheerful accent on a console table. The beauty of a DIY piece like this is its flexibility; it can adapt to different decorating themes and spaces with ease. It adds a touch of homemade warmth and a story to tell, which is what holiday decorating is truly about for me.
Beyond the Tree: The Philosophy of Upcycling
This project is more than just a Christmas decoration; it’s a testament to the endless possibilities of upcycling and sustainable living. In a world often focused on rapid consumption and disposal, taking the time to transform something old into something new and beautiful is a powerful act. It’s about seeing potential where others see trash, and it fosters a deeper appreciation for the resources we use.
So, if you happen to have an old toddler bed, an unused crib, or any other discarded furniture sitting around, please don’t rush to throw it out. Pause and consider its potential. You never know what incredible, unique, and meaningful creation you can craft from it. Upcycling not only contributes to a healthier planet but also infuses your home with decor that carries a personal story and a touch of genuine artistry. Let your imagination lead the way to your next sustainable DIY project!
You Might Also Like
Sharing At:
Met Monday,
The Scoop,
Wow Us Wednesdays,
Before and After,
Weekend Retreat, TT&J,
Share It,
Inspiration Monday,
Monday Funday