
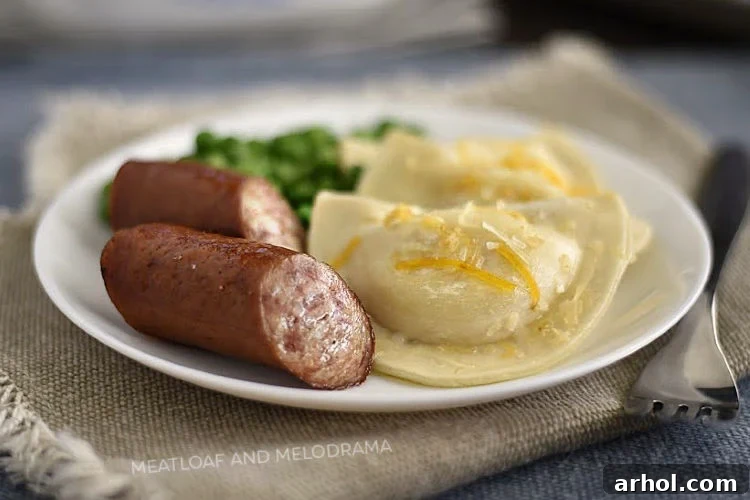
Baked Pierogies and Kielbasa is the ultimate solution for a quick and easy weeknight dinner, expertly prepared on a single sheet pan and ready to serve in just 20 minutes. This incredibly simple yet satisfying meal is a lifesaver for those hectic days when time is of the essence but a comforting, hearty dish is still craved.
Transforming Weeknights with a Simple Sheet Pan Meal
In the whirlwind of daily life, finding a dinner recipe that balances speed, minimal cleanup, and deliciousness can feel like a quest for the Holy Grail. Enter Baked Pierogies and Kielbasa – a dish that not only meets all these criteria but also brings a touch of hearty comfort to your table. This recipe champions simplicity without sacrificing flavor, proving that an extraordinary meal doesn’t always demand extraordinary effort or time.
For many, pierogies evoke memories of family gatherings and traditional, homemade goodness. I was raised on the authentic taste of homemade pierogi, a labor of love that involves meticulous preparation of dough and fillings, a tradition I proudly uphold every Christmas using my grandma’s cherished recipe for homemade pierogies. While the outcome is undeniably rewarding, the process is a significant undertaking. So, when a sudden craving for these delightful potato dumplings struck me last week amidst a particularly busy schedule, I made a decision that truly surprised my family: I bought a box of frozen pierogies from the grocery store.
My family, accustomed to my purist approach to pierogies, was genuinely taken aback. They knew my long-standing preference for the homemade version. However, with no local vendors offering freshly made pierogies, I embraced convenience. To my pleasant surprise, these frozen potato dumplings were far from bad. By baking them with savory kielbasa sausage on a single sheet pan, I created an incredibly easy and satisfying dinner. The true testament to its success came from my notoriously picky teenage daughter, who declared them “legit” – high praise in our household!
Why You’ll Adore This Baked Pierogies and Kielbasa Recipe
This recipe isn’t just a meal; it’s a weeknight revelation. Here’s why it’s destined to become a staple in your dinner rotation:
- Unbeatable Simplicity: With just a handful of ingredients and one sheet pan, the cooking process couldn’t be more straightforward.
- Lightning Fast: From prep to plate, you’re looking at about 20-25 minutes, making it perfect for those evenings when you’re short on time.
- Minimal Cleanup: The magic of sheet pan cooking means fewer dishes. Line your pan with foil, and cleanup is practically non-existent.
- Hearty & Flavorful: The combination of tender pierogies, savory kielbasa, and simple seasonings creates a deeply satisfying, comfort food experience.
- Family Favorite: It’s a crowd-pleaser that even the pickiest eaters are likely to enjoy, adaptable to various tastes.
Mastering the Oven: How to Cook Baked Pierogies and Kielbasa
The beauty of this dish lies in its fuss-free preparation. Baking frozen pierogies in the oven is perfectly acceptable, as most commercially available frozen pierogies have already been boiled or steamed during their production. Therefore, your primary goal in the oven is to reheat them thoroughly, crisp them up, and infuse them with flavor alongside the kielbasa.
To begin, preheat your oven to 400 degrees Fahrenheit (200 degrees Celsius). This ensures a hot environment for quick and even cooking. For truly effortless cleanup, I highly recommend lining a large baking sheet with aluminum foil. This step is optional but significantly reduces scrubbing time – a major win on any busy day. Once your pan is prepped, arrange the frozen pierogies evenly across it. Drizzle a generous amount of olive oil over the pierogies, ensuring each one is lightly coated. You can gently toss them on the pan or use a pastry brush to spread the oil. This olive oil coating is crucial for achieving that desirable golden-brown and slightly crispy exterior.
Next, add flavor with simple seasonings. Sprinkle the pierogies with a little bit of sea salt and dried minced onions. While fresh chopped onions could certainly be used, opting for dried minced onions keeps the preparation as swift and easy as possible, aligning perfectly with the “fix-it-and-forget-it” ethos of this quick dinner. Then, dot the pierogies with small pieces of butter. The butter will melt and spread, adding richness and helping with browning. Finally, arrange sliced kielbasa sausage around the pierogies on the same baking sheet. Ensure the kielbasa is cut into even pieces for uniform cooking.
Bake for approximately 20 minutes. Midway through the cooking time, about 10 minutes in, you’ll want to flip or turn both the sausage and the pierogies. This ensures they heat evenly and brown beautifully on all sides. If at any point the pierogies or sausage appear dry, feel free to add a little more butter or olive oil. For those who prefer their pierogies extra crispy, simply extend the baking time by another 5-10 minutes, keeping a close eye on them to prevent burning. The goal is golden-brown pierogies and nicely browned kielbasa.
After about 20 minutes, your delicious, hearty dinner is ready to be served! The convenience and simplicity of this sheet pan smoked sausage dinner make it a true weeknight champion.
What to Serve with Your Baked Pierogies and Kielbasa
The beauty of this sheet pan meal extends to its versatility in pairing. Traditionally, my family always enjoyed peas with pierogies, and they remain a fantastic choice. However, you have plenty of options to round out this meal, many of which can be cooked right on the same sheet pan for even greater convenience:
- Green Beans: Fresh or frozen green beans toss wonderfully with a little olive oil, salt, and pepper, and roast beautifully alongside the main components.
- Bell Peppers & Onions: Sliced bell peppers (any color) and additional onion wedges add sweetness and vibrant color.
- Broccoli or Asparagus: These vegetables become tender-crisp and flavorful when roasted with the pierogies and kielbasa.
- Brussels Sprouts: Halved Brussels sprouts caramelize nicely in the oven, offering a slightly bitter counterpoint to the rich sausage and pierogies.
- A Simple Side Salad: A fresh green salad with a light vinaigrette can add a refreshing element to the hearty meal.
- Sour Cream or Applesauce: Classic accompaniments for pierogies, offering a cool, tangy, or sweet contrast.
Variations to Keep Your Dinner Exciting
While the classic Baked Pierogies and Kielbasa is undeniably delicious, this recipe serves as an excellent canvas for culinary creativity. Don’t hesitate to experiment with these variations:
- Cheesy Boost: A few minutes before the dish is done, sprinkle shredded cheddar, mozzarella, or a blend of your favorite cheeses over the pierogies and kielbasa. Return to the oven until melted and bubbly.
- Spice It Up: Add a pinch of red pepper flakes with the salt and dried onions for a subtle kick, or drizzle with hot sauce after baking for a bolder flavor.
- Herbaceous Freshness: Fresh herbs like chopped dill, parsley, or chives sprinkled over the finished dish add brightness and aroma.
- Different Sausages: While kielbasa is traditional, feel free to substitute with other pre-cooked smoked sausages, chicken sausage, or even bratwurst for a different flavor profile.
- Tangy Toppings: A dollop of grainy Dijon mustard or a side of sauerkraut can add a wonderful tangy element that complements the rich flavors.
- Sweet & Savory: Try adding diced apples or even a touch of maple syrup to the pan during the last few minutes of baking for a unique sweet and savory twist.
Frequently Asked Questions About Baked Pierogies and Kielbasa
Here are answers to some common questions you might have about making this easy sheet pan dinner:
Q: Do I need to thaw frozen pierogies before baking?
A: No, you do not! This recipe is designed to work with frozen pierogies straight from the freezer. Simply toss them with olive oil and proceed with the baking instructions.
Q: Can I use fresh pierogies instead of frozen?
A: Yes, you can use fresh pierogies. If they are already cooked, follow the same baking instructions, but keep a closer eye on them as they may cook a bit faster. If they are uncooked fresh pierogies, you will need to boil them first according to package directions before adding them to the sheet pan for baking.
Q: What kind of kielbasa should I use?
A: Look for fully cooked smoked kielbasa sausage, which is readily available in most grocery stores. This ensures it only needs to be heated through and browned. You can choose beef, pork, or turkey kielbasa based on your preference.
Q: Can I prepare this meal ahead of time?
A: This meal is best enjoyed fresh, right out of the oven. However, you can prep the ingredients by slicing the kielbasa and having your seasonings measured out. Store them separately in the refrigerator until ready to bake.
Q: How do I store and reheat leftovers?
A: Store any leftover baked pierogies and kielbasa in an airtight container in the refrigerator for up to 3-4 days. To reheat, spread them on a baking sheet and warm in a 350°F (175°C) oven until heated through and slightly crispy, or microwave for a quicker option (though they might not be as crispy).
Other Easy Kielbasa Recipes to Explore
If you love the versatility and flavor of kielbasa, you’ll appreciate these other straightforward recipes that make use of this delicious sausage:
- Haluski and Kielbasa
- Polish Sausage Dogs
- Kielbasa Sauerkraut Sliders
- Instant Pot Smoked Sausage Mac and Cheese
- Instant Pot Creamy Kielbasa Tortellini
- One Pot Creamy Kielbasa Tortellini
- Sheet Pan Smoked Sausage Dinner
Easy Baked Pierogies and Kielbasa Dinner Recipe
Baked Pierogies and Kielbasa
Baked Pierogies and Kielbasa is a quick and easy dinner made on one sheet pan and ready to eat in just 20 minutes! Perfect for busy days!
Ingredients
- 2 tablespoons olive oil
- 2 tablespoons butter
- 12 frozen pierogies
- 1 pound kielbasa sausage
- 1 teaspoon dried minced onions
- 1 teaspoon sea salt
Instructions
- Preheat oven to 400 degrees Fahrenheit (200 degrees Celsius).
- Line a baking sheet with foil, and place frozen pierogies on top.
- Pour olive oil over pierogies and on the baking sheet. Rub oil over pierogies to ensure even coating and spread across the baking sheet.
- Dot pierogies with butter, and sprinkle evenly with sea salt and dried onions. Place cut kielbasa on the baking sheet, arranging it around the pierogies. Bake for 20 minutes, turning the pierogies and kielbasa at least once (around the 10-minute mark), or until they are golden brown, cooked through, and crispy to your liking.
- Remove from oven, and serve immediately with your favorite side dishes.
Nutrition
Carbohydrates: 30g,
Protein: 13g,
Fat: 42g,
Saturated Fat: 15g,
Cholesterol: 95mg,
Sodium: 1593mg,
Potassium: 234mg,
Fiber: 1g,
Sugar: 2g,
Vitamin A: 175IU,
Vitamin C: 0.9mg,
Calcium: 11mg,
Iron: 1.1mg
Nutrition information is automatically calculated, so should only be used as an approximation.
Additional Info
We truly hope you enjoy this easy baked pierogies and kielbasa sheet pan dinner as much as my family and I do. It’s a testament to how simple ingredients and minimal effort can still result in a incredibly satisfying and memorable meal. Give it a try tonight and let us know your thoughts in the comments below!