
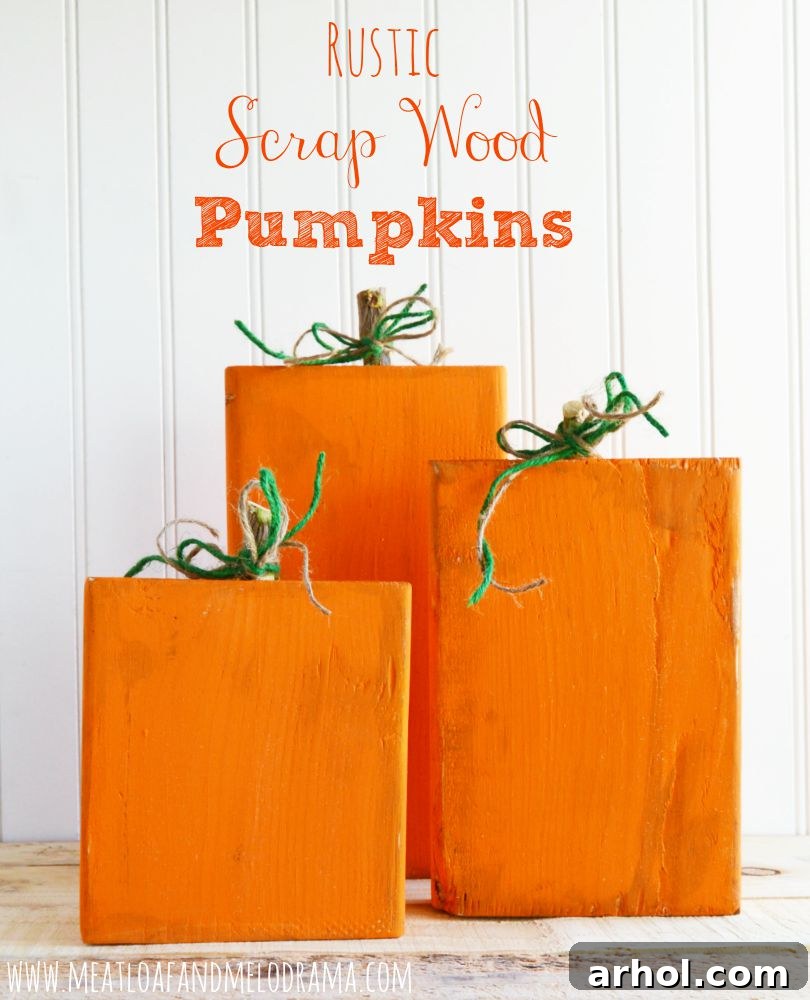
As the leaves begin to hint at their vibrant transformation and a crispness subtly enters the morning air, many of us find our thoughts drifting towards the cozy embrace of autumn. While summer still holds its lingering warmth, there’s an undeniable excitement that builds for the magic of fall. And what better way to usher in this beloved season than by immersing ourselves in delightful fall crafts? Today, I’m thrilled to share a project that perfectly captures the rustic charm of autumn: these beautiful rustic scrap wood pumpkins. They’re simple to make, budget-friendly, and an absolute joy to display!
There’s something truly enchanting about the transition of seasons, isn’t there? We eagerly anticipate summer’s arrival, yet as soon as the scorching heat settles in, we find ourselves yearning for the comforting coziness of fall. Here in the desert, where sweater weather feels like a distant dream even as autumn officially begins, I’m already envisioning cooler days and the quintessential beauty of fall decor. This anticipation fuels my passion for autumn crafting, and making pumpkins is always a favorite pastime!
These particular rustic wood pumpkins offer a unique twist compared to other wooden autumn crafts you might have seen or created. Unlike the slender wooden apples or even the Jack-o-lanterns I crafted last year using 2×4 boards, these beauties are fashioned from sturdier 2×6 wooden blocks. This choice gives them a wonderfully substantial and wider profile, lending them a distinct presence in any fall display. Despite their robust appearance, they remain incredibly easy to create, making them an ideal project for crafters of all skill levels, from beginners to seasoned DIY enthusiasts. Their slightly chunkier design not only adds to their rustic appeal but also ensures they stand securely, becoming charming focal points wherever you place them.
How to Craft Your Own Rustic Scrap Wood Pumpkins
Embracing the spirit of sustainability and creativity, this project transforms ordinary scrap wood into delightful autumnal accents. Follow these simple steps to bring your own set of rustic wood pumpkins to life, perfect for enhancing your home with handmade charm.
Supplies You’ll Need
- 3 2×6 Wood Pieces: Cut into varying lengths to create a dynamic set. Common lengths might be 6 inches, 8 inches, and 10 inches, but feel free to customize for your desired display. Utilizing genuine scrap wood adds to the authentic rustic feel.
- Twigs or Small Sticks: These will serve as natural, organic stems for your pumpkins. Look for interesting shapes and textures in your yard or local park.
- Orange Craft Paint: A matte or chalk paint finish works wonderfully for a rustic look.
- Brown Craft Paint: Essential for achieving that weathered, distressed effect.
- Strong Craft Glue: Wood glue or a strong adhesive is recommended for attaching the stems securely.
- Twine: Natural jute twine in shades of green and brown works best for mimicking vines and leaves.
- Scissors: For cutting twine and any other necessary materials.
- Sandpaper: Medium-grit for distressing the paint and softening edges.
- Paintbrushes: Various sizes for applying paint and detailing.
- Drop Cloth or Newspaper: To protect your work surface.
Step-by-Step Directions
Transforming simple wood blocks into charming fall decor is a rewarding process. Follow these easy steps to create your own set of unique rustic wood pumpkins.
Step 1: Prepare Your Wood Blocks and Stems
The foundation of your rustic pumpkins lies in the wood blocks. Begin by ensuring your 2×6 wood pieces are cut to your desired varying lengths. A common and visually appealing arrangement includes three different heights, mimicking a natural pumpkin patch. Once your wood blocks are ready, gather your twigs. I enlisted the help of my husband to collect some sturdy twigs from our bougainvillea plant, but any small, naturally dried branch or stick will work perfectly. Select pieces that are proportionate to your wood blocks and have an interesting, organic shape. These natural elements are key to achieving the authentic rustic look. Securely glue one twig to the center top of each wood block. Hold it in place for a moment to allow the glue to set, ensuring a firm attachment.
Step 2: Master the Rustic Paint Technique
This step is where the magic truly happens, transforming plain wood into aged, charming pumpkins. To achieve that coveted “old wood” aesthetic, begin by applying a layer of brown paint. Don’t aim for full coverage; instead, focus on painting around the edges of the wood blocks and lightly dabbing it in various spots across the surfaces. Think of it as creating a subtle, weathered base layer. Once the brown paint is dry to the touch, it’s time for the vibrant orange. Liberally paint over the brown layer with your orange craft paint. The trick here is to allow some of the underlying brown to show through, especially around the edges and in areas where you applied it more heavily. This layering technique is fundamental to creating depth and simulating the look of aged, distressed wood, giving your pumpkins a truly authentic farmhouse feel.
Step 3: Distress for Added Character
With the paint layers dry, it’s time to enhance the rustic appeal through distressing. Gently sand the edges of your painted pumpkins, focusing on corners and raised areas. The goal is to subtly reveal glimpses of the natural wood or the underlying brown paint, creating a worn, loved appearance. This step adds incredible character and depth, making each pumpkin feel uniquely antique. My children often tease me good-naturedly when I’m engrossed in this part, as they haven’t quite developed my appreciation for the charm of anything rustic or vintage! But trust me, this little extra effort makes all the difference in achieving that perfect farmhouse-style finish for your DIY fall decor.
Step 4: Add Twine “Vines” for a Finishing Touch
To complete the natural, organic look of your rustic wood pumpkins, we’ll add some charming twine embellishments. Take a combination of green and brown twine – the varying colors will create a more realistic, vine-like effect. Wrap the twine artfully around the base of each wooden stem. You can tie it in a simple knot, create a small bow, or even curl some ends to mimic delicate tendrils or small leaves. This small detail adds a wonderful touch of authenticity and brings the entire piece together, making your scrap wood pumpkins truly irresistible.
And just like that, you’ve created a beautiful set of rustic scrap wood pumpkins! C’est tout – that’s all there is to it. With minimal effort and a few basic supplies, you can transform simple wood blocks into enchanting fall decorations that perfectly embody the spirit of the season. These handmade treasures are not only a joy to craft but also add a personalized, cozy touch to any corner of your home.
Styling Your Rustic Wood Pumpkins for Fall
Once your charming rustic wood pumpkins are complete, the fun continues with styling them throughout your home. These versatile pieces of DIY fall decor can be arranged in countless ways to create inviting autumn vignettes. For early fall, they look absolutely adorable displayed alongside other natural elements like pinecones, acorns, or even some of those wooden apples you might have crafted earlier. They are perfect for gracing your entryway console, adding a warm welcome to guests, or adorning your mantelpiece, creating a cozy focal point above the fireplace.
Consider grouping them together on a tiered tray with small candles and faux fall leaves for a stunning centerpiece on your dining table or coffee table. Their varying heights make them ideal for creating visual interest in any arrangement. As we draw closer to Halloween, these rustic pumpkins can easily transition into your spooky decor by placing them near your beloved Jack-o-lanterns or alongside other Halloween-themed crafts. The beauty of these scrap wood pumpkins lies in their timeless appeal and durability; they’re not just for one season but can be cherished and reused year after year, becoming a beloved part of your family’s fall traditions. Their handmade nature adds a unique, personal touch that mass-produced decorations simply can’t replicate, making your home feel truly special and inviting.
Why Choose DIY Scrap Wood Pumpkins?
Opting for DIY scrap wood pumpkins offers numerous benefits beyond just creating beautiful fall decor. Firstly, it’s an incredibly sustainable choice. By repurposing wood scraps that might otherwise be discarded, you’re contributing to a more eco-friendly approach to home decoration. This gives each piece a unique history and character that new materials simply can’t offer. Secondly, this project is remarkably budget-friendly. Scrap wood can often be sourced for free or at a minimal cost from local lumberyards, construction sites (with permission!), or even from your own garage. The paints and embellishments are also inexpensive, making this an accessible craft for everyone.
Beyond the practical advantages, there’s immense satisfaction in crafting something with your own hands. The process of transforming raw materials into charming decorative items is not only a creative outlet but also a therapeutic activity. It allows you to personalize your fall decor, ensuring it perfectly matches your home’s aesthetic and your personal style. These rustic wood pumpkins are durable, meaning they’ll withstand the test of time and can be brought out season after season, becoming cherished elements of your autumn traditions. They embody the warmth and inviting spirit of farmhouse fall decor, making your home feel cozy and welcoming throughout the harvest season.
Thank you so much for joining me today on this crafting adventure! I hope you feel inspired to gather some scrap wood and create your own adorable set of rustic wood pumpkins. There’s nothing quite like the feeling of decorating your home with handmade treasures that evoke the true essence of fall. Happy crafting!
Explore More Fall Craft Ideas!
If you loved making these rustic scrap wood pumpkins, you might also enjoy these other delightful fall-themed DIY projects: