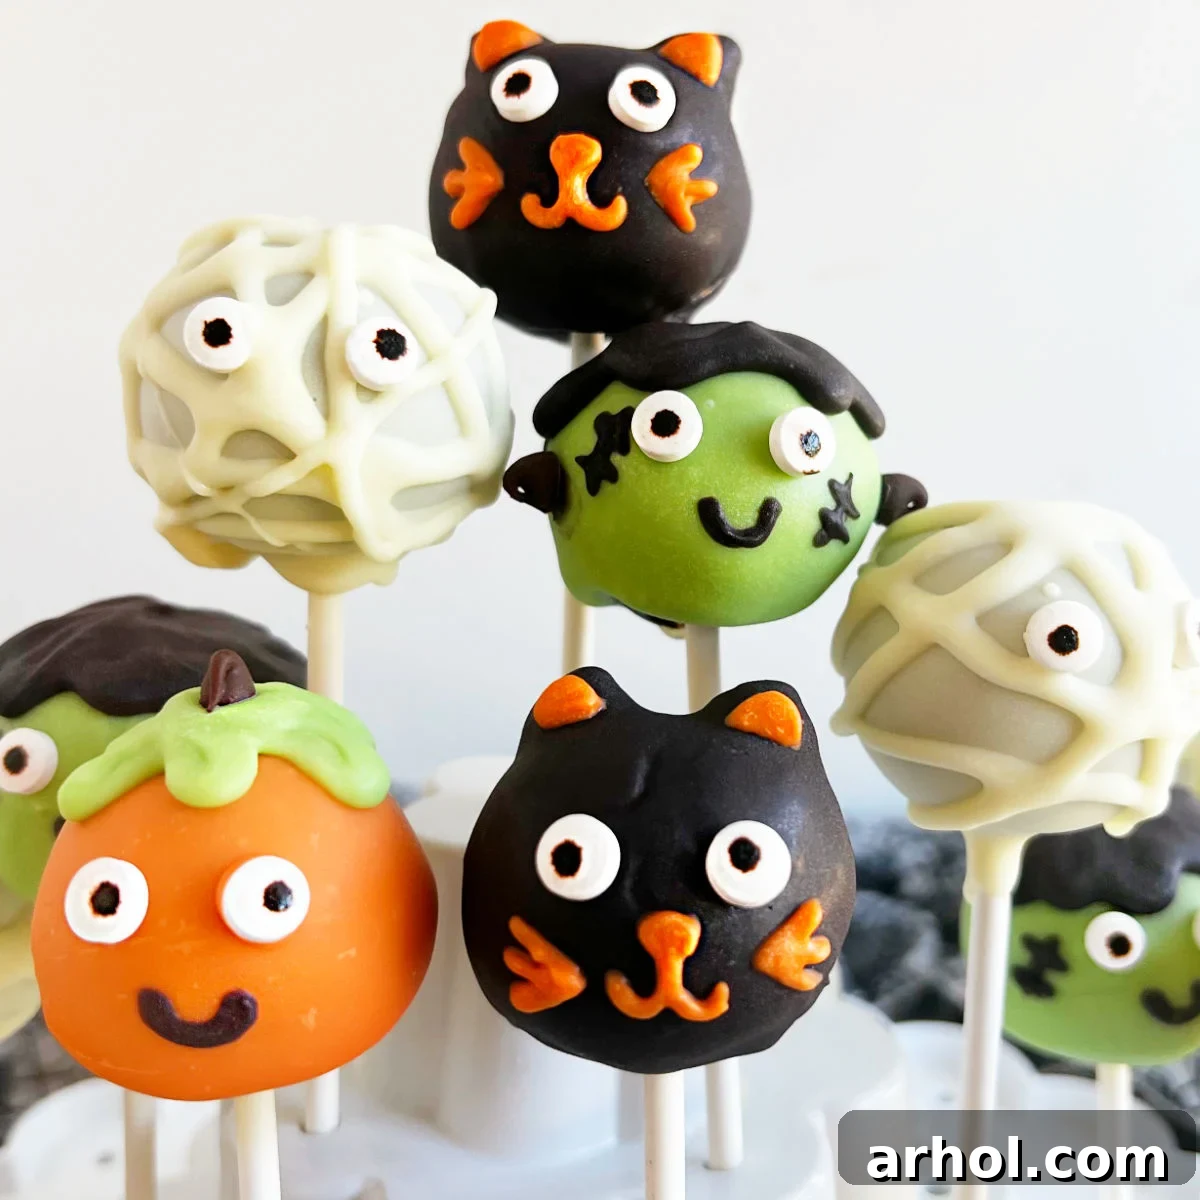
Spooktacular Halloween Cake Pops: Your Ultimate Guide to Easy & Fun Treats
As the vibrant colors of autumn emerge and a crisp, cool breeze ushers in the spooky season, there’s no better time to indulge in festive homemade delights. Our **Halloween Cake Pops** are far more than just a dessert; they are miniature works of art, a delightful project for all ages, and an absolute highlight for any Halloween celebration. Crafted from moist cake, luscious frosting, and vibrant candy melts, these charming cake balls are transformed into an array of whimsical and spooky characters, making them the perfect centerpiece or party favor for your next Halloween gathering.
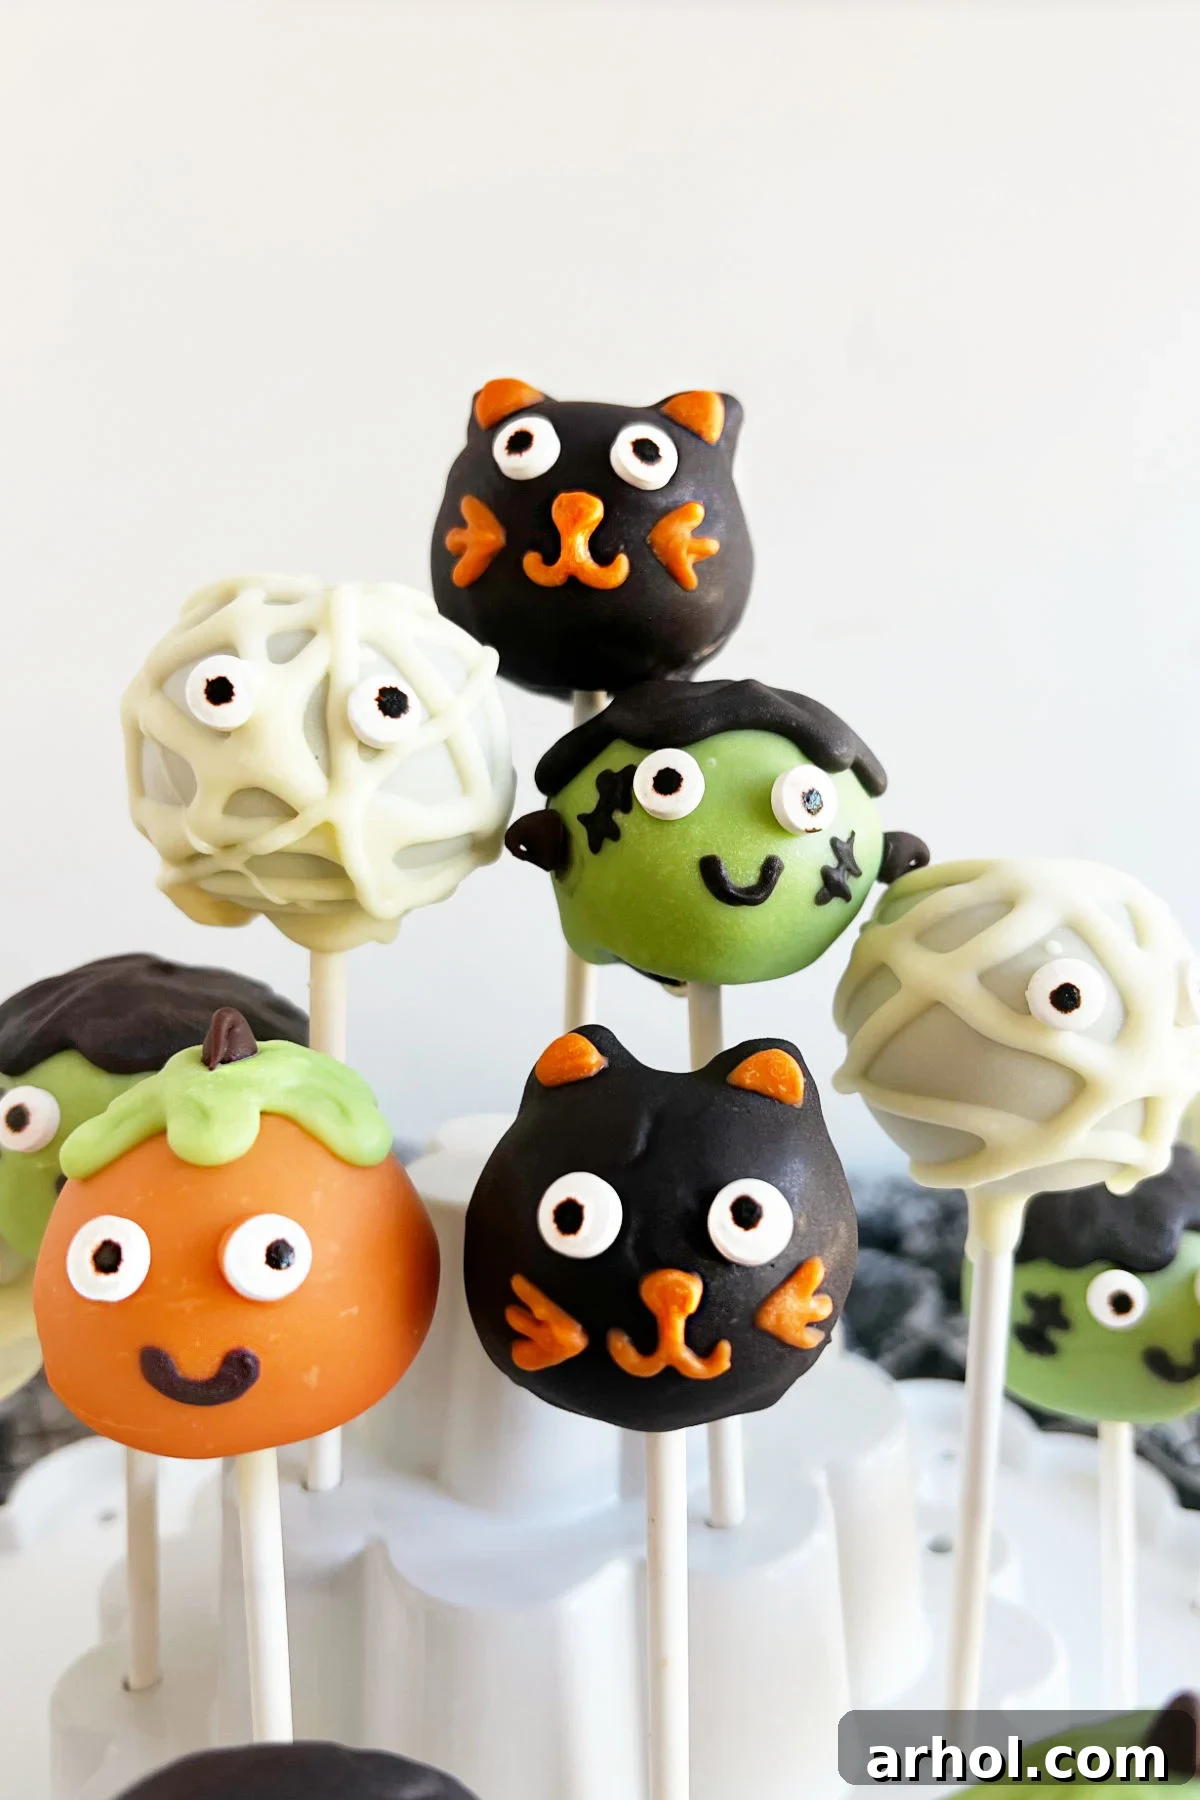
If you’re seeking a dessert that combines adorable aesthetics with undeniable deliciousness, this easy Halloween cake pops recipe is your answer. The process is straightforward and enjoyable: simply crumble a baked cake, blend it with creamy frosting to form a pliable dough, shape it into perfect little spheres, and then unleash your creativity by decorating them as your favorite Halloween characters or themes. From the iconic grinning jack-o’-lanterns and bandaged mummies to eerie Frankensteins and mysterious black cats, each cake pop offers a unique opportunity for imaginative fun.
One of the many advantages of this recipe is its incredible versatility. You can opt to bake a cake from scratch using a convenient box of cake mix, allowing you to choose any flavor that tickles your fancy. Alternatively, it’s a fantastic way to utilize leftover cake, transforming yesterday’s dessert into today’s party sensation. For those with a packed schedule, don’t let baking hold you back! A plain cake or a batch of unfrosted cupcakes purchased from your local bakery or grocery store can serve as an excellent shortcut, making these enchanting treats accessible to even the busiest Halloween enthusiasts.
Table of Contents
- Why You’ll Love These Halloween Cake Pops
- Essential Ingredients for Spooky Cake Pops
- Step-by-Step Guide: Crafting Your Halloween Cake Pops
- Creative Halloween Cake Pop Decorating Ideas
- Storage Tips to Keep Your Cake Pops Fresh
- Pro Tips for Perfect Cake Pop Success
- More Spooktacular Halloween Treat Ideas
- Printable Recipe Card: The Cutest Halloween Cake Pops
- Frequently Asked Questions About Cake Pops
Why You’ll Love These Halloween Cake Pops
Halloween Cake Pops are more than just a sweet indulgence; they’re an engaging activity and a guaranteed crowd-pleaser for any spooky celebration. Here’s why these delightful treats are destined to become a beloved part of your Halloween traditions:
- Unleash Your Creativity: Each cake pop provides a miniature canvas for artistic expression. Whether you envision classic pumpkins, friendly ghosts, mischievous monsters, or iconic characters like Frankenstein, the decorating possibilities are truly boundless. This makes them a joy to create and personalize.
- Perfectly Portioned Party Treats: Their individual size makes cake pops ideal for parties. They are easy to serve, simple to eat, and can double as charming party favors or delightful additions to a dessert buffet, ensuring every guest gets a delicious bite.
- Fun for All Ages: Involve children in the decorating process for a memorable family activity. Kids adore dipping the cake balls, adding sprinkles, and carefully placing candy eyeballs, turning baking into a hands-on, creative adventure.
- Flavor Customization: Begin with any cake flavor you desire – classic chocolate, moist vanilla, rich red velvet, or a seasonal pumpkin spice. Pair your chosen cake with a complementary frosting to create a symphony of flavors in every bite.
- Excellent Make-Ahead Option: The cake balls can be prepared in advance and stored, significantly reducing stress on party day. Decorate them closer to your event to ensure maximum freshness and visual appeal, giving you more time to enjoy the festivities.
- A Unique Dessert Experience: For those who appreciate cake but desire a novel presentation, cake pops offer a delightful textural contrast. Their dense, moist interior is beautifully complemented by a crisp, sweet candy coating, providing a truly satisfying treat.
Prepare to delight your guests and infuse your Halloween celebrations with homemade charm and irresistible sweetness!
Essential Ingredients for Spooky Cake Pops
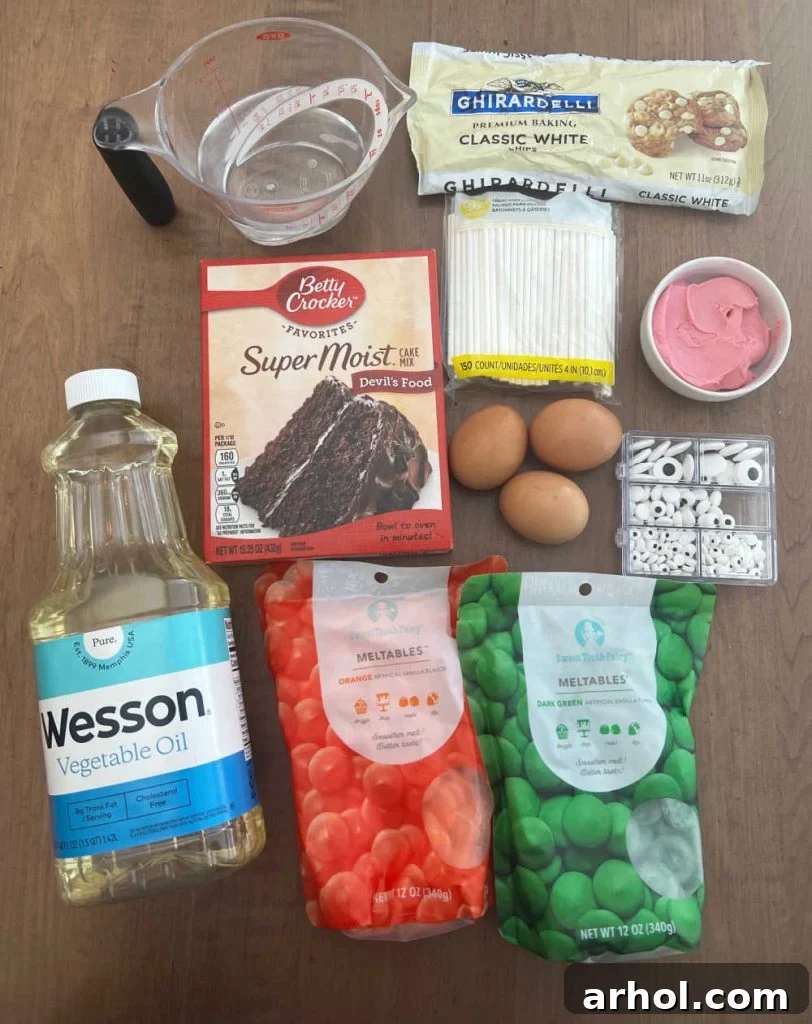
Creating these delightful Halloween cake pops is made easy with a selection of readily available ingredients. Below is a detailed breakdown of what you’ll need to bring your spooky confections to life. For precise quantities, please refer to the comprehensive printable recipe card located further down on this page.
- Boxed Cake Mix: This forms the base of your cake pops. Any brand and flavor will work wonderfully. Chocolate cake mix is a popular choice, providing a rich, dark crumb that contrasts beautifully with colorful coatings. However, feel free to experiment with vanilla, red velvet, or even a spiced cake mix for a unique flavor profile.
- Eggs, Oil, and Water: These are the standard liquid components typically required to prepare your boxed cake mix. Always adhere to the specific instructions provided on your chosen cake mix packaging to ensure your cake bakes to perfection, resulting in a moist and ideal crumb for forming cake pops.
- Frosting: The magic ingredient that binds your cake crumbs into a pliable, truffle-like dough. Store-bought frosting, whether vanilla, chocolate, or cream cheese flavored, is a convenient choice. If you have any leftover homemade frosting, this recipe is a fantastic way to put it to delicious use.
- Candy Melts: Crucial for creating a smooth, vibrantly colored, and quick-setting outer shell. We recommend an assortment of Halloween-themed colors such as bright orange (perfect for pumpkins), classic black (for cats and intricate details), and vivid green (ideal for Frankenstein’s monster). Candy melts are specifically formulated to melt evenly and harden quickly, providing a professional and durable finish.
- White Chocolate Chips: These serve multiple purposes in this recipe. They are used to help secure the cake pop sticks and are perfect for drizzling mummy “bandages.” White candy melts or almond bark can be used as alternatives, often melting even more smoothly and requiring less fuss.
- Coconut Oil (Optional): A small amount of coconut oil can be a game-changer when melting white chocolate chips, helping them achieve a thinner, smoother consistency. This makes dipping significantly easier and helps create a perfectly uniform coating without streaks. Note that it’s generally not needed for candy melts or almond bark.
- Cake Pop Sticks (or Popsicle Sticks): Essential for easy handling, dipping, and serving your cake pops. Standard cake pop sticks are widely available in baking sections. For a slightly more rustic feel or a sturdier hold, craft popsicle sticks can also be employed.
- Candy Eyeballs (Optional but Recommended!): The quickest and most charming way to give your cake pops instant personality! These edible candy eyeballs transform simple coated cake pops into expressive, adorable, or spooky characters in seconds.
Step-by-Step Guide: Crafting Your Halloween Cake Pops
Making cake pops is a rewarding process that combines a few simple culinary steps with creative flair. Follow this detailed guide to ensure your cake pops are perfectly formed, delicious, and ready for their enchanting Halloween transformation.
1. Bake and Thoroughly Cool Your Cake
Begin by preparing your chosen cake mix according to the package instructions, typically for a 9×13 inch pan. It is absolutely essential that the cake bakes evenly and completely. Once baked, carefully transfer the cake to a wire rack and allow it to cool *entirely*. This step cannot be rushed; attempting to crumble a warm or even slightly warm cake will result in a greasy, crumbly texture that will not bind properly into stable cake pop dough. Patience at this initial stage is paramount for the success of your cake pops.
2. Crumble the Cake and Mix with Frosting
Once your cake has completely cooled, transfer it to a large mixing bowl. Now, it’s time to crumble the cake. You can do this by hand, breaking it into very fine, even crumbs – ensure there are no large chunks remaining. For a quicker and more uniform result, an electric mixer or a stand mixer fitted with the paddle attachment can be used. Once crumbled, add the frosting to the cake crumbs. Start with the quantity specified in the recipe card, then mix thoroughly. The goal is to achieve a cohesive, dough-like mixture that holds its shape when pressed together, but isn’t overly sticky or greasy. Adjust the frosting amount if necessary: add a touch more if the mixture seems too dry, or a sprinkle of powdered sugar if it feels too wet.
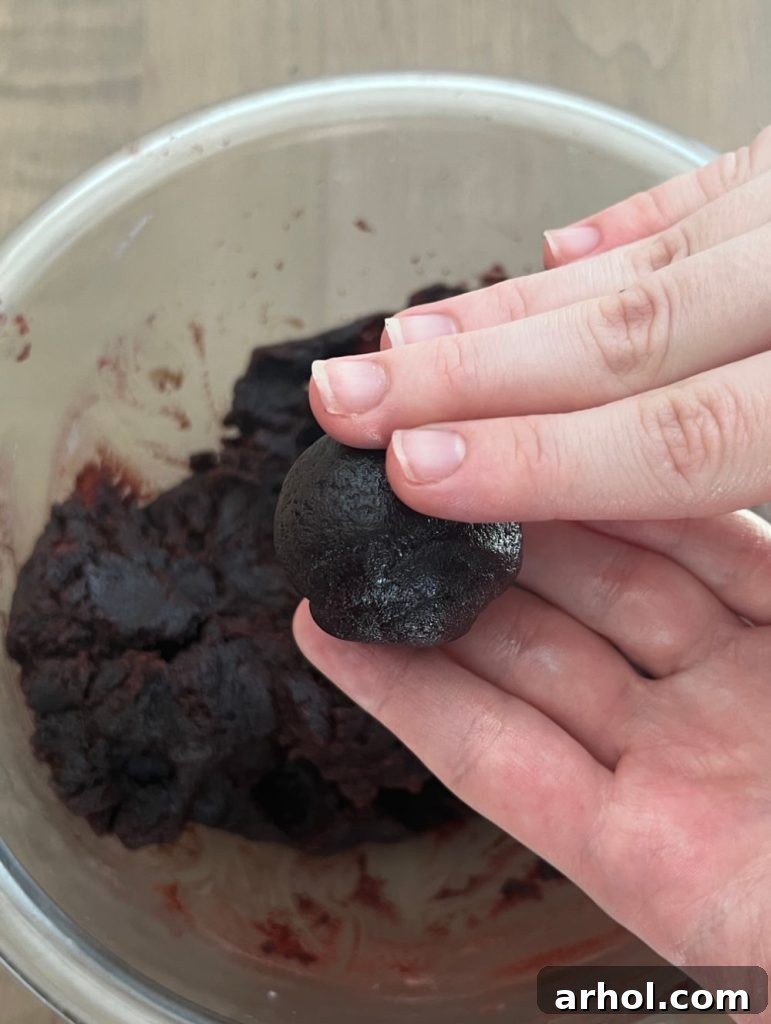
3. Shape Uniform Cake Balls
Scoop out small, consistent portions of the cake mixture. Roll each portion between your palms to form smooth, compact, and perfectly round balls. Aim for a uniform size, typically around 1 to 1.5 inches in diameter. Consistency in size is important for even dipping and a polished, professional look for your finished cake pops. As you form each ball, place it onto a baking sheet that has been meticulously lined with wax paper or parchment paper. This prevents any sticking and makes the next steps much easier. Continue until all of your cake mixture has been transformed into neat little spheres.
4. Insert Sticks and Chill for Firmness
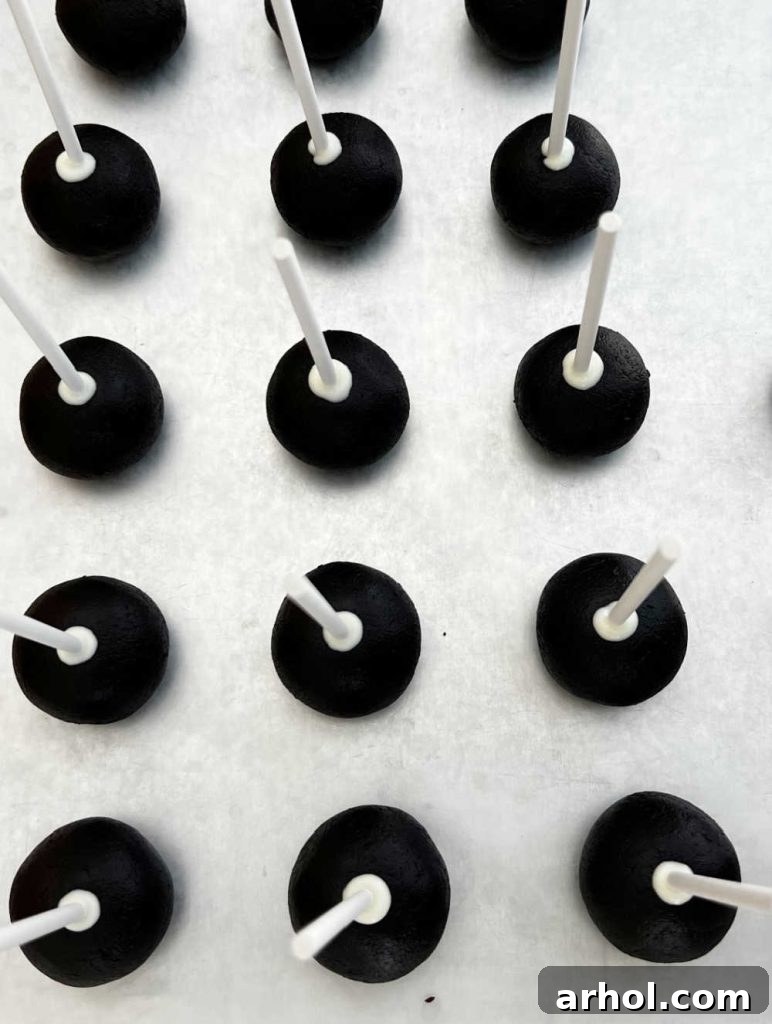
In a small, microwave-safe bowl, melt a few tablespoons of white chocolate chips or white candy melts until smooth. This melted chocolate will act as the “glue” that secures your cake pop sticks. Dip one end of a cake pop stick into the melted chocolate, then carefully insert the stick halfway into the center of each cake ball. The melted chocolate will harden as it cools, firmly anchoring the stick and preventing your cake pops from slipping off during the dipping process. Once all sticks are in place, return the baking sheet with the skewered cake balls to the refrigerator. Allow them to chill for at least 1 hour, or until they are completely firm to the touch. This crucial chilling period ensures the cake pops remain intact and sturdy when dipped into the warm candy coating, preventing cracks or breakage.
Creative Halloween Cake Pop Decorating Ideas
This is where the real Halloween magic happens! Transforming your simple cake pops into spooky or cute characters is the most exciting part. Before you begin, melt your various colored candy melts in separate microwave-safe bowls or cups, following the package directions (typically in 30-second intervals, stirring until smooth). Ensure your chilled cake pops are ready. Dip each cake pop into the melted candy coating, allowing any excess to drip back into the bowl before the coating sets. Remember to work swiftly, as candy melts harden relatively quickly, giving you just enough time to add small details.
1. Adorable Mummy Cake Pops
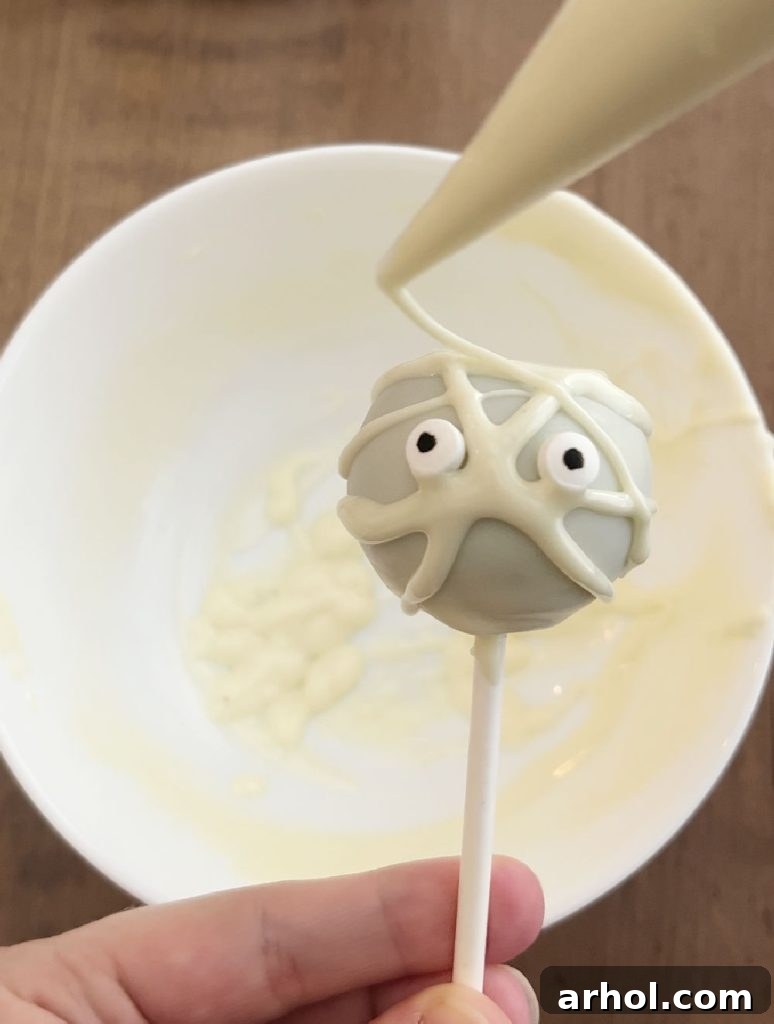
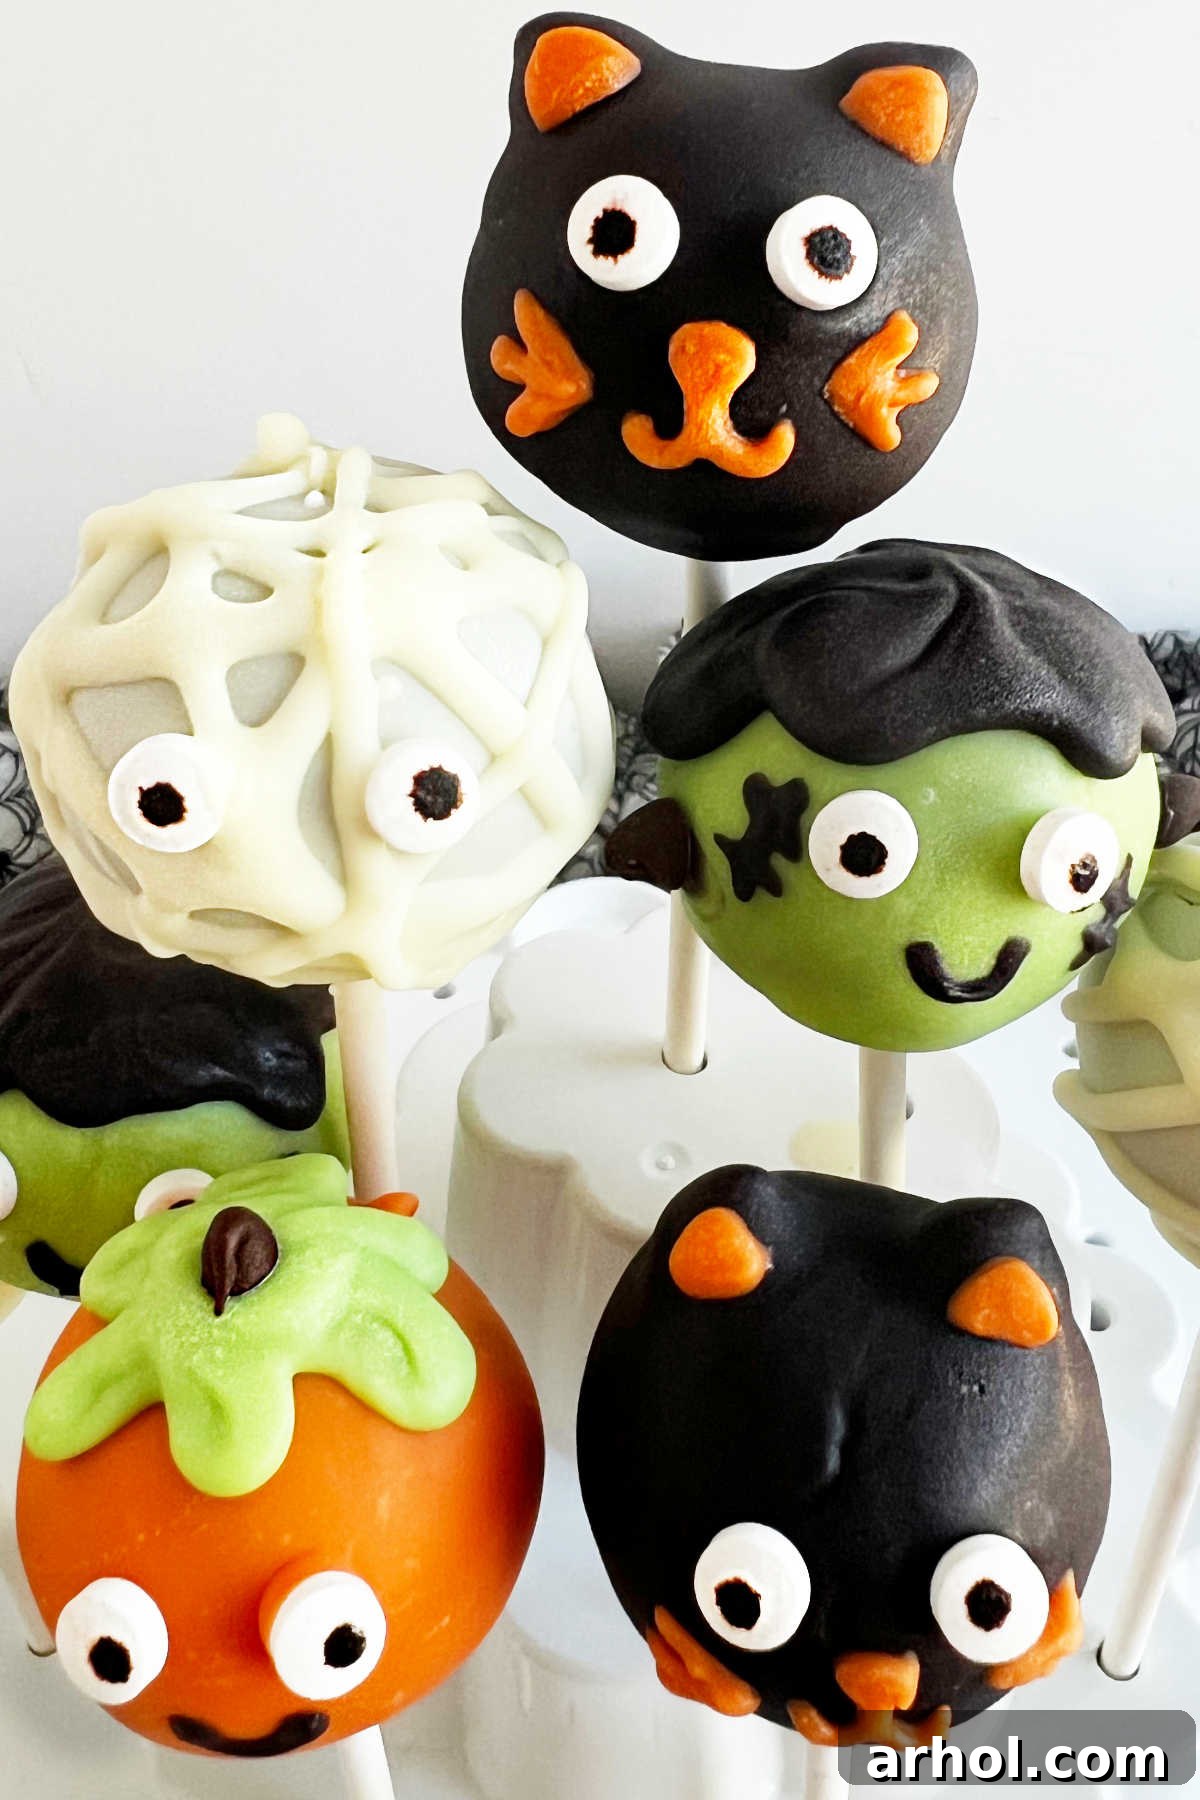
To create charming mummy cake pops, first dip your cake balls into a bath of melted white candy coating or white chocolate, aiming for a smooth, complete base layer. While this initial coating is still slightly tacky and beginning to set, gently place two candy eyeballs in the desired position on the front of the cake pop. Once the base coating has firmed up a bit more but is not fully hardened, use a piping bag (or a small Ziploc bag with a tiny corner snipped off) filled with additional melted white chocolate. Drizzle thin, irregular lines across the cake pop to simulate mummy bandages. Don’t strive for perfection; the slightly messy, crisscrossing lines will enhance the authentic, aged mummy appearance.
2. Grinning Pumpkin Cake Pops
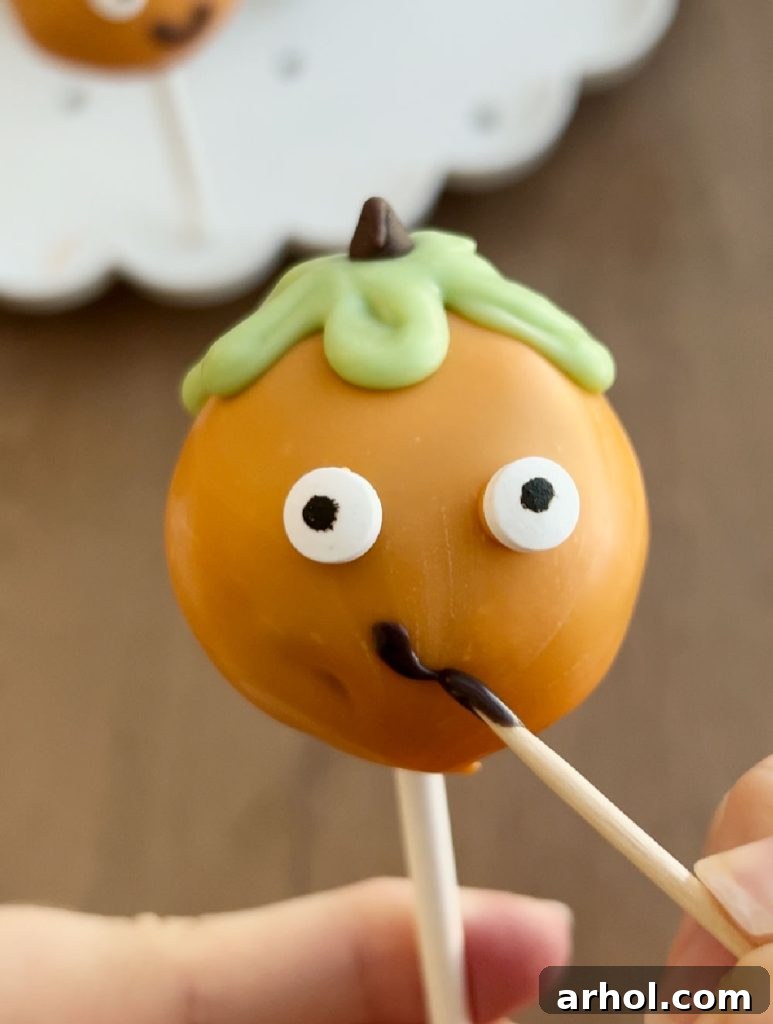
Crafting festive pumpkin cake pops is a Halloween classic. Dip your cake balls into a vibrant pool of melted orange candy coating, ensuring a full, even layer. As the orange coating begins to set, carefully position two candy eyes to create an expressive face. For the pumpkin’s stem, a mini chocolate chip makes an ideal, edible choice – simply press it firmly onto the very top of the cake pop. To add a touch of autumnal greenery, use a piping bag filled with melted green candy melts to pipe small leaves or curling vines around the base of the stem. Finally, for that quintessential pumpkin grin, use a toothpick dipped in melted black chocolate or black candy coating to draw a spooky or friendly mouth. For a traditional jack-o’-lantern look, omit the candy eyes and use the black chocolate to create triangular eyes, a nose, and a zig-zag mouth.
3. Spooky Frankenstein Cake Pops
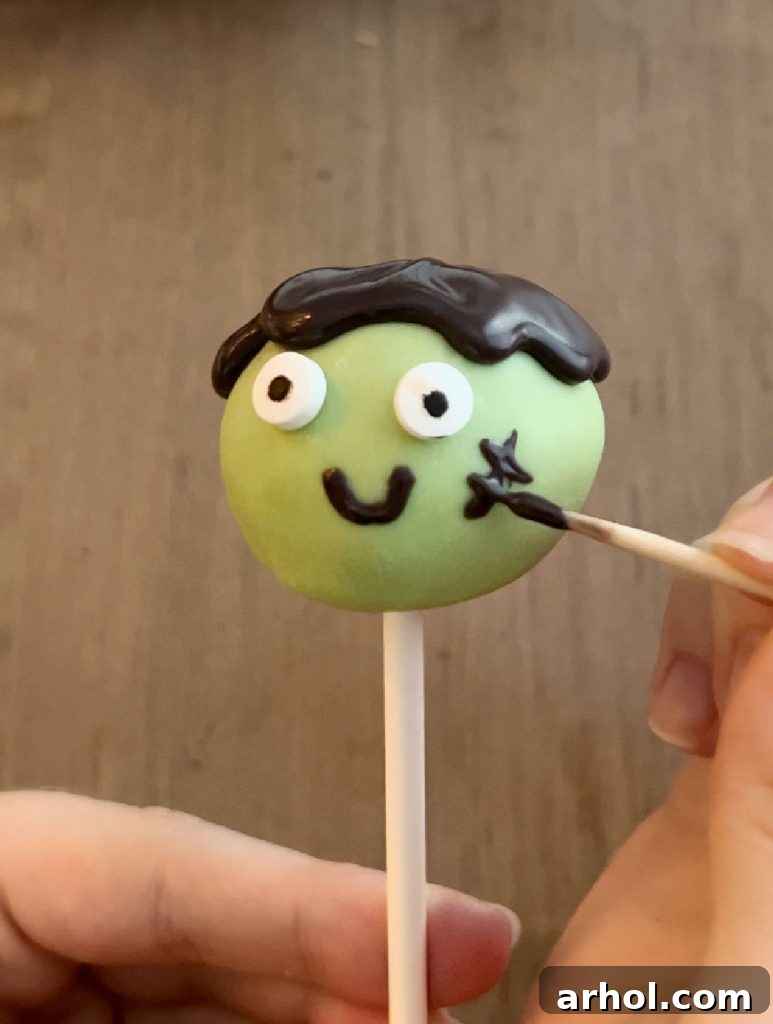
Bring the iconic green monster to life with these engaging Frankenstein cake pops! Begin by dipping the cake balls into melted green candy coating, giving him his characteristic skin tone. Once the green coating is slightly firm, affix two candy eyeballs to complete his gaze. For Frankenstein’s distinctive hair, you have creative liberty: you can either gently dip the very top portion of the green-coated cake pop into melted black candy coating to create a jagged hairline, or use a piping bag filled with black chocolate to pipe on messy, stylized strands of hair. Then, with a toothpick or a fine piping tool dipped in black chocolate, meticulously draw his classic stitched mouth and the subtle scars or bolts on his neck, adding character and detail to your monstrous creation.
4. Mysterious Black Cat Cake Pops
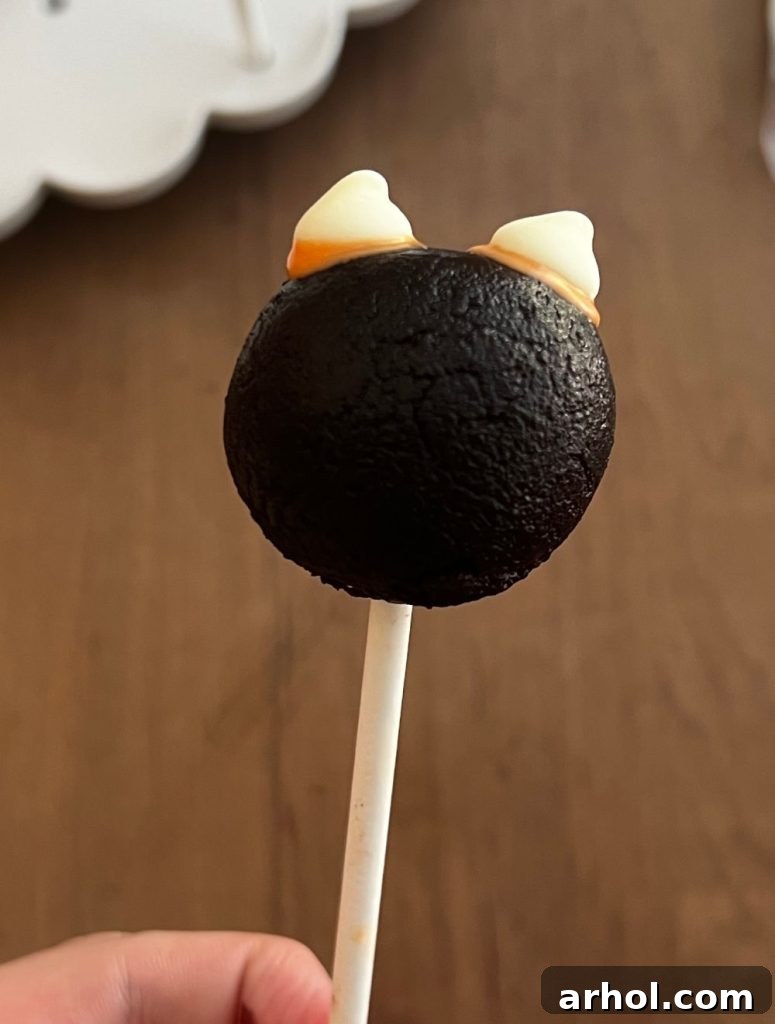
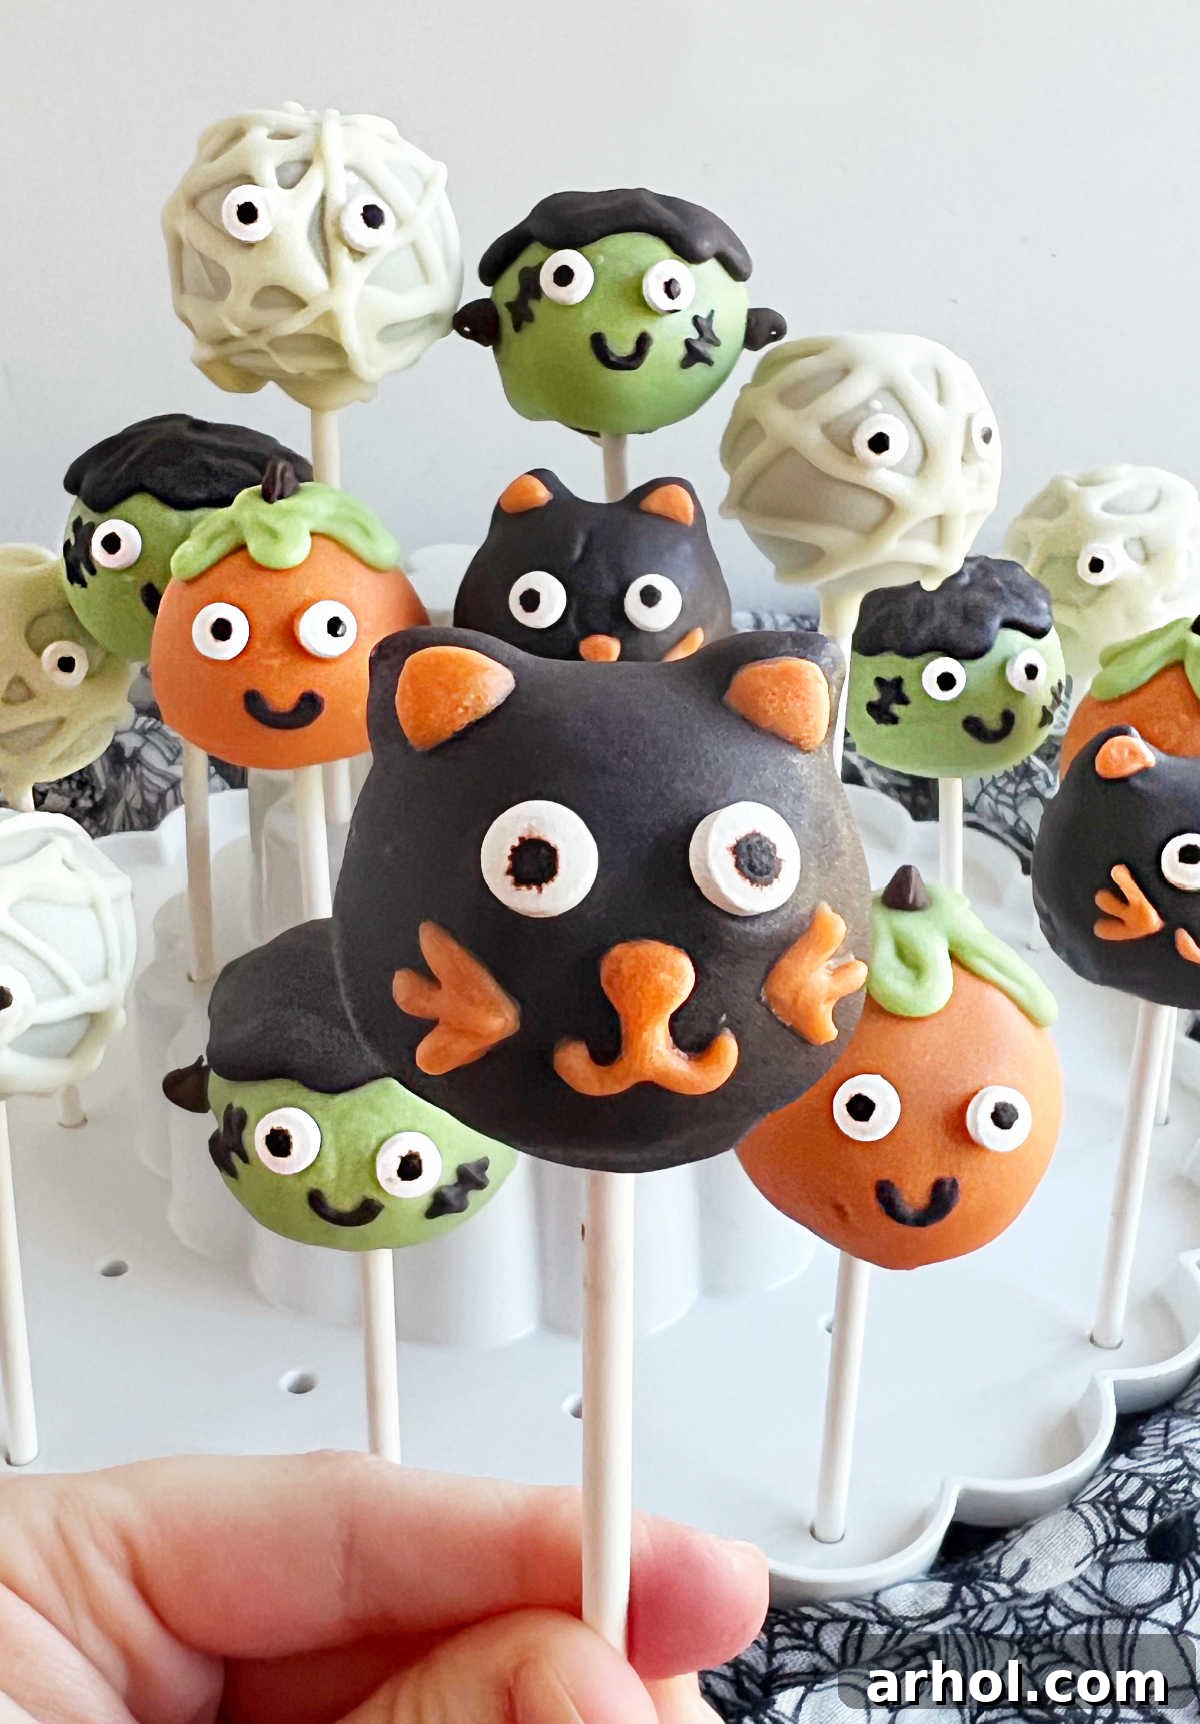
These black cat cake pops are both elegantly spooky and utterly charming. Start by creating their adorable ears: use a tiny dot of frosting or melted candy coating to attach two mini chocolate chips to the very top of each cake ball, positioning them to resemble perky cat ears. Allow this “glue” to set and dry completely to ensure the ears are firmly secured. Next, carefully dip the entire cake ball (with the now-attached chocolate chip ears) into a bath of melted black candy coating, ensuring full coverage. Once dipped, and while the black coating is still slightly wet and tacky, quickly add two candy eyeballs to give your cat its soulful gaze. For the final feline touches, use a toothpick dipped in a contrasting color of melted candy coating (such as orange or white) to carefully paint the insides of the ears and draw delicate whiskers and a tiny, cute mouth, completing your mysterious black cats.
Storage Tips to Keep Your Cake Pops Fresh
Ensuring your Halloween cake pops remain as delicious and visually appealing as the day they were made requires proper storage. Whether you’re preparing them in advance for a festive celebration or saving some for later enjoyment, these tips will help preserve their quality.
If you’re crafting a substantial batch of these delightful treats, investing in an inexpensive **cake pop holder** is highly recommended. These specialized stands allow your beautifully decorated pops to dry evenly and display elegantly without any risk of them touching, sticking, or damaging their intricate designs. You can confidently leave decorated Halloween cake pops in a holder at room temperature for up to 1 day, especially if your frosting and candy coating are stable in ambient conditions. For extended freshness or in warmer climates, refrigeration is always the safest bet.
For longer-term storage, carefully place your decorated cake pops into an **airtight container**. If you need to stack them, always use layers of parchment paper or wax paper between each row to protect the delicate decorations from smudging or sticking together. When stored in this manner within the refrigerator, your cake pops will maintain their peak freshness and flavor for an impressive 3-4 days. This makes them an ideal make-ahead dessert, simplifying your Halloween party preparations.
For maximum longevity, you have the option to **freeze plain, unfrosted cake balls** (before they are dipped and decorated) for up to 3 months. To do so, wrap each cake ball tightly in plastic wrap, then place them in a freezer-safe bag or container. When you’re ready to complete your cake pops, simply transfer the frozen cake balls to the refrigerator to thaw overnight. Once thawed, you can proceed with inserting the sticks, dipping them in candy melts, and unleashing your creative decorating ideas as usual. This method is a fantastic time-saving strategy for getting a significant head start on your Halloween baking projects!
Pro Tips for Perfect Cake Pop Success
Achieving perfectly formed and beautifully decorated cake pops is simpler than you think with a few expert tips. These insights will help ensure your Halloween cake pops are a resounding success, from the initial cake crumbling to the final artistic flourish:
- Alternative Melting Methods: While the microwave offers speed and convenience, if you prefer not to use it or desire more precise temperature control, a **double boiler** on the stovetop is an excellent alternative for melting candy melts or chocolate. This gentle heating method prevents scorching and helps achieve a consistently smooth, silky texture.
- The Importance of Chilling: Never skip the crucial refrigeration step before dipping your cake pops! The cake balls *must* be firm and thoroughly chilled. Warm or soft cake balls are highly susceptible to falling off their sticks, crumbling into the coating, or developing unsightly cracks as the warm coating dries. However, exercise caution: **avoid freezing cake pops before dipping**. Extremely cold cake balls can sometimes cause the candy coating to crack as the cake thaws and expands. Aim for refrigerator cold, not rock solid frozen.
- Optimal Decoration Timing: Allow the primary candy coating on your cake pops to **dry slightly** and become tacky before you attempt to add candy eyeballs, sprinkles, or other small decorations. If the coating is too wet, your embellishments will simply slide off. If, on the other hand, the coating dries completely before you get a chance to add the eyes, don’t despair! A tiny dab of extra melted coating or even a small dot of frosting can serve as effective “glue” to secure your decorations in place.
- Smart Shortcuts for Busy Bakers: Time is often a luxury, but that doesn’t mean you have to miss out on the fun of Halloween cake pops! For an excellent shortcut, simply purchase a plain, unfrosted cake or a batch of cupcakes from your local grocery store or bakery. Crumble them up and proceed with mixing them with frosting as directed in the recipe. For super quick and easy decorating, after dipping your coated pops, roll them in festive Halloween sprinkles, edible glitter, or colored sugars for an instant, impactful design.
- Achieving the Ideal Coating Consistency: If your candy melts appear too thick for smooth, even dipping, you can easily thin them down. Add a small amount of paramount crystals or a tiny bit of flavorless vegetable shortening (like Crisco) in small increments, stirring continuously until you achieve a fluid, pourable consistency. Be careful not to add too much, as an overly thin coating can become transparent.
- Working in Manageable Batches: Especially when decorating a variety of designs, it’s wise to work in small batches. Keep the undipped cake balls stored in the refrigerator while you dip and decorate a few at a time. This strategy ensures that your cake balls remain firm and cold, and that your melted coating doesn’t harden prematurely while you’re focused on the details.
More Spooktacular Halloween Treat Ideas
If you’ve discovered a passion for crafting festive treats and want to expand your Halloween repertoire, we have plenty more delightful ideas for you! Our collection of easy and fun Halloween recipes is perfect for parties, school events, or simply enjoying a cozy autumn evening with a spooky movie:
- Halloween Marshmallow Pops: Even simpler and quicker to make than cake pops, these adorable marshmallow treats offer endless decorating possibilities and are just as charming for a fast festive fix.
- Halloween Graveyard Cake: A truly fun and imaginative edible scene featuring rich chocolate cake, creamy pudding, and crushed cookie “dirt” – a guaranteed showstopper for any Halloween dessert table.
- Easy Spooky Cookies: Get creative with simple sugar cookies and basic decorating techniques to produce a delightful array of ghostly, ghoulish, and grinning treats that are fun for all skill levels.
- Nutter Butter Ghost Cookies: For an absolutely fantastic no-bake Halloween dessert, these Nutter Butter ghosts are incredibly easy to assemble, require minimal ingredients, and are universally adored by kids and adults alike.
- Explore our wider selection of Easy Homemade Halloween Treats for a full spectrum of inspiration, ensuring your spooky season is filled with deliciousness!
The Cutest Halloween Cake Pops
Dee
30 minutes
30 minutes
1 hour
2 hours
45
Ingredients
-
▢
1
15.25 oz
box cake mix -
▢
3
eggs -
▢
1¼
cup
water -
▢
½
cup
vegetable oil -
▢
1
cup
frosting -
▢
2
cups
white chocolate chips
divided -
▢
1
tsp
coconut oil -
▢
12
oz
orange candy melts -
▢
12
oz
green candy melts -
▢
12
oz
black candy melts -
▢
candy eyeballs
Instructions
-
Prepare and bake the cake mix according to box instructions for a 9×13 inch pan. Let cake cool completely on a wire rack.
-
Break the cooled cake up into small, fine pieces in a large mixing bowl. Add in the frosting and mix together thoroughly until a cohesive, dough-like consistency forms.
-
Form the cake dough into consistent 1-inch sized balls and place them onto a baking sheet lined with wax paper or parchment paper.
-
Melt 2 tablespoons of the white chocolate chips. Dip one end of each cake pop stick into the melted white chocolate and then insert the stick halfway into the center of each cake ball.
-
Refrigerate the cake pops for at least 1 hour to allow them to thoroughly chill and set up firmly.
For the Mummies
-
Melt the remaining white chocolate chips and coconut oil (if using) together in 30-second intervals, stirring after each, until completely smooth and melted.
-
Evenly dip each chilled cake pop into the melted white chocolate. Allow excess chocolate to drip off. While the coating is still slightly wet, add candy eyeballs in the center of the cake pop. Once the coating has set a little more, use a piping bag or a ziplock baggie with a small snipped corner to drizzle thin lines of melted white chocolate over the cake pop to create mummy “bandages.”
For the Pumpkins
-
Melt orange candy melts in 30-second intervals, stirring after each, until completely smooth and melted.
-
Evenly dip each chilled cake pop into the orange candy melts. Allow candy melts to firm up slightly before adding two candy eyeballs in the center.
-
Using a piping bag (or a toothpick for fine details) with melted green candy melts, pipe on some vines or leaves on top of the pumpkin. Stick a mini chocolate chip on top as a stem. Draw a smile face with a toothpick dipped in melted black candy melts.
For the Black Cats
-
Melt a small amount of black candy melts. Use a tiny dot of this melted coating (or frosting) to stick two white chocolate chips onto the top of each cake ball, creating ears. Allow this coating to harden completely to secure the ears.
-
Melt the remaining black candy melts in 30-second intervals, stirring after each, until completely smooth. Evenly dip the cake pops (with ears) into the black candy melts. Allow the candy melts to firm up slightly before adding two candy eyeballs in the center. Using a toothpick and melted orange candy coating, draw on whiskers and the insides of the ears.
For the Frankensteins
-
Melt green candy melts in 30-second intervals, stirring after each, until completely smooth and melted.
-
Evenly dip each chilled cake pop into the green candy melts. Allow candy melts to firm up slightly before adding two candy eyeballs in the center.
-
Using a piping bag or a toothpick with black candy melts, pipe on the jagged hair. Draw on the mouth and stitches with a toothpick for Frankenstein’s signature look.
Video
Notes
Ingredients and their precise amounts, particularly for wet ingredients, may vary slightly with different brands of cake mix. Always refer to your chosen box for specific quantities to ensure the best results.
If your candy melts dry too quickly before you can add on the candy eyeballs or other small decorations, don’t worry! Simply use a tiny dab of extra melted candy coating or a small bit of frosting to act as glue to secure the eyes or other embellishments in place.
If you wish to make fewer cake pops, you have two convenient options: you can either halve the entire recipe’s ingredients and instructions, or simply freeze any undecorated cake balls for future use. This provides excellent flexibility and helps minimize food waste.
For an excellent shortcut that saves baking time, you can effectively use a plain, store-bought cake or even pre-made cupcakes if you prefer not to bake the cake yourself. Just crumble them up and proceed with the recipe from the “Crumble and Mix the Cake Base” step.
Nutrition
Calories:
98
kcal
,
Carbohydrates:
12
g
,
Protein:
0.5
g
,
Fat:
5
g
,
Saturated Fat:
3
g
,
Polyunsaturated Fat:
0.5
g
,
Monounsaturated Fat:
1
g
,
Cholesterol:
2
mg
,
Sodium:
23
mg
,
Potassium:
25
mg
,
Fiber:
0.02
g
,
Sugar:
12
g
,
Vitamin A:
2
IU
,
Vitamin C:
0.04
mg
,
Calcium:
16
mg
,
Iron:
0.03
mg
Nutrition information is automatically calculated, so should only be used as an approximation.
Additional Info
Dessert
American
Like this? Leave a comment below!
Frequently Asked Questions About Halloween Cake Pops
Here are answers to some common questions you might have when embarking on your Halloween cake pop adventure:
Q: Can I use gluten-free cake mix for cake pops?
A: Absolutely! Gluten-free cake mixes are perfectly suitable for making cake pops. Simply follow the package instructions for baking the cake, then proceed with the recipe as written. The texture of gluten-free cakes often crumbles beautifully, making them ideal for forming the cake pop dough and achieving that signature dense, moist consistency.
Q: How can I prevent my cake pops from cracking after dipping?
A: Cracking in cake pops is a common issue often caused by extreme temperature differences or coating consistency. To minimize cracking, ensure your cake balls are thoroughly chilled from the refrigerator, but not frozen solid. Also, verify that your candy coating is at the correct temperature – not too hot – and has a smooth, pourable consistency. If the coating seems too thick, you can thin it slightly with paramount crystals or a small amount of vegetable shortening. After dipping, allow the coating to set partially at room temperature before refrigerating.
Q: What if my cake pop mixture is too sticky or too dry?
A: The consistency of your cake pop dough is key. If the mixture feels too sticky and difficult to roll, it likely contains too much frosting. You can remedy this by adding a little more crumbled cake (if you have any spare) or by mixing in a tablespoon of powdered sugar at a time to absorb excess moisture. Conversely, if the mixture is too dry and crumbles apart without holding its shape, gradually add a tiny bit more frosting, starting with a teaspoon, until you achieve the desired pliable consistency.
Q: Can I use regular chocolate instead of candy melts for the coating?
A: While you can use regular baking chocolate or chocolate chips, it typically requires a process called “tempering” to achieve a smooth, shiny finish that sets firmly and doesn’t melt easily at room temperature. Without proper tempering, regular chocolate can appear dull, streaky, or be prone to blooming (white spots). Candy melts, on the other hand, are specifically formulated to melt smoothly and set quickly without the need for tempering, making them a much easier and more reliable option for beginners and for vibrant, consistent coatings.
Q: How long do Halloween cake pops typically last?
A: Decorated Halloween cake pops, when stored properly in an airtight container within the refrigerator, will stay fresh and delicious for approximately 3-4 days. Uncoated cake balls can be kept refrigerated for up to a week or frozen for an extended period of up to 3 months, providing great flexibility for making them ahead of time.
For even more easy, delightful, and spooktacular recipes, don’t forget to sign up for our weekly newsletter! Stay connected and inspired by following us on social media for daily dose of delicious ideas and festive fun.