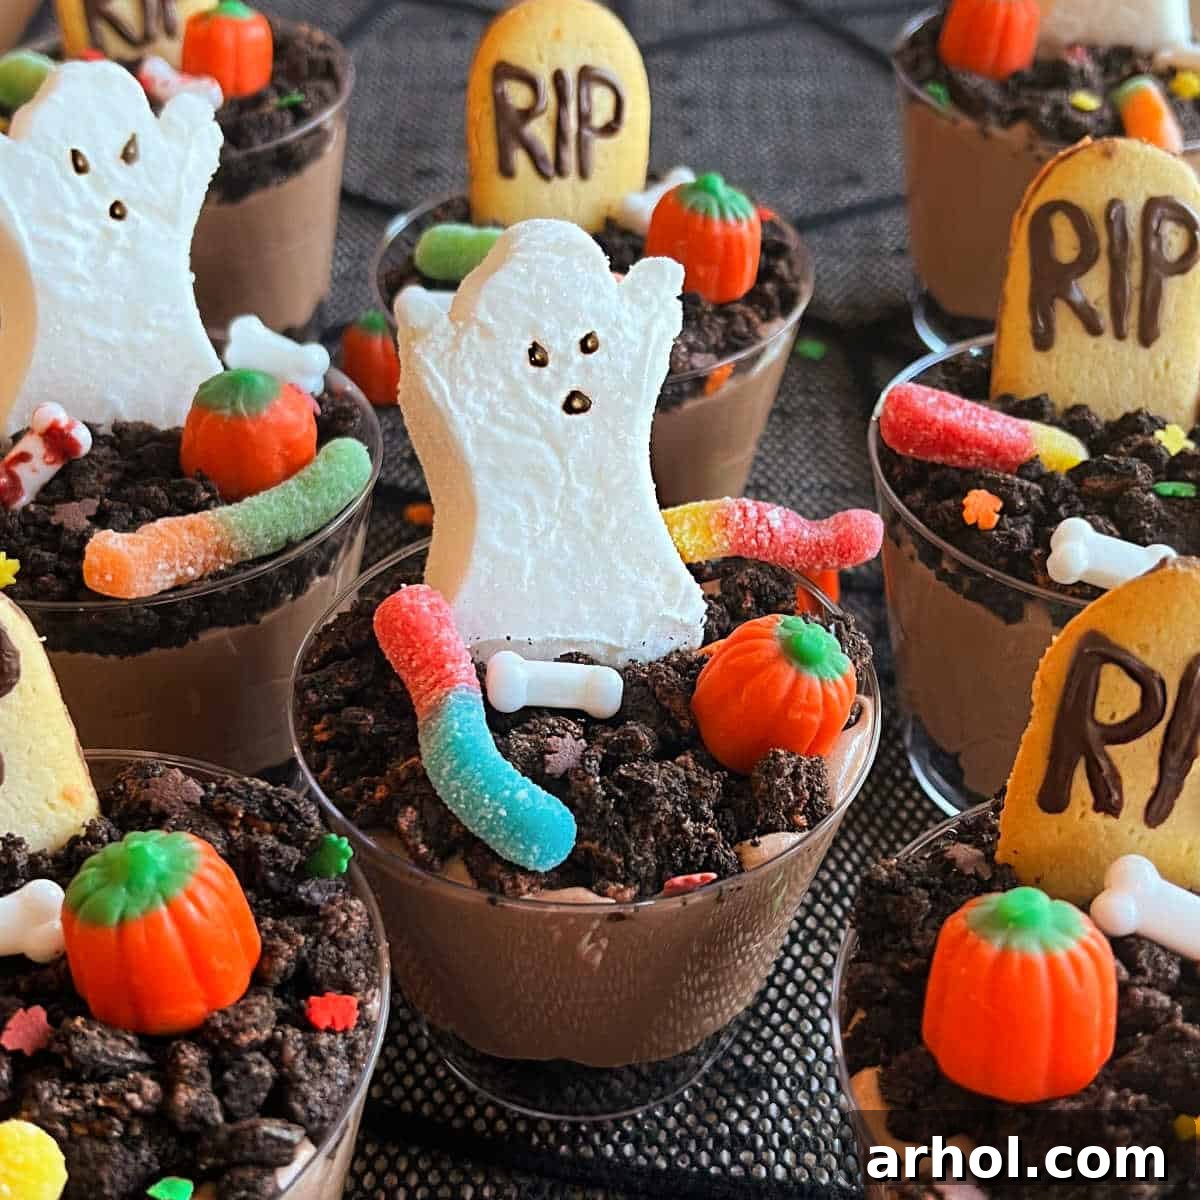
Get ready to conjure up some magic in your kitchen with these incredibly easy and utterly delicious Halloween Dirt Cups! Often called graveyard pudding cups, this no-bake dessert is a Halloween party essential, delighting both kids and adults with its spooky charm and irresistible flavor. Imagine rich, creamy chocolate pudding layered with crunchy, “dirt-like” crushed Oreos and adorned with an assortment of ghoulish candies and edible gravestones. It’s not just a treat; it’s an edible masterpiece that captures the playful and eerie spirit of the season.
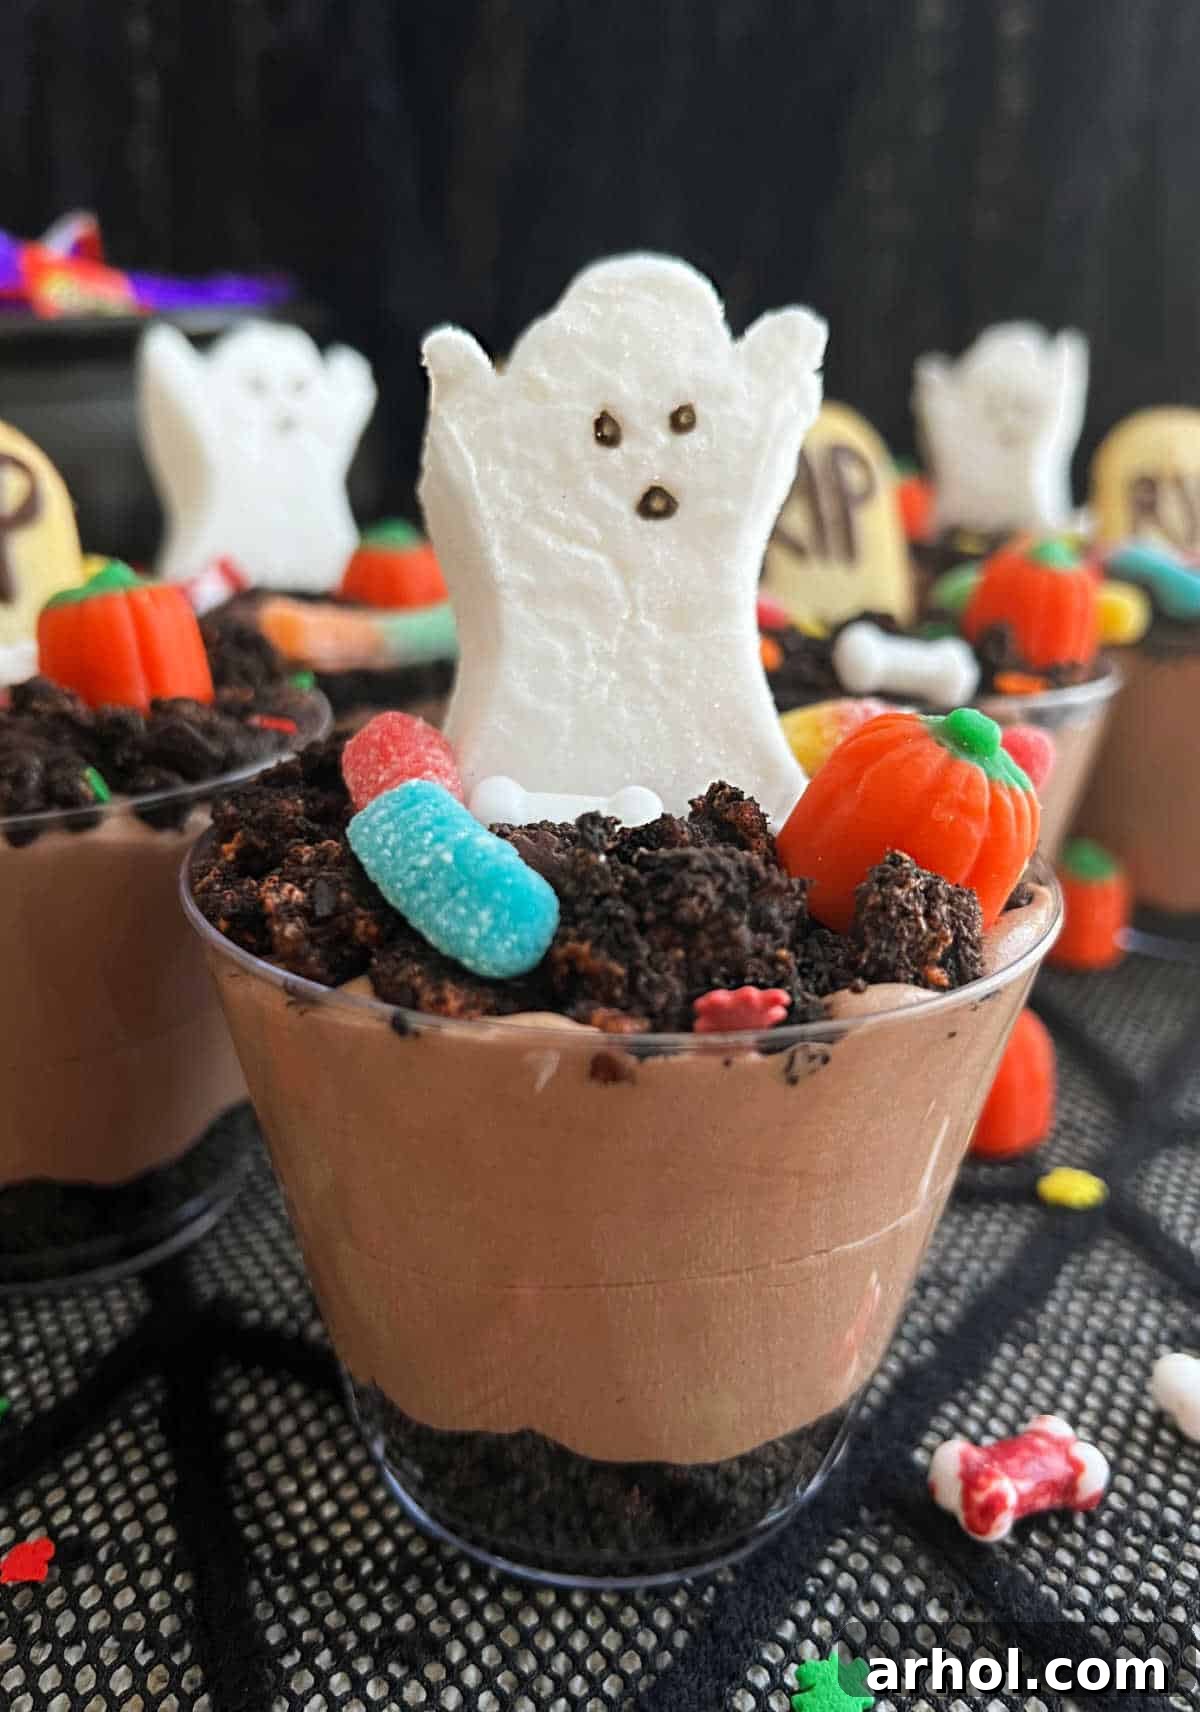
Spooktacular Halloween Dirt Cups: The Ultimate Graveyard Pudding Recipe
When the leaves start to turn vibrant hues of red and orange, and a crisp chill fills the air, it can only mean one thing: Halloween is just around the corner! This beloved holiday is a time for costumes, haunted houses, and, of course, delightfully eerie treats. Our Halloween Dirt Cups are a festive and ingenious twist on the classic “dirt and worms” dessert, transforming a childhood favorite into individual graveyard scenes that are perfect for any spooky celebration. This recipe is your secret weapon when you need a quick, no-fuss dessert that still manages to make a big, memorable impression. Forget elaborate baking projects; these cute Halloween desserts come together in mere minutes, making them an ideal choice for busy hosts, school parties, or simply a fun, spooky snack night with the family.
Why You’ll Fall for These Easy Halloween Treats
There are countless reasons why these graveyard pudding cups are destined to become a beloved staple in your annual Halloween celebrations. They strike the perfect balance between ease, fun, and undeniable deliciousness:
- Effortlessly Easy: The biggest draw of this recipe is its simplicity. There’s absolutely no baking involved! This dessert relies on instant pudding and straightforward layering, making it incredibly accessible for even the most novice of cooks, or for those precious moments when you’re short on time but still want to deliver a show-stopping treat.
- Kid-Friendly & Engaging: Involve the whole family in the preparation! Little hands will absolutely love helping to crush the cookies, whisk the pudding, and especially taking creative control over decorating their own spooky graveyard scenes. It’s a fantastic, hands-on activity that results in a delicious dessert everyone can enjoy.
- Unleash Your Creativity: From choosing the type of cookies to assembling an array of ghoulish candies, you have full creative freedom to personalize each cup. Make them as eerie, charming, or whimsical as your imagination desires. Every cup can be a unique mini Halloween masterpiece!
- Perfect for Parties: Since these treats are served in individual cups, they offer a hygienic, convenient, and visually appealing option for any gathering. They’re easy to distribute, look stunning when arranged on a Halloween dessert table, and eliminate the need for extra plates or cutting.
- Irresistibly Delicious: At their core, these dirt cups are a delightful combination of textures and flavors. The rich, creamy chocolate pudding, the satisfying crunch of Oreo “dirt,” and the sweet surprise of various candy toppings create a flavor explosion that appeals to everyone, regardless of age.
- Conveniently Make-Ahead: Planning a party can be stressful, but this dessert helps ease the burden. You can prepare most of the components in advance, allowing you to free up valuable time on party day for other preparations or simply to relax and enjoy the festivities.
Whether you’re hosting a grand haunted gathering, contributing to a potluck, or simply looking for a special treat to enjoy with your family, these Halloween Dirt Cups offer a perfect blend of convenience, creativity, and deliciousness that will surely get everyone into the Halloween spirit.
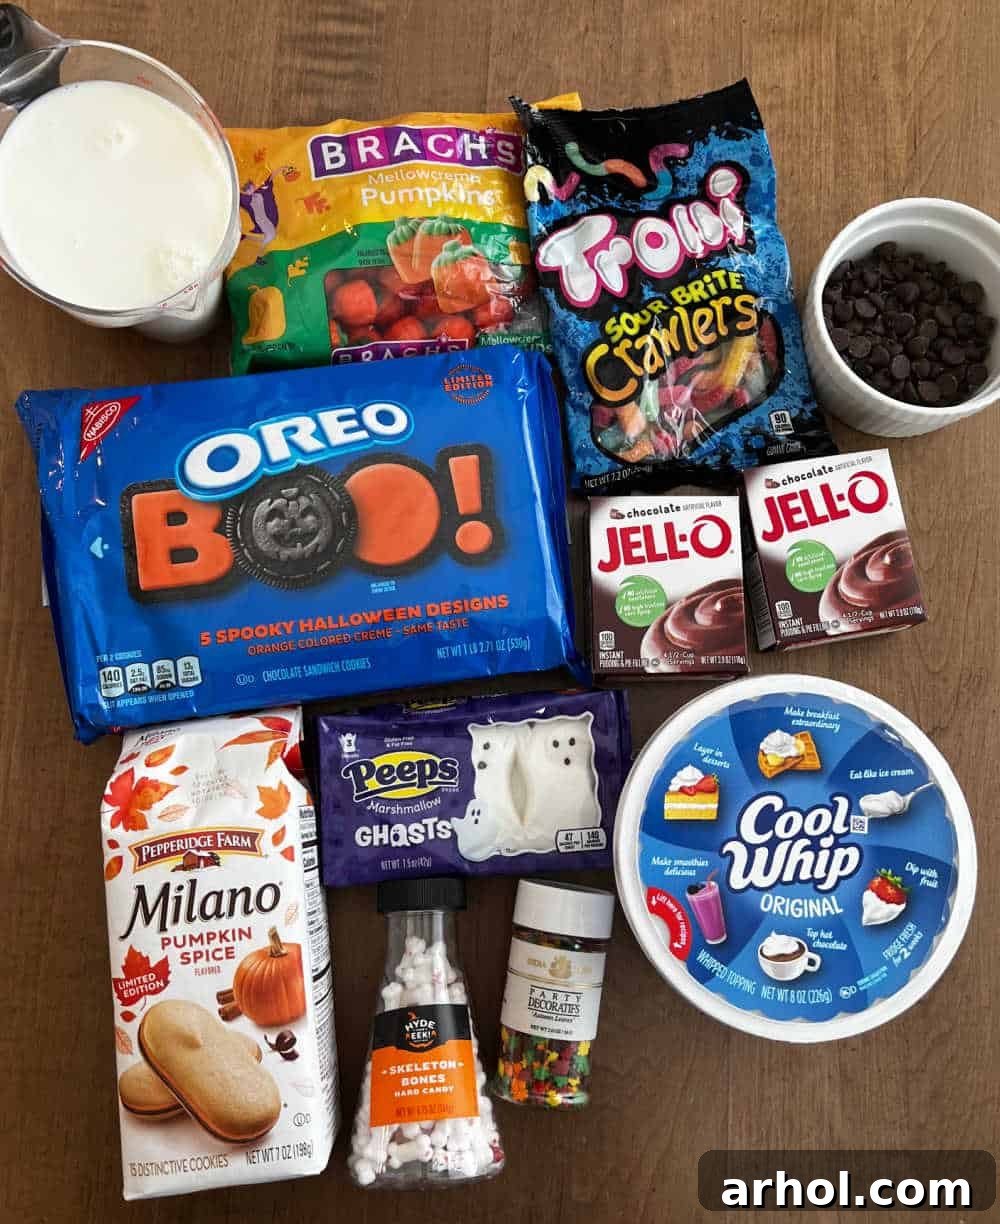
Gather Your Ghoulish Ingredients: What You’ll Need
Creating these delightful Halloween dessert cups requires just a few readily available ingredients, most of which you might already have in your pantry. Here’s a detailed look at what you’ll need to assemble your spooky graveyards, along with some helpful tips and substitution ideas. Full ingredient amounts and exact measurements are provided in the static recipe card located further down this page.
- Oreo Cookies: These iconic chocolate sandwich cookies are absolutely essential, providing the dark, crumbly “dirt” layer that defines this dessert. While Halloween-themed Oreos with orange creme are a wonderfully festive touch, classic regular Oreos work just as perfectly. Feel free to experiment with other chocolate sandwich cookies or even graham crackers for a different flavor or texture profile. The key is to crush them finely enough to truly resemble rich, dark soil.
- Instant Chocolate Pudding Mix: We highly recommend using Jell-O instant chocolate pudding mix for its reliable performance, quick setting time, and deep, satisfying chocolate flavor. It’s crucial to select an “instant” variety, as cook-and-serve puddings have different preparation instructions and will not yield the same light and fluffy texture when combined with whipped topping. Any reputable brand of chocolate instant pudding will be suitable.
- Milk: This is essential for preparing the instant pudding base. For the creamiest, most decadent pudding, whole milk or 2% milk are ideal choices. If you use skim milk, be aware that it might result in a slightly thinner pudding consistency, which could affect the layering.
- Cool Whip (Thawed Whipped Topping): Once thawed, this whipped topping is gently folded into the prepared pudding to create an incredibly light, airy, and fluffy texture. This step transforms the pudding layer into something truly delightful and adds to the dessert’s overall appeal. If you prefer to avoid store-bought options, you can prepare your own homemade whipped cream, though it might be slightly less stable for prolonged refrigeration in the cups.
- Milano Cookies and Chocolate Chips: These two components are dedicated to crafting your charmingly eerie gravestones. Milano cookies (or similar flat, oblong cookies like shortbread or even rectangular graham cracker pieces) provide a perfect, sturdy canvas for writing spooky messages. Melted chocolate chips are an excellent choice for piping the “RIP” messages; alternatively, a tube of black or white decorating gel or edible food markers can be used for extra convenience and precision.
- Assorted Halloween Candy Decorations: This is where the magic truly happens, and your creativity can run wild! Stock up on a fun variety to make each cup unique:
- Peeps Marshmallow Ghosts: These classic seasonal treats add an adorable, ethereal touch, appearing as if floating over the graves.
- Marshmallow Pumpkins: Another festive marshmallow option that brings a cheerful pop of orange to your graveyard scene.
- Gummy Worms: Absolutely essential for achieving the iconic “dirt and worms” effect, with their colorful bodies peeking out from beneath the crushed cookie layers.
- Candy Bones: Small, white candy bones enhance the graveyard theme perfectly, adding a touch of playful macabre.
- Fall Leaf Sprinkles or Candies: These can add a touch of autumnal color and texture, making the graveyard look even more authentic.
- Other Creative Ideas: Consider adding candy corn, mini chocolate candies, pretzel sticks (for “fences”), or even small plastic spiders (just ensure they are food-safe and easy to remove before eating!).
Having a diverse selection of candies on hand will not only make the decorating process more fun but will also allow you to create unique and engaging scenes in each cup, ensuring every Halloween Dirt Cup is a mini work of art ready to impress.
Crafting Your Creepy Concoctions: Step-by-Step Guide
Making these spooky dirt cups is an incredibly straightforward process that’s not only simple but also enjoyable for all ages. Follow these easy, step-by-step instructions to assemble your delicious and delightfully eerie graveyard treats:
Step 1: Prepare Your “Dirt”
Your first task is to transform the Oreo cookies into crumbly “dirt.” Place the entire cookies (no need to scrape out the creme filling – it adds to the flavor and texture!) into a large, sturdy zip-top bag. Seal the bag, removing as much air as possible, then use a rolling pin or a meat mallet to crush the cookies until they resemble fine, uniform soil. This particular step is often a favorite for kids to help with! For a quicker process and a finer crumb, you can also pulse the cookies in a food processor until they are uniformly crushed.
Step 2: Whisk Up the Creamy Pudding Base
In a large mixing bowl, combine the instant chocolate pudding mix with the specified amount of milk. Typically, this is 4 cups of milk for two 3.9 oz boxes of pudding mix, but always refer to your specific pudding package directions for accurate measurements. Whisk the mixture vigorously for about 2-3 minutes until the pudding begins to thicken. It will continue to firm up as it chills in the refrigerator.
Step 3: Gently Fold in the Fluffy Whipped Topping
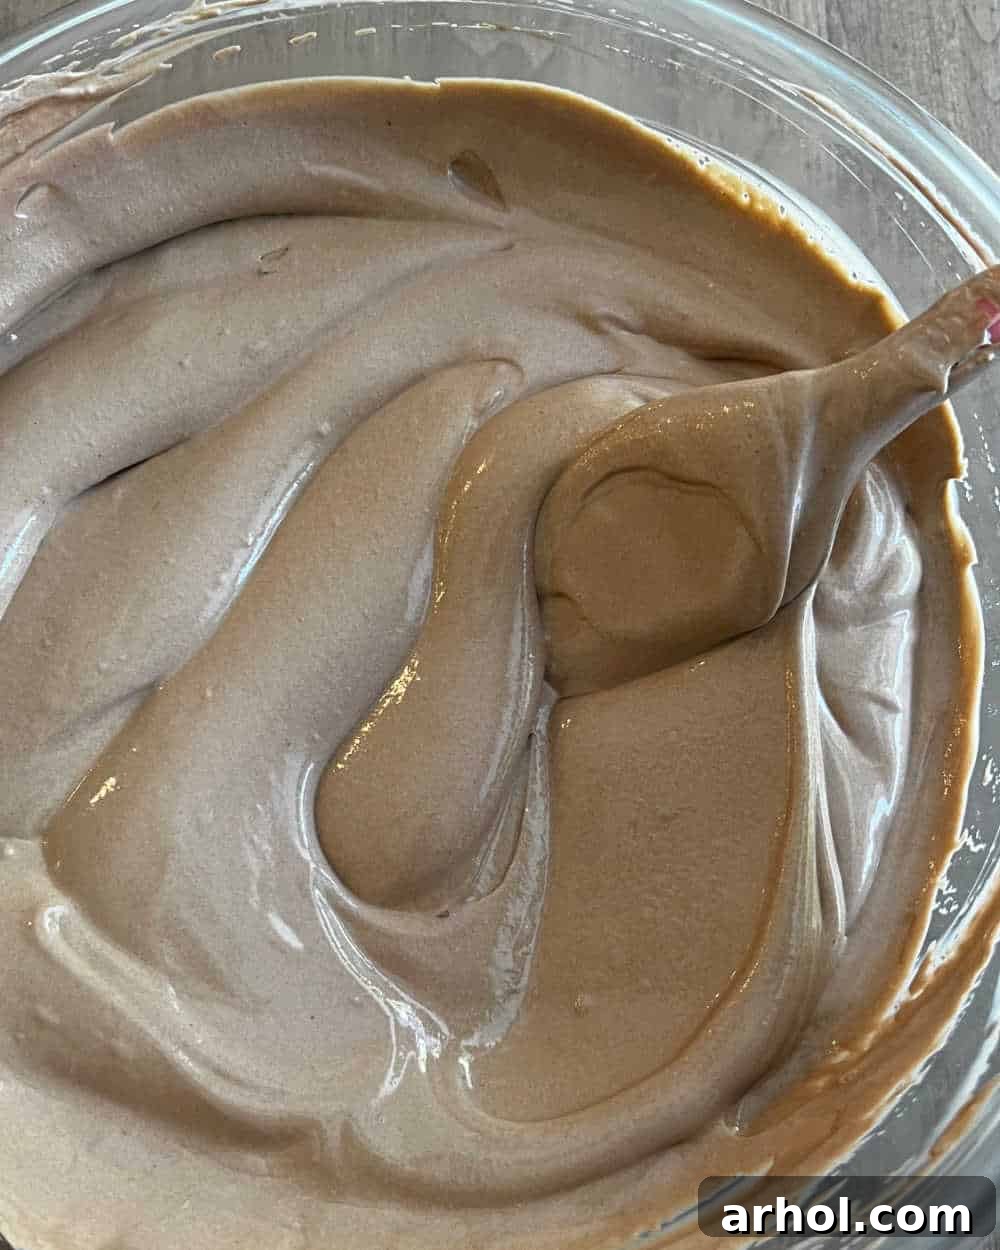
Once your pudding is prepared and has started to set slightly, it’s time to incorporate the thawed Cool Whip or other whipped topping. Using a rubber spatula, gently fold the whipped topping into the pudding mixture. Use a light, careful hand to preserve the airiness of the whipped topping, mixing just until the ingredients are well combined and the pudding achieves a wonderfully light, airy, and creamy consistency. Avoid overmixing, as this can deflate the whipped topping and make your pudding less fluffy.
Step 4: Layer Your Graveyard Cups
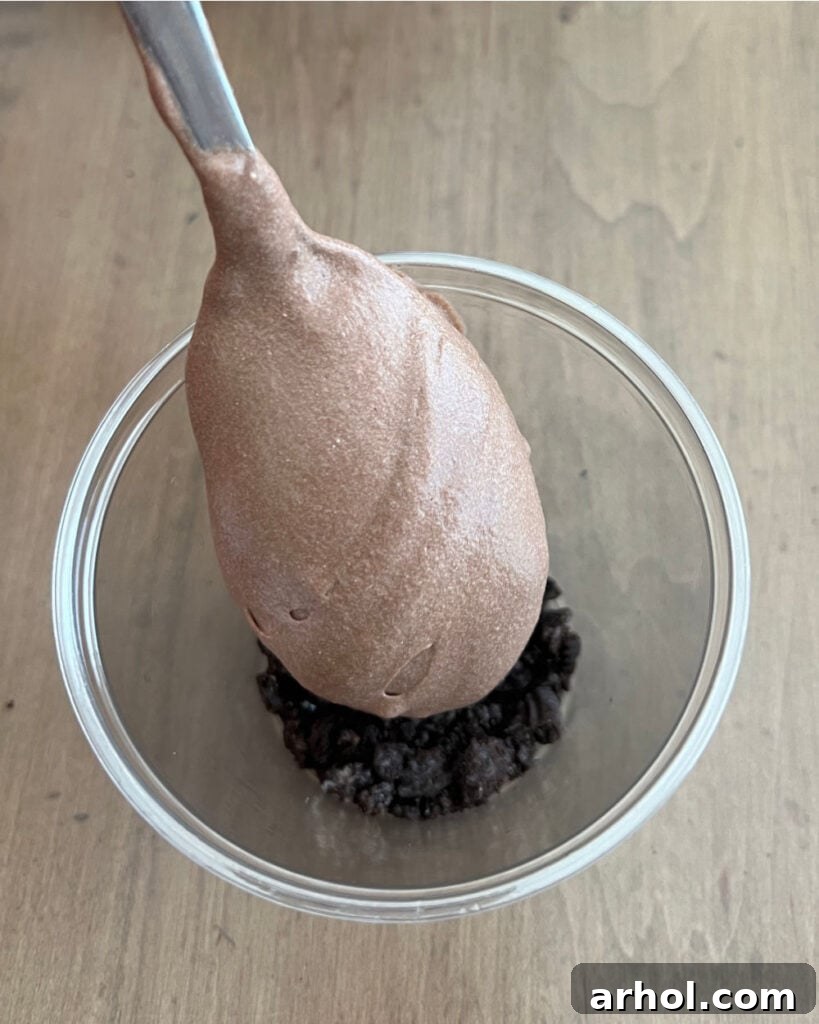
Now comes the fun part of assembly! Grab your individual serving cups – clear plastic cups work exceptionally well as they beautifully showcase the distinct layers. Spoon a thin layer of the crushed Oreo “dirt” (approximately 1-2 tablespoons) into the bottom of each cup. Next, spoon a generous amount of the creamy chocolate pudding mixture over the cookie layer, filling each cup almost to the top. Finish this stage by sprinkling another layer of crushed cookies on top of the pudding, meticulously creating a realistic “dirt” surface for your graveyard.
Step 5: Design Your Eerie Gravestones
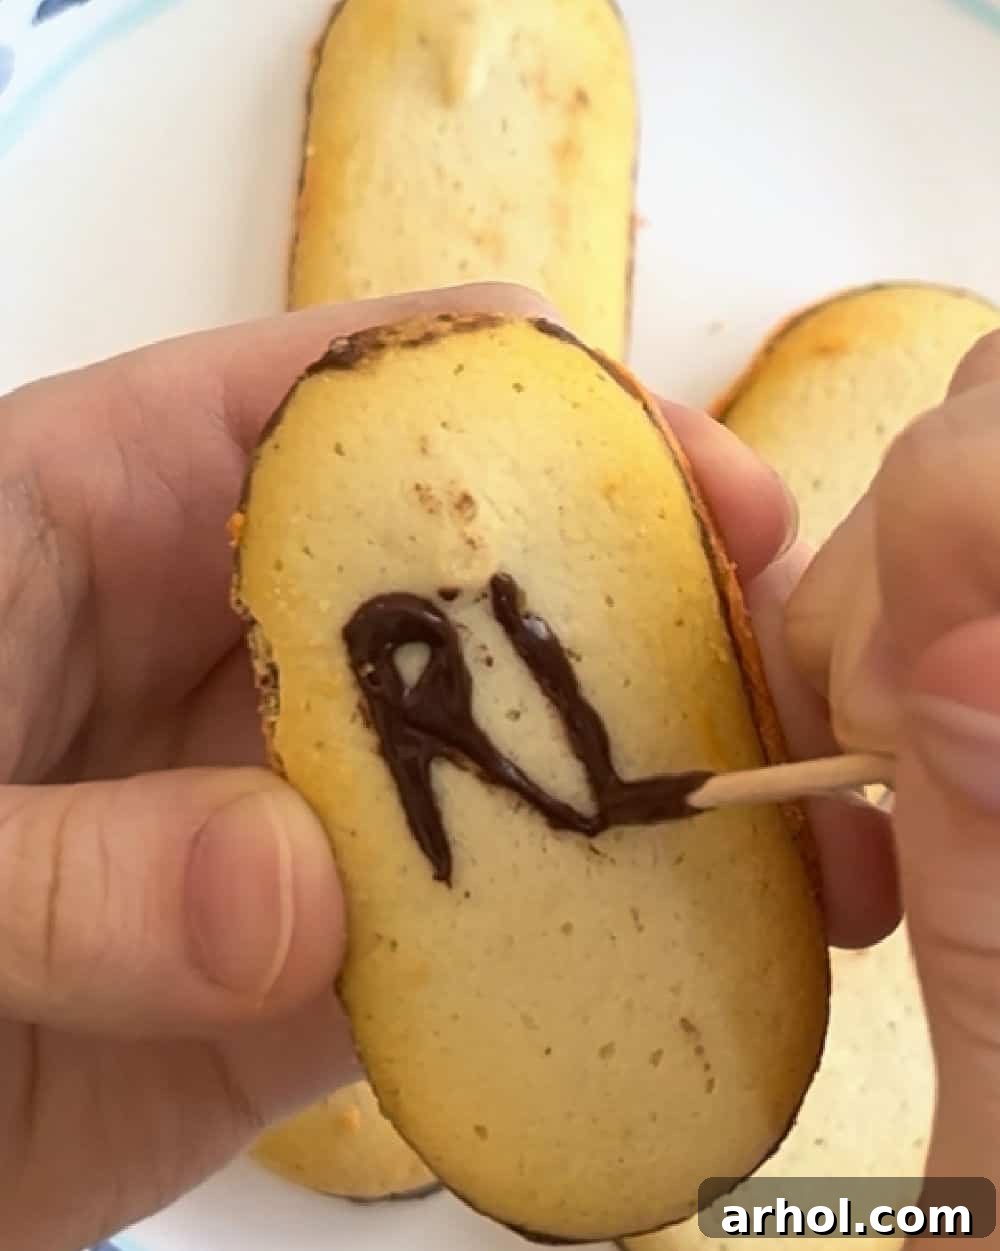
It’s time to prepare your iconic Milano cookie gravestones. Melt the chocolate chips in a microwave-safe bowl. Heat them in short 15-20 second intervals, stirring well after each, until the chocolate is smooth and fully melted. Dip a clean toothpick into the melted chocolate and carefully write “RIP” (Rest In Peace) or any other spooky messages like “BOO!” or “GHOUL” onto each Milano cookie. If you’re using decorating gel, simply pipe the letters directly onto the cookies for ease. Allow the chocolate or gel to set slightly before handling the cookies to avoid smudging.
Step 6: Decorate Your Spooky Scene
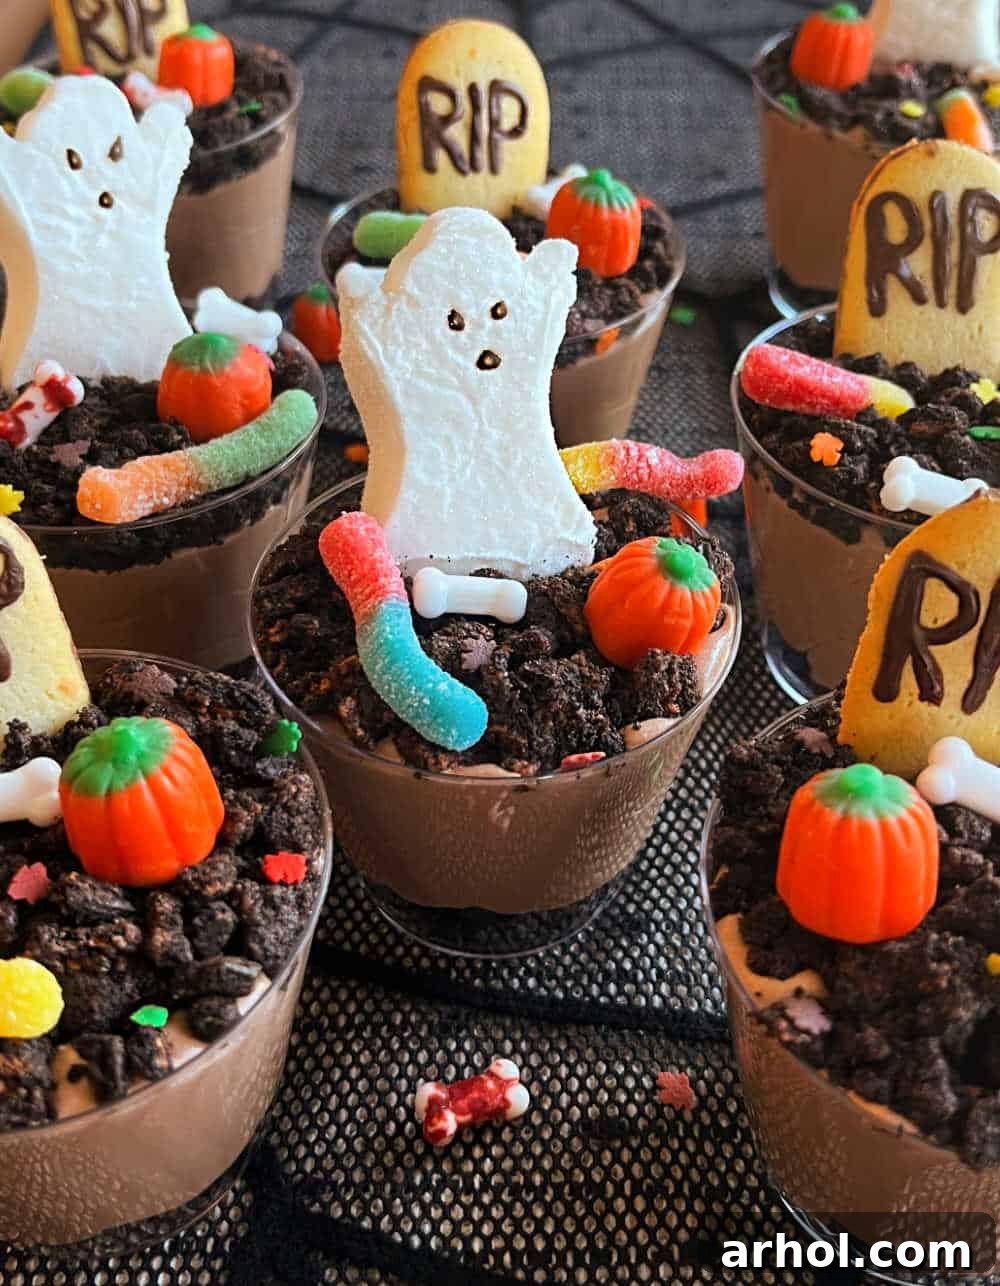
This is arguably the most exciting and creative part of the process! Arrange your gravestone cookies, Peeps ghosts, marshmallow pumpkins, gummy worms, candy bones, and any other festive candies artistically on top of the crushed cookie layer in each cup. Let your imagination run wild as you build unique and engaging little graveyard scenes. For standing elements like the marshmallow ghosts or gravestones, you can gently insert a toothpick into the bottom of the candy or cookie and then into the pudding layer for added stability. Just remember this crucial tip: always remove any toothpicks before serving, especially when serving to children!
Tips for a Perfectly Spooky Presentation
To truly elevate your Halloween Dirt Cups from simple treats to show-stopping desserts, consider these presentation tips that will impress all your guests and add to the festive atmosphere:
- Select the Ideal Cups: The choice of serving vessel can make a big difference. Small, clear plastic cups with wide rims are highly recommended. The transparent material beautifully displays the distinct layers of “dirt” and pudding, while wide rims make the process of filling and decorating much easier and neater. For a slightly more elegant or rustic look, small mason jars or mini glass parfait dishes also work wonderfully.
- Create an Ethereal Fog Effect: For an extra eerie and dramatic touch on your dessert table, place your finished dirt cups around a bowl containing dry ice. When activated with a little warm water, the dry ice will produce a mysterious, flowing fog that creeps around the base of your cups, adding an undeniably haunting atmosphere. Always handle dry ice with extreme caution and ensure adequate ventilation.
- Vary Your Decorations: Don’t feel confined to just ghosts and gravestones. Explore other creative edible decorations! Consider adding edible glitter for a shimmering, haunted effect, or pipe green frosting “slime” cascading down the sides of the cups. Candy corn, candy eyes, or tiny candy spiders can also add playful or creepy character to your graveyard scenes.
- Thoughtful Arrangement is Key: How you present your dirt cups on the table matters. Arrange them on a themed serving tray or a tiered stand. Enhance the overall graveyard theme by using a black tablecloth, faux spiderwebs, plastic spiders, and other small Halloween props. A scattering of real or artificial fall leaves can also add a natural, autumnal touch.
- Personalize Each Cup: For an interactive party activity, especially if children are present, consider setting up a “Dirt Cup Decorating Station.” Prepare the layered pudding cups in advance, then offer bowls of various candies and decorating tools. Let guests (or kids) unleash their imaginations and decorate their own unique spooky creations!
Storage and Make-Ahead Magic
These Halloween graveyard pudding cups are incredibly convenient because they can be made ahead of time, which is a huge advantage when you’re planning for a Halloween party. Here’s how to properly store them to maintain their freshness and some smart tips for preparing them in advance:
- Refrigeration: Once assembled, always store your Halloween Dirt Cups in the refrigerator until you are ready to serve them. It’s best to cover them loosely with plastic wrap. This prevents the pudding from drying out and also keeps it from absorbing any unwanted odors from other items in your refrigerator.
- Optimal Shelf Life: These delicious dessert cups will stay fresh and maintain their quality for approximately 2-3 days when stored correctly in the refrigerator. Beyond this timeframe, the crushed cookie layers might start to soften significantly due to moisture from the pudding, though they will generally still be perfectly edible.
- Smart Make-Ahead Tips: If your party or event is more than a day away, we highly recommend delaying the addition of the final candy decorations until the actual day you plan to serve them. Delicate candies like Peeps marshmallow ghosts or pumpkins can absorb moisture from the refrigeration, potentially becoming sticky, soft, or losing their original shape. Similarly, the Milano cookie gravestones might soften if left on the pudding for too long. For best results, prepare and layer the pudding and crushed cookie mixture, then cover and store them in the fridge. On the day of your event, simply add your decorative candies and gravestones just a few hours before serving to ensure they look their absolute best.
Recipe Tip: Enhancing Decoration Stability
For upright decorations, such as marshmallow ghosts or the Milano cookie gravestones, a simple trick is to insert a toothpick into the base of the candy or cookie. Then, gently push the toothpick into the pudding layer. This provides excellent stability, ensuring your graveyard scene stands tall and proud throughout your event. Just a friendly reminder: it is crucial to communicate to your guests, or personally remove, these toothpicks before serving, especially when offering these treats to children.
Additionally, when selecting your serving cups, opt for small, clear plastic cups that feature wide rims. These are generally much easier to fill neatly with layers and offer ample space for creative decoration compared to taller, narrower cup designs.
Endless Eerie Variations to Try
One of the most appealing aspects of Halloween Dirt Cups is their incredible versatility. Don’t hesitate to experiment with different flavors, colors, and decorations to craft your own uniquely spooky treats that perfectly match your Halloween theme!
- Pudding Power-Ups: While classic chocolate is always a hit, consider other instant pudding flavors. Vanilla pudding creates a lighter, contrasting “dirt” effect, while white chocolate pudding can cleverly mimic eerie fog or ghost-like elements. For an autumnal twist, pumpkin spice pudding would be absolutely perfect, and pistachio pudding could resemble a mossy, overgrown graveyard.
- Cookie Creativity: Beyond the traditional Oreos, a world of “dirt” options awaits. Try crushed peanut butter cookies for a “swamp” theme, chocolate chip cookies for a richer, more textural base, or even gluten-free chocolate cookies to accommodate specific dietary needs. Graham cracker crumbs can also be used if you prefer a less intensely chocolate base.
- Fruity Frights: Introduce a layer of fresh raspberries or sliced strawberries in the middle of your cups to represent “blood” or hidden, gruesome treasures. A dollop of canned cherry pie filling can also create a wonderfully gruesome and flavorful effect.
- Themed Toppings Galore: Beyond the standard Halloween candy, think about adding crushed Heath bars, mini chocolate chips, green coconut flakes (to represent vibrant grass or moss), or even chocolate sprinkles for extra texture and visual appeal. Caramel drizzle can add a sticky, spiderweb-like look.
- Adult Indulgence: For an adults-only version of this treat, consider infusing the pudding mixture with a subtle splash of coffee liqueur, a hint of Irish cream, or even a touch of rum for a more sophisticated and spirited twist.
- Vegan and Dairy-Free Options: This recipe can easily be adapted! Look for dairy-free instant pudding mixes (many chocolate varieties are accidentally vegan), use your favorite plant-based milk (almond or soy milk work particularly well), and substitute with a vegan whipped topping. Just ensure your chosen cookies are also certified vegan.
Frequently Asked Questions (FAQs) About Halloween Dirt Cups
To help ensure your Halloween Dirt Cups are a smashing success, here are answers to some common questions you might have:
- Can I use homemade pudding instead of instant pudding?
Yes, you absolutely can use homemade pudding! However, it’s crucial to ensure your homemade pudding is thick and thoroughly chilled before you attempt to fold in the whipped topping. The consistency needs to be firm enough to support the layers and decorations effectively. Instant pudding is generally preferred for this recipe due to its guaranteed convenience and reliable setting properties.
- How far in advance can I prepare these Halloween Dirt Cups?
You can prepare the core pudding and crushed cookie layers up to 2-3 days in advance. Keep them well-covered and refrigerated. For the best visual appeal and to prevent candies from becoming soggy, we recommend adding the final Halloween candy decorations on the day of serving, ideally just a few hours before your party begins.
- What if I don’t have a food processor to crush the cookies?
No problem at all! A food processor offers convenience, but it’s not essential. Simply place your Oreo cookies into a large, sturdy zip-top plastic bag, making sure to remove as much air as possible before sealing. Then, use a rolling pin, a meat mallet, or even the bottom of a heavy glass to crush them into fine crumbs. This traditional method is surprisingly effective and can be a fun, stress-relieving activity!
- Can I make a large dirt cake instead of individual cups?
Absolutely! This recipe is incredibly versatile and can easily be scaled up to create a large Halloween dirt cake. Simply layer the crushed cookies and pudding mixture in a 9×13 inch baking pan (or a similar sized dish). Then, decorate the entire surface as a single, expansive graveyard scene. It’s a fantastic option for serving a larger crowd with less individual effort.
More Hauntingly Delicious Halloween Treats to Explore
No Halloween party is truly complete without an impressive array of spooky delights! If you enjoyed the ease and fun of making these Halloween Dirt Cups, you’ll undoubtedly love exploring these other easy and festive recipes that are perfect for the season:
- Easy Halloween Popcorn Mix: A delightful combination of sweet and salty, this snack mix is loaded with festive Halloween candies and vibrant colors, making it perfect for munching during a spooky movie night.
- Halloween Cake Pops: These adorable, bite-sized cakes on a stick can be creatively decorated as mummies, monsters, or cute pumpkins, adding a touch of elegance and fun to your dessert spread.
- Spooky Marshmallow Pops: Simple yet effective, these treats feature fluffy marshmallows dipped in colorful chocolate and decorated with spooky designs, perfect for a quick and impressive dessert.
- Easy Ghost Cookies: Transform classic sugar cookies into friendly (or frightful!) ghosts with a simple coating of white frosting and the addition of edible candy eyes.
- Oreo Pumpkin Treats: Take beloved Oreo cookies, dip them in vibrant orange candy melts, and decorate them to resemble adorable mini pumpkins – a crowd-pleaser for all ages.
- Halloween Muddy Buddies (Puppy Chow): A sweet, powdered sugar-coated snack that’s incredibly addictive, with a festive Halloween twist achieved through colorful candies or sprinkles.
And for savory options that provide a perfect contrast to all these sweet treats, don’t miss out on whipping up some Spicy Sriracha Mummy Dogs and making a batch of Easy Candy Coated Halloween Pretzels! They round out any Halloween feast perfectly.
Full Recipe Card: Halloween Dirt Cups
Print Recipe
Halloween Dirt Cups
Dee
30 minutes
0 minutes
30 minutes
10
Equipment
-
small plastic cups (clear recommended)
-
toothpicks (optional, for decoration stability)
-
food processor OR large zip-top bag and rolling pin/mallet
-
large mixing bowl
-
whisk
-
rubber spatula
Ingredients
- 2 (3.9 oz) boxes chocolate instant pudding mix
- 4 cups milk (2 percent or whole, based on pudding package directions)
- 25 Oreo sandwich cookies (Halloween-themed or regular chocolate)
- 8 oz Cool Whip whipped topping (thawed)
- 10-12 Milano cookies (for gravestones)
- ¼ cup chocolate chips (for writing on gravestones, or use decorating gel)
- 5-10 Peeps ghosts (for decoration)
- 5-10 marshmallow pumpkins (for decoration)
- 1 package gummy worms (for decoration)
- 1 package candy bones (for decoration)
- Optional: fall sprinkles or other assorted Halloween candies
Instructions
-
Crush Cookies: Place Oreo cookies in a large zip-top bag and crush them into fine crumbs using a rolling pin or meat mallet. Alternatively, pulse them in a food processor. Set aside.
-
Prepare Pudding: In a large mixing bowl, combine the instant chocolate pudding mix with the milk. Whisk thoroughly for 2-3 minutes until the pudding begins to thicken, following the instructions on your pudding package.
-
Fold in Whipped Topping: Gently fold the thawed Cool Whip into the prepared pudding mixture using a rubber spatula until it is well combined and the mixture becomes light and fluffy. Avoid overmixing.
-
Layer Cups: Spoon a thin layer of crushed cookies (about 1-2 tablespoons) into the bottom of each small plastic cup.
-
Add Pudding: Spoon the creamy pudding mixture over the crushed cookie layer, filling each cup almost to the top.
-
Make Gravestones: Melt the chocolate chips in a microwave-safe bowl (in 15-20 second bursts, stirring in between). Using a toothpick, carefully write “RIP” or other spooky messages on each Milano cookie to create gravestones. Let the chocolate set briefly.
-
Top with Dirt: Sprinkle a final layer of crushed cookies on top of the pudding in each cup, creating the “dirt” surface for your graveyard.
-
Decorate: Arrange the Milano gravestones, Peeps ghosts, marshmallow pumpkins, gummy worms, candy bones, and any other desired Halloween candies on top of the crushed cookie layer in each cup. For stability, you can insert a toothpick into the base of upright decorations (remember to remove them before serving!).
-
Chill: Refrigerate the Halloween Dirt Cups until you are ready to serve them.
Notes
Get creative with your decorations! You can do a combination of ghosts and tombstones, or focus on just one type of spooky scene.
Important: Always remember to remove any toothpicks used for decoration stability before serving, especially when serving to children.
This recipe is highly customizable. Use your favorite Halloween candies and toppings for decorating!
The recipe can easily be halved if you need fewer servings, or doubled/tripled for a larger Halloween party.
Nutrition
Carbohydrates: 67g,
Protein: 8g,
Fat: 9g,
Saturated Fat: 4g,
Polyunsaturated Fat: 1g,
Monounsaturated Fat: 4g,
Trans Fat: 1g,
Cholesterol: 11mg,
Sodium: 661mg,
Potassium: 227mg,
Fiber: 1g,
Sugar: 34g,
Vitamin A: 137IU,
Vitamin C: 1mg,
Calcium: 144mg,
Iron: 4mg
Nutrition information is automatically calculated and should be used as an approximation only.
Additional Info
Dessert
American
We hope you have a spooktacular time making and enjoying these fun and delicious Halloween Dirt Cups! They are truly a highlight of any festive gathering and offer a simple, enjoyable way to bring smiles to faces, both young and old. If you make this recipe, we’d absolutely love to see your creative graveyard scenes – please share your photos and ideas with us!
For more easy and delicious recipes that are perfect for any occasion, be sure to follow us on social media and sign up for our weekly newsletter. You’ll get the latest culinary inspiration, tips, and seasonal recipes delivered straight to your inbox, ensuring your kitchen is always ready for the next delightful creation.